Changing the default sound device in Windows 10 is straightforward, allowing you to easily switch between speakers, headphones, or other audio outputs. Streetsounds.net is here to help you understand how to manage your audio settings for the best sound experience. Let’s get your audio sounding perfect, utilizing the right audio output devices, sound configurations and default playback device.
1. Understanding The Importance Of Default Sound Device Settings
Why is it important to know how to change the default sound device in Windows 10? Setting the correct default audio device ensures that sound from your computer plays through the desired output, whether it’s your headphones, speakers, or an external audio interface. When your system correctly identifies your preferred device, audio output becomes seamless and efficient.
1.1. What Happens If You Don’t Set A Default Device?
Without a designated default, Windows 10 might randomly select an output, leading to sound playing through the wrong device. Imagine you’re a music producer and your mix sounds completely different through your studio monitors compared to your headphones. Setting your preferred device prevents such frustrations and ensures consistent audio quality.
1.2. Why Different Devices Matter
Different audio devices serve different purposes. High-quality studio monitors are essential for accurate music production, while headphones offer privacy for mixing or enjoying personal audio. Switching between devices should be easy and reliable, which is why understanding how to set a default is crucial.
2. Identifying Your Audio Devices
Before you can change the default, you need to know what devices are connected to your computer.
2.1. Common Audio Devices Used In Windows 10
- Internal Speakers: Built into laptops and some desktop monitors, suitable for general use.
- External Speakers: Connected via audio cables (3.5mm, RCA) or USB, often offering better sound quality than internal speakers.
- Headphones: Wired or wireless, perfect for private listening.
- Bluetooth Devices: Wireless headphones or speakers that connect via Bluetooth.
- USB Audio Interfaces: Used by musicians and audio engineers for high-quality recording and playback.
2.2. How To List Connected Audio Devices
- Settings App:
- Open the Settings app.
- Go to “System” then “Sound”.
- Under “Choose your output device”, you’ll see a dropdown list of connected devices.
- Control Panel:
- Open Control Panel.
- Go to “Hardware and Sound” then “Sound”.
- In the “Playback” tab, you’ll see a list of available devices.
3. Methods To Change The Default Sound Device In Windows 10
Now that you know why it’s important and how to identify your devices, let’s explore the methods to change the default sound device.
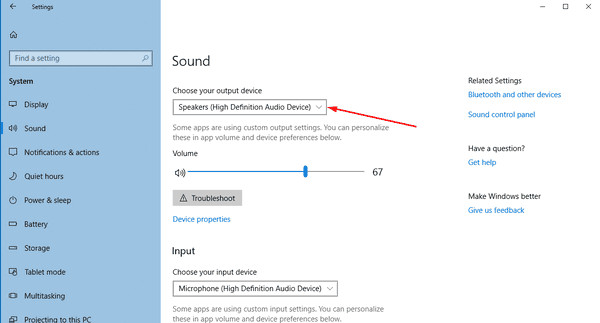
3.1. Using The Settings App
The Settings app is the modern way to manage audio devices in Windows 10.
3.1.1. Step-By-Step Guide
- Open Settings: Click the Start button and select the gear icon to open the Settings app.
- Navigate to Sound Settings: Go to “System” > “Sound”.
- Choose Output Device: In the “Output” section, use the dropdown menu labeled “Choose your output device” to select your preferred device.
- Test The Device: Play a sound to ensure audio is coming through the selected device.
3.1.2. Advantages Of Using The Settings App
- User-Friendly Interface: The Settings app offers a clean, intuitive interface.
- Quick Access: Easily accessible from the Start menu.
- Integration: Seamlessly integrates with other Windows 10 settings.
3.2. Using The Sound Flyout Menu
The Sound Flyout menu provides a quick way to switch devices directly from the taskbar.
3.2.1. Step-By-Step Guide
- Access Sound Flyout: Click the speaker icon in the system tray (lower-right corner of the taskbar).
- Select Output Device: Click the upward-pointing arrow (^) next to the volume slider. This opens a list of available audio devices.
- Choose Your Device: Select the device you want to use. The sound will immediately switch to the selected output.
- Verify Device: Test the audio to confirm it is playing through the correct device.
3.2.2. Advantages Of Using The Sound Flyout Menu
- Convenience: Fast access to audio device selection without navigating through multiple menus.
- Real-Time Switching: Instantly switches audio output, making it great for quick changes.
- Accessibility: Always available in the system tray for immediate use.
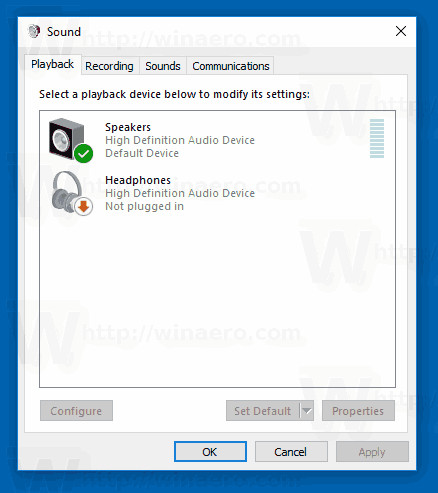
3.3. Using The Classic Sound Applet (Control Panel)
The classic Sound applet in the Control Panel offers more detailed settings and options.
3.3.1. Step-By-Step Guide
- Open Control Panel: Search for “Control Panel” in the Start menu and open it.
- Navigate To Sound Settings: Go to “Hardware and Sound” > “Sound”.
- Select Playback Tab: In the Sound dialog, click the “Playback” tab.
- Choose Device: Select your desired device from the list.
- Set As Default: Click the “Set Default” button. If you want this device to also handle communication audio (like voice chat), click “Set Default Communication Device”.
- Apply Changes: Click “Apply” then “OK” to save your changes.
3.3.2. Advantages Of Using The Classic Sound Applet
- Detailed Settings: Offers comprehensive control over audio settings, including enhancements and spatial sound options.
- Device Configuration: Allows you to configure each device individually, setting specific properties and levels.
- Troubleshooting Tools: Provides access to troubleshooting tools for diagnosing and fixing audio issues.
 Windows 10 Classic Sound Applet
3.4. Using Command Prompt
For advanced users, the Command Prompt can be used to manage audio devices.
3.4.1. Step-By-Step Guide
- Open Command Prompt: Search for “Command Prompt” in the Start menu, right-click, and select “Run as administrator”.
- List Audio Devices: Type
powershell -Command "(New-Object -ComObject MMDeviceAPI.MMDeviceEnumerator).EnumerateAudioEndpoints([AUDIO_TYPE], [DEVICE_STATE])"and press Enter. Replace[AUDIO_TYPE]with 0 for playback devices and[DEVICE_STATE]with 1 for active devices. - Identify Device ID: Note the index number of the device you want to set as default.
- Set Default Device: Use the command
powershell -Command "$DefaultDeviceId = [DEVICE_ID]; (New-Object -ComObject MMDeviceAPI.MMDeviceEnumerator).GetDefaultAudioEndpoint([AUDIO_TYPE],[DEVICE_ROLE]).ID = $DefaultDeviceId"replacing[DEVICE_ID]with the device index,[AUDIO_TYPE]with “eRender”, and[DEVICE_ROLE]with “eMultimedia”. - Restart Audio Services: Restart the audio services for the changes to take effect.
3.4.2. Advantages Of Using Command Prompt
- Automation: Useful for scripting and automating audio device settings.
- Advanced Control: Provides a deeper level of control for experienced users.
- Remote Management: Can be used for remote configuration and troubleshooting.
4. Troubleshooting Common Issues
Sometimes, changing the default device doesn’t go as planned. Here are some common issues and how to resolve them.
4.1. No Sound After Changing The Default Device
4.1.1. Possible Causes
- Incorrect Device Selected: The selected device might not be the one you intended.
- Device Disabled: The device might be disabled in the Sound settings.
- Driver Issues: Outdated or corrupted audio drivers.
- Volume Levels: Muted volume or very low volume levels.
4.1.2. Solutions
- Verify Device Selection: Double-check that you’ve selected the correct device in the Sound settings or Sound Flyout menu.
- Enable Device:
- Open Control Panel > Hardware and Sound > Sound.
- In the Playback tab, right-click and select “Show Disabled Devices”.
- If your device appears, right-click it and select “Enable”.
- Update Audio Drivers:
- Open Device Manager (search for it in the Start menu).
- Expand “Sound, video and game controllers”.
- Right-click your audio device and select “Update driver”.
- Choose “Search automatically for drivers”.
- Check Volume Levels:
- Click the speaker icon in the system tray.
- Ensure the volume slider is not muted and is set to an audible level.
- Open Volume Mixer (right-click the speaker icon and select “Open Volume Mixer”) to check individual app volume levels.
4.2. Sound Only Playing Through One Speaker/Headphone
4.2.1. Possible Causes
- Incorrect Audio Balance: The audio balance might be skewed to one side.
- Faulty Cable/Connection: A damaged cable or loose connection.
- Driver Issues: Problems with the audio drivers.
4.2.2. Solutions
- Check Audio Balance:
- Open Control Panel > Hardware and Sound > Sound.
- Select your device and click “Properties”.
- Go to the “Levels” tab and click “Balance”.
- Adjust the left and right channels to be equal.
- Inspect Cables/Connections:
- Ensure all audio cables are securely connected.
- Try using a different cable to rule out a faulty one.
- Update Audio Drivers:
- Follow the steps outlined in the “Update Audio Drivers” section above.
4.3. Bluetooth Device Not Showing Up
4.3.1. Possible Causes
- Bluetooth Disabled: Bluetooth might be turned off on your computer or the device.
- Pairing Issues: The device might not be properly paired with your computer.
- Driver Issues: Outdated or incompatible Bluetooth drivers.
4.3.2. Solutions
- Enable Bluetooth:
- Open Settings > Devices > Bluetooth & other devices.
- Ensure Bluetooth is toggled on.
- Pair The Device:
- Put your Bluetooth device in pairing mode.
- Click “Add Bluetooth or other device” in the Bluetooth settings.
- Select your device from the list and follow the on-screen instructions.
- Update Bluetooth Drivers:
- Open Device Manager.
- Expand “Bluetooth”.
- Right-click your Bluetooth adapter and select “Update driver”.
- Choose “Search automatically for drivers”.
 Windows 10 Choose Default Audio Device
5. Advanced Audio Settings
For those looking to fine-tune their audio experience, Windows 10 offers advanced settings.
5.1. Spatial Sound
Spatial sound enhances the audio experience by creating a more immersive, 3D soundscape.
5.1.1. How To Enable Spatial Sound
- Open Sound Settings: Right-click the speaker icon in the system tray and select “Open Sound settings”.
- Device Properties: Select your output device and click “Device properties”.
- Spatial Sound Tab: Go to the “Spatial sound” tab.
- Choose Format: Select your preferred spatial sound format from the dropdown menu (e.g., Windows Sonic for Headphones, Dolby Atmos for Headphones).
- Apply Changes: Click “Apply” and “OK”.
5.1.2. Benefits Of Spatial Sound
- Immersive Audio: Creates a more realistic and engaging sound environment.
- Directional Audio: Enhances the ability to perceive the direction of sounds.
- Gaming Advantage: Provides a competitive edge in games by improving spatial awareness.
5.2. Sound Enhancements
Windows 10 offers various sound enhancements to improve audio quality.
5.2.1. Available Enhancements
- Bass Boost: Enhances low-frequency sounds for a richer bass response.
- Virtual Surround: Creates a virtual surround sound experience with stereo headphones.
- Loudness Equalization: Reduces the difference between loud and quiet sounds, providing a more consistent volume level.
5.2.2. How To Enable Enhancements
- Open Sound Settings: Open Control Panel > Hardware and Sound > Sound.
- Device Properties: Select your device and click “Properties”.
- Enhancements Tab: Go to the “Enhancements” tab.
- Select Enhancements: Check the boxes next to the enhancements you want to enable.
- Apply Changes: Click “Apply” and “OK”.
5.3. Exclusive Mode
Exclusive Mode allows applications to take full control of the audio device, bypassing system-level processing.
5.3.1. How To Enable Exclusive Mode
- Open Sound Settings: Open Control Panel > Hardware and Sound > Sound.
- Device Properties: Select your device and click “Properties”.
- Advanced Tab: Go to the “Advanced” tab.
- Exclusive Mode Settings: Under “Exclusive Mode”, check the boxes next to “Allow applications to take exclusive control of this device” and “Give exclusive mode applications priority”.
- Apply Changes: Click “Apply” and “OK”.
5.3.2. Benefits Of Exclusive Mode
- Higher Audio Quality: Bypasses system-level processing, resulting in cleaner audio.
- Lower Latency: Reduces audio latency, which is crucial for real-time audio applications like music production.
- Optimal Performance: Ensures that audio applications have priority, preventing interruptions from other system sounds.
6. Connecting With The Streetsounds.Net Community
At streetsounds.net, we understand the importance of high-quality audio, especially when it comes to capturing the vibrant sounds of urban life.
6.1. Explore Our Sound Libraries
Dive into our extensive collection of street sounds, from bustling city ambiences to unique urban soundscapes. Perfect for music producers, filmmakers, and sound designers, our libraries offer the authentic audio textures you need to bring your projects to life.
6.2. Read Expert Articles And Guides
Enhance your knowledge with our in-depth articles and guides on audio recording, mixing, and sound design. Learn how to capture the best street sounds and incorporate them into your creative endeavors.
6.3. Join Our Community Forums
Connect with fellow sound enthusiasts, share your work, and get feedback from experienced professionals. Our forums are a great place to discuss techniques, share tips, and collaborate on exciting projects.
7. Street Sounds In Music And Art: Case Studies
Explore how street sounds have been used in various artistic projects to add depth and authenticity.
7.1. Music Production
Many artists incorporate street sounds into their music to create unique soundscapes. For example, producers might use recordings of traffic, construction, or crowd noise to add a sense of realism to their tracks.
Example: A hip-hop producer might sample the sound of a subway train to create a gritty, urban vibe in their beat.
7.2. Film And Video Games
In film and video games, street sounds are essential for creating immersive environments. The sounds of a bustling city, quiet suburban street, or busy marketplace can significantly enhance the viewer’s or player’s experience.
Example: A film director might use the sounds of sirens, car horns, and distant conversations to create a sense of chaos and tension in a scene set in New York City.
7.3. Sound Art Installations
Sound artists often use street sounds in their installations to explore themes of urban life, technology, and the environment. These installations can range from simple recordings played in a gallery to complex, multi-sensory experiences.
Example: An artist might create an installation that combines recordings of street sounds with visual elements, such as photographs or videos, to create a thought-provoking commentary on urban life.
8. Future Trends In Audio Technology
Stay updated with the latest advancements in audio technology, from improved recording techniques to innovative ways of experiencing sound.
8.1. Immersive Audio Technologies
Technologies like Dolby Atmos and Ambisonics are becoming increasingly popular, offering more immersive and realistic audio experiences.
8.2. AI-Powered Audio Tools
Artificial intelligence is being used to develop new tools for audio editing, mixing, and mastering, making it easier for creators to achieve professional-quality results.
8.3. Binaural Recording
Binaural recording techniques are gaining traction, capturing sound in a way that closely mimics human hearing, providing a more natural and immersive listening experience.
9. Understanding Audio Formats And Quality
Different audio formats offer varying levels of quality and compression. Here’s a breakdown to help you choose the best format for your needs.
9.1. Lossless Formats
Lossless formats preserve all the original audio data, resulting in the highest possible quality.
- WAV (Waveform Audio File Format): A widely used format for uncompressed audio.
- Pros: High quality, compatible with most devices and software.
- Cons: Large file size.
- FLAC (Free Lossless Audio Codec): A compressed lossless format.
- Pros: High quality, smaller file size compared to WAV.
- Cons: Slightly less compatible than WAV.
- ALAC (Apple Lossless Audio Codec): Apple’s lossless format, similar to FLAC.
- Pros: High quality, good compatibility with Apple devices.
- Cons: Limited compatibility with non-Apple devices.
9.2. Lossy Formats
Lossy formats compress audio data by discarding some information, resulting in smaller file sizes but reduced quality.
- MP3 (MPEG Audio Layer III): The most popular lossy format.
- Pros: Small file size, widely compatible.
- Cons: Reduced audio quality compared to lossless formats.
- AAC (Advanced Audio Coding): A more efficient lossy format than MP3.
- Pros: Better quality than MP3 at the same bit rate, good compatibility.
- Cons: Slightly less compatible than MP3.
- OGG Vorbis: An open-source lossy format.
- Pros: Good quality, free to use.
- Cons: Less compatible than MP3 and AAC.
9.3. Bit Rate And Sample Rate
- Bit Rate: The amount of data used to represent audio per unit of time (e.g., 128 kbps, 320 kbps). Higher bit rates generally result in better quality.
- Sample Rate: The number of samples of audio carried per second (e.g., 44.1 kHz, 48 kHz). Higher sample rates can capture more high-frequency content.
10. Optimizing Your Audio Setup For Recording
If you’re recording street sounds, optimizing your audio setup is crucial for capturing the best possible quality.
10.1. Choosing The Right Equipment
- Microphones: Use high-quality microphones designed for field recording, such as condenser microphones or shotgun microphones.
- Recorders: Invest in a portable audio recorder with good preamps and the ability to record in lossless formats.
- Accessories: Use accessories like windscreens, shock mounts, and headphones to improve your recordings.
10.2. Recording Techniques
- Location Scouting: Scout your recording locations in advance to identify the best spots and avoid potential problems.
- Monitor Audio: Use headphones to monitor your audio levels and identify any unwanted sounds.
- Capture Ambient Sound: Record plenty of ambient sound to provide a realistic backdrop for your recordings.
10.3. Editing And Mixing
- Remove Unwanted Sounds: Use audio editing software to remove unwanted sounds like wind noise, traffic, or conversations.
- Adjust Levels: Adjust the levels of your recordings to create a balanced and natural-sounding mix.
- Add Effects: Use effects like reverb, EQ, and compression to enhance your recordings.
11. Audio Accessibility Features In Windows 10
Windows 10 includes several accessibility features to make audio more accessible to users with hearing impairments.
11.1. Mono Audio
Mono audio combines the left and right channels into a single channel, making it easier for people with hearing in only one ear to hear all the sounds.
11.1.1. How To Enable Mono Audio
- Open Settings: Click the Start button and select the gear icon to open the Settings app.
- Navigate To Ease Of Access: Go to “Ease of Access” > “Audio”.
- Turn On Mono Audio: Toggle the “Turn on mono audio” switch to the on position.
11.2. Audio Notifications
Audio notifications provide visual cues for system sounds, making it easier for people with hearing impairments to know when events occur.
11.2.1. How To Enable Audio Notifications
- Open Settings: Click the Start button and select the gear icon to open the Settings app.
- Navigate To Ease Of Access: Go to “Ease of Access” > “Audio”.
- Choose Visual Notifications: Select an option from the “Show audio alerts visually” dropdown menu, such as “Flash the display” or “Flash the active window”.
11.3. Captions
Captions display the text of spoken audio, making it easier for people with hearing impairments to understand videos and other audio content.
11.3.1. How To Enable Captions
- Open Settings: Click the Start button and select the gear icon to open the Settings app.
- Navigate To Ease Of Access: Go to “Ease of Access” > “Captions”.
- Customize Captions: Customize the appearance of captions, such as the font, color, and size, to make them easier to read.
12. Legality And Ethics Of Recording Street Sounds
When recording street sounds, it’s important to be aware of the legal and ethical considerations involved.
12.1. Privacy Laws
Be aware of privacy laws that may restrict your ability to record conversations or other personal information without consent.
12.2. Copyright Issues
Avoid recording copyrighted material, such as music or performances, without permission.
12.3. Ethical Considerations
Respect the privacy and dignity of the people you are recording. Avoid recording in sensitive areas, such as hospitals or schools, without permission.
13. Case Studies: How Professionals Manage Audio Devices
Learn from the pros on how they optimize audio settings for different applications.
13.1. Music Producers
Music producers often use multiple audio interfaces and devices. They configure their DAWs (Digital Audio Workstations) to route audio to specific outputs for mixing and monitoring.
- Best Practice: Use ASIO drivers for low-latency performance, and regularly calibrate studio monitors for accurate sound reproduction.
13.2. Video Editors
Video editors need accurate audio playback to ensure their soundtracks match the visuals.
- Best Practice: Use high-quality headphones for detailed audio work, and regularly check audio levels to avoid clipping.
13.3. Podcasters
Podcasters focus on clear voice recording and playback.
- Best Practice: Use a USB microphone with a built-in audio interface, and monitor audio in real-time to catch any issues.
14. Quick Tips For Optimizing Sound Quality
Here are some quick tips to improve the sound quality of your audio devices:
14.1. Clean Your Speakers And Headphones
Dust and debris can affect the sound quality of your speakers and headphones. Clean them regularly with a soft cloth.
14.2. Use High-Quality Cables
Use high-quality audio cables to ensure a clean and reliable signal.
14.3. Position Your Speakers Properly
Position your speakers correctly to create a balanced and immersive soundstage.
- Tip: Place speakers at ear level and equidistant from your listening position.
15. How To Restore Default Sound Settings
If you’ve made changes to your sound settings and want to revert to the default configuration, follow these steps:
15.1. Using System Restore
System Restore can revert your computer to a previous state, including sound settings.
- Open System Restore: Search for “Create a restore point” in the Start menu and open it.
- System Protection Tab: Click the “System Restore” button.
- Choose Restore Point: Select a restore point from before you made the changes to your sound settings.
- Follow Instructions: Follow the on-screen instructions to complete the System Restore process.
15.2. Resetting Sound Devices
You can reset individual sound devices to their default settings.
- Open Sound Settings: Open Control Panel > Hardware and Sound > Sound.
- Select Device: Select the device you want to reset and click “Properties”.
- Restore Defaults: Go to the “Advanced” tab and click the “Restore Defaults” button.
FAQ: Changing Default Sound Device In Windows 10
1. Why Can’t I See My Audio Device In The List?
Ensure the device is properly connected and powered on. Check Device Manager to see if the device is recognized and has the correct drivers installed.
2. How Do I Set A Different Default Device For Different Apps?
Some apps allow you to select a specific audio output device within their settings. For apps that don’t, you can use the Volume Mixer to route audio from specific apps to different devices.
3. Can I Use Multiple Audio Outputs At The Same Time?
Yes, Windows 10 allows you to use multiple audio outputs simultaneously. You can configure this in the Sound settings by enabling “Stereo Mix” and setting it as the default device.
4. What Should I Do If My Audio Sounds Distorted?
Check your audio levels to ensure they are not too high. Update your audio drivers and try using a different audio cable or device.
5. How Do I Test My Audio Devices?
In the Sound settings (Control Panel > Hardware and Sound > Sound), select your device and click the “Test” button. This will play a test sound through the device.
6. How Can I Improve My Microphone Quality?
Use a high-quality microphone, reduce background noise, and adjust your microphone levels in the Sound settings.
7. What Is Latency, And How Do I Reduce It?
Latency is the delay between when an audio signal is produced and when it is heard. To reduce latency, use ASIO drivers, increase your buffer size, and disable unnecessary audio effects.
8. How Do I Change The Default Input Device (Microphone)?
In the Sound settings (Settings > System > Sound), use the “Choose your input device” dropdown menu to select your preferred microphone.
9. Why Is My Bluetooth Audio Cutting Out?
Ensure your Bluetooth device is within range of your computer and that there are no obstructions between them. Update your Bluetooth drivers and try disconnecting and reconnecting the device.
10. How Do I Disable All Sound Effects?
In the Sound settings (Control Panel > Hardware and Sound > Sound), select your device, click “Properties,” go to the “Enhancements” tab, and check the “Disable all enhancements” box.
Changing the default sound device in Windows 10 is a straightforward process that can greatly enhance your audio experience. Whether you’re a music producer, filmmaker, or simply an audio enthusiast, understanding how to manage your audio settings is essential. Visit streetsounds.net today to discover a world of high-quality street sounds, expert articles, and a vibrant community of fellow audio lovers. Explore our libraries, read our guides, and join our forums to take your audio projects to the next level. Let’s create something amazing together! For any inquiries, visit us at 726 Broadway, New York, NY 10003, United States, call +1 (212) 998-8550, or explore more at streetsounds.net.