
Recording your screen on a Mac with sound is essential for creating tutorials, capturing gameplay, or preserving important video calls. If you’re passionate about street sounds and want to share your discoveries, “How To Record Screen On Mac With Sound” is your gateway to capturing and sharing the unique sounds of urban environments. Streetsounds.net offers a platform to explore the art of recording and integrating these sounds into creative projects.
1. Why Record Your Mac Screen with Sound?
Recording your Mac screen with sound opens up a world of possibilities, especially for capturing and sharing the vibrant sounds of the streets. Whether you’re a musician, filmmaker, or sound enthusiast, recording your screen with audio is crucial for creating engaging content. Here’s why:
- Creating Tutorials: Show others how to use software or perform specific tasks on their Macs with clear audio instructions.
- Capturing Gameplay: Record your gaming sessions with in-game audio and commentary to share your skills and experiences.
- Preserving Video Calls: Save important video conferences, interviews, or online meetings for future reference.
- Documenting Bugs and Issues: Easily demonstrate software glitches to developers with visual and audio evidence.
- Sharing Street Sounds: Capture the unique audio landscape of urban environments to integrate into music, film, or sound design projects on platforms like streetsounds.net.
- Educational Content: Develop educational videos or lectures with screen recordings and synchronized audio explanations.
Recording your screen with sound allows you to create high-quality, informative, and engaging content. By using the right tools and techniques, you can effectively communicate your ideas and share your passion for street sounds on streetsounds.net and beyond.
2. What are the 5 User Search Intentions for “How to Record Screen on Mac With Sound?”
Understanding user search intentions is crucial for providing relevant and valuable content. Here are five common search intentions behind the query “how to record screen on Mac with sound”:
- Informational: Users want step-by-step instructions on how to record their screen with internal and external audio using built-in tools or third-party software.
- Tutorial: Users need a detailed guide on using specific software like QuickTime Player, OBS Studio, or ScreenFlow to record their screen and audio effectively.
- Troubleshooting: Users are facing issues with audio recording, such as no sound, distorted sound, or compatibility problems, and seek solutions to fix these issues.
- Comparison: Users want to compare different screen recording software options, considering factors like price, features, ease of use, and audio quality.
- Recommendation: Users are looking for recommendations on the best screen recording software for their specific needs, such as recording gameplay, creating tutorials, or capturing street sounds for projects on streetsounds.net.
3. Using QuickTime Player to Record Screen on Mac With Sound
QuickTime Player is a built-in application on macOS that allows you to record your screen easily. However, recording internal audio requires additional steps. Here’s how to do it:
- Open QuickTime Player: Find it in the Applications folder or use Spotlight search.
- Start a New Screen Recording: Click “File” in the menu bar, then select “New Screen Recording.”
- Configure Recording Options: A small recording panel will appear. Click the arrow next to the record button to adjust settings:
- Microphone: Choose your desired microphone (built-in or external).
- Show Mouse Clicks: Enable this to highlight mouse clicks in the recording.
- Start Recording: Click the record button. You can either:
- Click anywhere on the screen to start recording the entire screen.
- Drag a selection to record a specific area.
- Stop Recording: Click the stop button in the menu bar or press “Command + Control + Esc.”
- Save Your Recording: QuickTime Player will open the recording. Go to “File” and select “Save” to name and save your file.
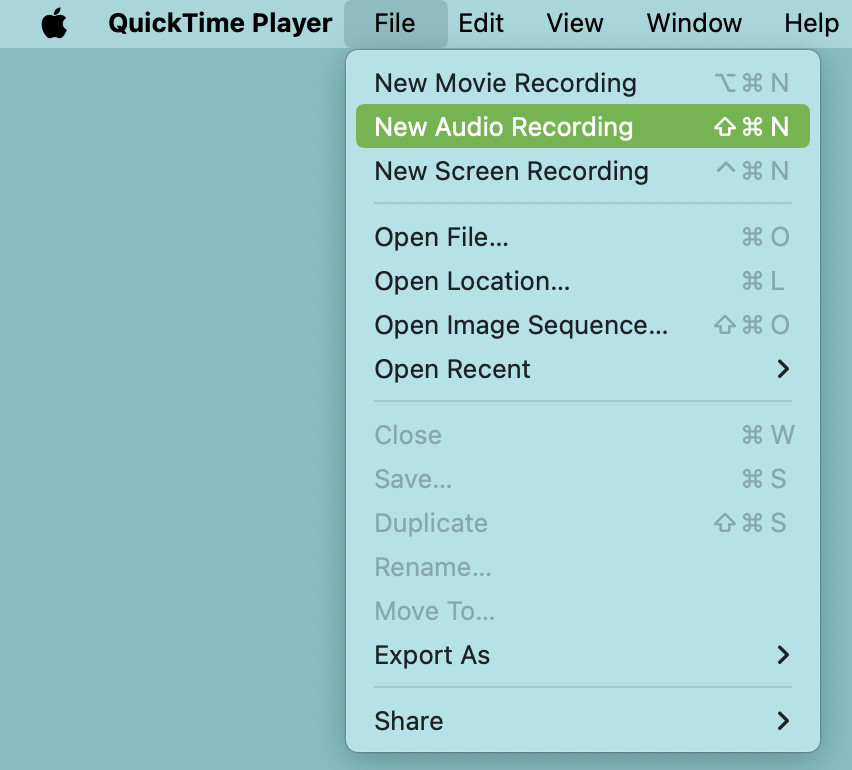 QuickTime Player Screen Recording Options on macOS
3.1. Recording Internal Audio with QuickTime Player
To record internal audio with QuickTime Player, you need to install a virtual audio driver like BlackHole or Soundflower. These drivers route internal audio so QuickTime Player can record it.
3.1.1. Install BlackHole
BlackHole is a free, open-source virtual audio driver that allows you to route audio between applications.
- Download BlackHole: Visit the Existential Audio website and download the latest version.
- Install BlackHole: Follow the installation instructions provided on the website.
- Configure Audio MIDI Setup:
- Open “Audio MIDI Setup” (found in /Applications/Utilities).
- Click the “+” button in the bottom left corner and select “Create Multi-Output Device.”
- In the Multi-Output Device tab, select “Built-in Output” and “BlackHole 2ch.”
- Ensure “Drift Correction” is checked for “Built-in Output.”
- Select Multi-Output Device: In the menu bar, choose “Multi-Output Device” as your sound output.
- Record with QuickTime Player: Follow the steps above to start a new screen recording, and select “BlackHole 2ch” as the microphone.
 Creating a Multi-Output Device in Audio MIDI Setup
By setting up a multi-output device, you can both hear the audio and record it simultaneously. Remember to adjust the volume before starting the recording, as you won’t be able to control it in multi-output mode. This setup is particularly useful for capturing street sounds directly from your Mac for integration into projects on streetsounds.net.
3.1.2. Install Soundflower
Soundflower is another virtual audio driver that predates BlackHole, serving a similar purpose of routing audio internally.
- Download Soundflower: Find Soundflower on GitHub or SourceForge.
- Install Soundflower: Follow the instructions for installation. Note that Soundflower may require disabling System Integrity Protection (SIP) temporarily, which involves booting into recovery mode.
- Configure Audio MIDI Setup: Similar to BlackHole, create a Multi-Output Device in Audio MIDI Setup.
- Select Soundflower: Choose Soundflower as the input in QuickTime Player.
3.2. Advantages and Disadvantages of Using QuickTime Player
Advantages
- Free and Built-In: No need to download or purchase additional software.
- Easy to Use: Simple interface for basic screen recording.
- No Watermarks: Recordings are free of watermarks.
Disadvantages
- Limited Features: Lacks advanced editing and annotation tools.
- Complicated Internal Audio Recording: Requires additional virtual audio drivers.
- Basic Audio Settings: Limited control over audio input and quality.
4. Using OBS Studio to Record Screen on Mac With Sound
OBS Studio (Open Broadcaster Software) is a free and open-source software for video recording and live streaming. It’s a powerful tool for recording your screen with both internal and external audio.
4.1. Setting Up OBS Studio
- Download and Install OBS Studio: Visit the OBS Studio website and download the macOS version. Follow the installation instructions.
- Configure Audio Settings:
- Open OBS Studio.
- Go to “Settings” in the bottom right corner.
- Select “Audio” from the left sidebar.
- Under “Global Audio Devices,” configure your audio inputs:
- Desktop Audio: Select “Default” or your desired audio output device (e.g., BlackHole 2ch for internal audio).
- Mic/Auxiliary Audio: Choose your microphone.
- Create a Scene:
- In the “Scenes” panel, click the “+” button to add a new scene.
- Name the scene (e.g., “Screen Recording”).
- Add a Source:
- In the “Sources” panel, click the “+” button to add a new source.
- Select “Display Capture” to record your entire screen or “Window Capture” to record a specific application window.
- Configure the source settings as needed.
4.2. Recording Internal Audio with OBS Studio
To record internal audio, you need to use a virtual audio driver like BlackHole or Soundflower.
- Install BlackHole or Soundflower: Follow the installation instructions as described in the QuickTime Player section.
- Configure OBS Studio:
- In OBS Studio, go to “Settings” > “Audio.”
- Set “Desktop Audio” to “BlackHole 2ch” or “Soundflower (2ch).”
- Ensure your microphone is also selected under “Mic/Auxiliary Audio.”
- Start Recording: Click “Start Recording” in the main OBS Studio window.
- Stop Recording: Click “Stop Recording” when you’re finished.
- Find Your Recording: By default, recordings are saved in your “Videos” folder. You can change the output path in “Settings” > “Output.”
4.3. Advantages and Disadvantages of Using OBS Studio
Advantages
- Free and Open-Source: No cost to use, and it’s supported by a large community.
- Advanced Features: Offers extensive customization options for video and audio settings.
- Versatile: Suitable for both screen recording and live streaming.
- Multiple Sources: Allows recording from multiple sources simultaneously (e.g., screen, webcam, microphone).
Disadvantages
- Steeper Learning Curve: Can be overwhelming for beginners due to its many features.
- Resource-Intensive: May require a more powerful Mac for smooth recording, especially at high resolutions.
- Initial Setup: Requires initial configuration to optimize settings for your specific setup.
5. Using Third-Party Software for Recording Screen on Mac With Sound
Several third-party screen recording applications offer advanced features and user-friendly interfaces. Here are a few popular options:
5.1. ScreenFlow
ScreenFlow is a premium screen recording and video editing software for macOS. It offers a wide range of features for creating professional-quality videos.
- Download and Install ScreenFlow: Purchase and download ScreenFlow from the Telestream website.
- Configure Recording Settings:
- Open ScreenFlow.
- Click “New Recording” to start a new project.
- Select your recording sources (screen, camera, microphone, computer audio).
- Start Recording: Click the record button.
- Edit Your Recording: ScreenFlow provides powerful editing tools for trimming, adding annotations, transitions, and effects.
- Export Your Video: Choose your desired export settings and save your video.
Advantages
- User-Friendly Interface: Intuitive design makes it easy to learn and use.
- Comprehensive Editing Tools: Offers a wide range of editing features for creating polished videos.
- High-Quality Recording: Captures high-resolution video and clear audio.
- Direct Upload: Allows direct upload to platforms like YouTube and Vimeo.
Disadvantages
- Paid Software: Requires a one-time purchase or subscription.
- Larger File Sizes: High-quality recordings can result in larger file sizes.
5.2. Camtasia
Camtasia is another popular screen recording and video editing software known for its ease of use and robust features.
- Download and Install Camtasia: Purchase and download Camtasia from the TechSmith website.
- Configure Recording Settings:
- Open Camtasia.
- Click “New Recording” to start a new project.
- Select your recording sources (screen, camera, microphone, system audio).
- Start Recording: Click the record button.
- Edit Your Recording: Camtasia offers a variety of editing tools for enhancing your video.
- Export Your Video: Choose your desired export settings and save your video.
Advantages
- Easy to Use: Simple and intuitive interface.
- Templates and Assets: Provides templates, animations, and other assets to enhance your videos.
- Interactive Features: Allows adding quizzes and interactive elements to engage viewers.
Disadvantages
- Paid Software: Requires a one-time purchase.
- System Requirements: May require a more powerful Mac for optimal performance.
5.3. Aiseesoft Screen Recorder
Aiseesoft Screen Recorder is designed to be straightforward, making it easy for users to capture both screen and internal audio without needing to be tech experts. It focuses on cleanly capturing video and audio, which is essential for creating tutorials or recording gameplay.
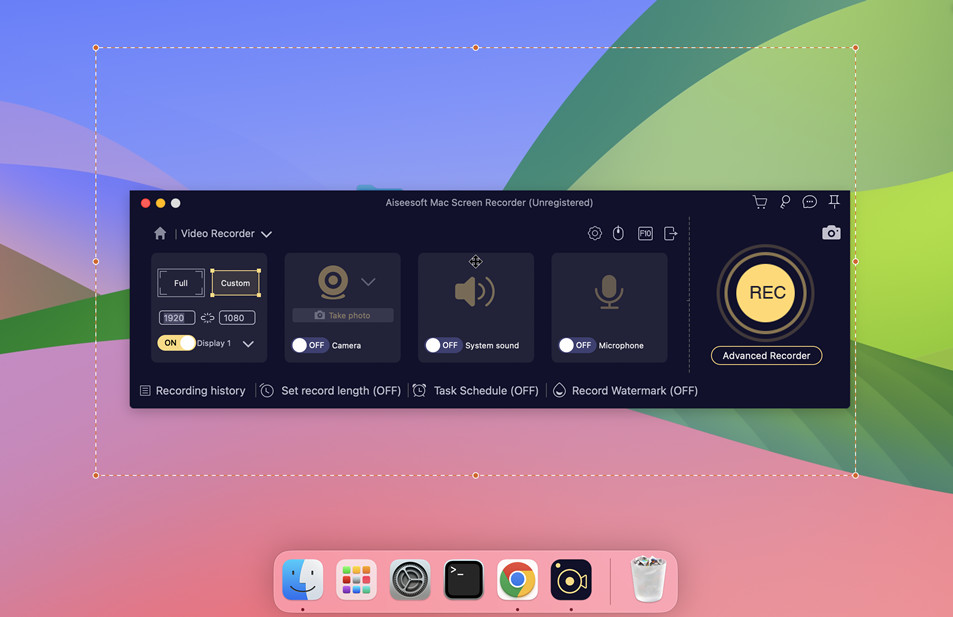 Aiseesoft Screen Recorder Interface
Advantages
- Ease of Use: User-friendly interface suitable for beginners.
- Clean Audio Capture: Records screen and internal audio without background noise.
- Straightforward Functionality: Easy to figure out without extensive technical knowledge.
Disadvantages
- Limited Advanced Features: May not have the advanced editing capabilities of more comprehensive software.
- Potential Cost: While user-friendly, it is a paid software, which may be a barrier for some users.
6. Troubleshooting Common Audio Recording Issues
Recording screen with sound on a Mac can sometimes be challenging. Here are some common issues and how to resolve them:
- No Internal Audio:
- Issue: QuickTime Player or other software doesn’t record internal audio.
- Solution: Install and configure a virtual audio driver like BlackHole or Soundflower. Ensure the correct input is selected in your recording software.
- Distorted or Low-Quality Audio:
- Issue: Audio sounds muffled, distorted, or has low volume.
- Solution:
- Check your microphone settings in System Preferences > Sound > Input.
- Adjust the input level to an appropriate level.
- Use a higher-quality microphone.
- Reduce background noise.
- Software Compatibility Issues:
- Issue: Some software may not work well with virtual audio drivers.
- Solution:
- Update your recording software and virtual audio driver to the latest versions.
- Try a different recording software or virtual audio driver.
- Check the software’s compatibility documentation.
- Audio Feedback or Echo:
- Issue: Hearing an echo or feedback during recording.
- Solution:
- Use headphones to monitor audio.
- Disable the “Listen to this device” option in System Preferences > Sound > Input (if applicable).
- Adjust microphone and speaker placement to minimize feedback.
- Incorrect Audio Input:
- Issue: Recording from the wrong microphone or audio source.
- Solution:
- Check your recording software’s audio input settings.
- Select the correct microphone or audio source.
- Ensure the selected device is active and working correctly.
7. Optimizing Audio Quality for Street Sounds Recording
For enthusiasts capturing street sounds for platforms like streetsounds.net, optimizing audio quality is crucial. Here are specific tips to ensure your recordings are top-notch:
- Use External Microphones:
- Lavalier Microphones: Clip-on mics for clear voice recording.
- Shotgun Microphones: Directional mics for focused sound capture.
- Portable Recorders: Devices like Zoom H4n Pro for high-quality field recording.
- Minimize Background Noise:
- Record in quieter environments.
- Use noise reduction software like Audacity or Adobe Audition.
- Use pop filters and windscreens to reduce unwanted sounds.
- Adjust Audio Levels:
- Set the input level to avoid clipping or distortion.
- Monitor audio levels using headphones.
- Use audio editing software to normalize levels.
- Use Audio Editing Software:
- Audacity: Free, open-source software for editing and cleaning up audio.
- Adobe Audition: Professional-grade software for advanced audio editing.
- Logic Pro X: Apple’s professional DAW for comprehensive audio production.
- Record in Mono:
- For capturing single-source sounds, mono recording can provide better focus and clarity.
- Stereo recording is ideal for capturing ambient sounds and creating a sense of space.
- Use High Sample Rates and Bit Depths:
- Record at 48kHz or 96kHz for high-quality audio.
- Use 24-bit or 32-bit depth for greater dynamic range.
8. Incorporating Street Sounds into Creative Projects
Street sounds can add depth, authenticity, and character to various creative projects. Here are some ideas for incorporating them:
- Music Production:
- Use street sounds as samples in electronic music.
- Create soundscapes for ambient or experimental tracks.
- Layer street sounds with musical instruments.
- Film and Video:
- Add street sounds to establish location and atmosphere.
- Use sounds to enhance action scenes or create tension.
- Create realistic soundscapes for animated projects.
- Game Design:
- Use street sounds to create immersive game environments.
- Add sounds to enhance gameplay and user experience.
- Create realistic urban settings.
- Podcasting:
- Use street sounds as background ambiance.
- Add sounds to transition between segments.
- Create a sense of place and atmosphere.
- Sound Art Installations:
- Create immersive audio experiences using street sounds.
- Combine sounds with visual elements to create multimedia installations.
- Mobile Apps:
- Use street sounds to enhance app features.
- Create location-based audio experiences.
9. Licensing and Copyright Considerations
When recording and using street sounds, it’s important to be aware of licensing and copyright issues. Here are some key considerations:
- Public Domain:
- Sounds recorded in public spaces are generally considered public domain.
- However, specific recordings may be copyrighted if they include identifiable copyrighted material (e.g., music playing from a store).
- Creative Commons Licenses:
- Some sound libraries offer sounds under Creative Commons licenses.
- These licenses allow you to use sounds for free, but may require attribution.
- Commercial Use:
- If you plan to use street sounds for commercial projects, ensure you have the necessary rights.
- Consider purchasing royalty-free sound effects from reputable sources.
- Privacy Concerns:
- Be mindful of privacy laws when recording in public spaces.
- Avoid recording conversations without consent.
- Sound Libraries:
- Websites like streetsounds.net offer licensed street sound recordings.
- Ensure you understand the terms and conditions of the license before using the sounds.
10. Streetsounds.net: Your Hub for Street Sounds
Streetsounds.net is a dedicated platform for exploring, sharing, and licensing street sounds. Here’s how it can benefit you:
- Extensive Sound Library: Access a vast collection of high-quality street sound recordings from around the world.
- Curated Content: Discover curated soundscapes, articles, and interviews with sound artists.
- Licensing Options: Obtain licenses for commercial and non-commercial use.
- Community: Connect with other sound enthusiasts, artists, and professionals.
- Resources: Find tutorials, tips, and best practices for recording and using street sounds.
- Inspiration: Get inspired by innovative projects that incorporate street sounds.
10.1. Navigating Streetsounds.net
- Browse Sounds: Explore the sound library by location, category, or keyword.
- Read Articles: Dive into articles about the history, culture, and art of street sounds.
- Listen to Soundscapes: Experience curated soundscapes that capture the essence of urban environments.
- Join the Community: Connect with other members, share your work, and participate in discussions.
By leveraging streetsounds.net, you can enhance your creative projects with authentic and high-quality street sounds.
FAQ: How to Record Screen on Mac With Sound
- Can I record my screen on a Mac without additional software?
- Yes, you can use QuickTime Player, which comes pre-installed on macOS, to record your screen. However, recording internal audio may require additional software like BlackHole.
- How do I record internal audio on a Mac?
- To record internal audio, you need to install a virtual audio driver like BlackHole or Soundflower. These drivers route internal audio so your recording software can capture it.
- Is OBS Studio free to use?
- Yes, OBS Studio is a free and open-source software for video recording and live streaming. It offers advanced features and customization options.
- What is the best software for screen recording on a Mac?
- The best software depends on your needs. QuickTime Player is great for basic recording, OBS Studio for advanced features and streaming, and ScreenFlow or Camtasia for comprehensive editing capabilities.
- How do I fix audio distortion in my screen recordings?
- Check your microphone settings, adjust input levels, reduce background noise, and use audio editing software to clean up the audio.
- Can I record my screen and webcam at the same time?
- Yes, OBS Studio and ScreenFlow allow you to record your screen and webcam simultaneously.
- What is a Multi-Output Device in Audio MIDI Setup?
- A Multi-Output Device allows you to send audio to multiple outputs simultaneously, such as your built-in speakers and a virtual audio driver like BlackHole.
- Are there any legal considerations when recording street sounds?
- Yes, be mindful of privacy laws, avoid recording conversations without consent, and ensure you have the necessary rights for commercial use.
- How can I improve the audio quality of my street sound recordings?
- Use external microphones, minimize background noise, adjust audio levels, and use audio editing software to enhance the sound.
- Where can I find high-quality street sound recordings?
- Websites like streetsounds.net offer extensive libraries of licensed street sound recordings.
Conclusion
Recording your screen on a Mac with sound is a valuable skill for creating tutorials, capturing gameplay, and sharing street sounds. Whether you choose to use QuickTime Player, OBS Studio, or a third-party application like ScreenFlow or Camtasia, understanding the tools and techniques involved will help you create high-quality recordings. For those passionate about capturing the sounds of urban environments, platforms like streetsounds.net offer a wealth of resources, inspiration, and community. Dive in, explore, and start sharing your unique audio discoveries today.
Ready to capture the sounds of the streets? Visit streetsounds.net to explore our extensive library of high-quality sound recordings, read insightful articles, and connect with a community of fellow sound enthusiasts. Whether you’re a musician, filmmaker, or sound artist, streetsounds.net is your ultimate resource for all things street sound related. Start your sonic journey today and bring the vibrant sounds of the city to your next creative project Address: 726 Broadway, New York, NY 10003, United States. Phone: +1 (212) 998-8550.