Removing background sound in Premiere Pro is possible and essential for achieving polished audio in your video projects, especially when capturing pristine audio is a challenge. At streetsounds.net, we understand the importance of clean audio, whether it’s for music production, filmmaking, or game design, and we’re here to provide solutions. By utilizing Premiere Pro’s built-in features and third-party plugins, you can significantly reduce unwanted noises and enhance your overall sound quality.
1. What Is The Best Way To Remove Background Noise In Premiere Pro?
The best way to remove background noise in Adobe Premiere Pro involves using the DeNoise effect or the Essential Sound panel. The DeNoise effect directly targets and reduces noise frequencies, while the Essential Sound panel offers more comprehensive audio repair tools, including noise reduction, rumble reduction, and de-humming, for a cleaner, more professional sound.
1.1 How Does The DeNoise Effect Work?
The DeNoise effect in Premiere Pro analyzes the audio clip and identifies frequencies considered noise. By adjusting the Amount slider, you can control the intensity of the noise reduction applied, making it suitable for quick fixes. However, it’s crucial to monitor the audio quality to avoid distorting the desired sounds.
1.2 What Are The Advantages Of Using The Essential Sound Panel?
The Essential Sound panel is a comprehensive audio toolkit that enhances, mixes, and repairs audio directly within Premiere Pro. Its intuitive interface allows you to unify loudness, remove low-frequency noises, and eliminate background sounds efficiently, making it ideal for achieving professional-quality audio.
1.3 How Do I Access The Essential Sound Panel?
To access the Essential Sound panel in Premiere Pro, navigate to Window > Essential Sound. Once the panel is open, select your audio clip and assign the appropriate tag, such as Dialogue, Music, SFX, or Ambience, to access specific tools tailored to that audio type.
2. Using The DeNoise Effect To Remove Background Noise
The DeNoise effect is a straightforward tool in Premiere Pro for reducing background noise. Here’s how to use it effectively:
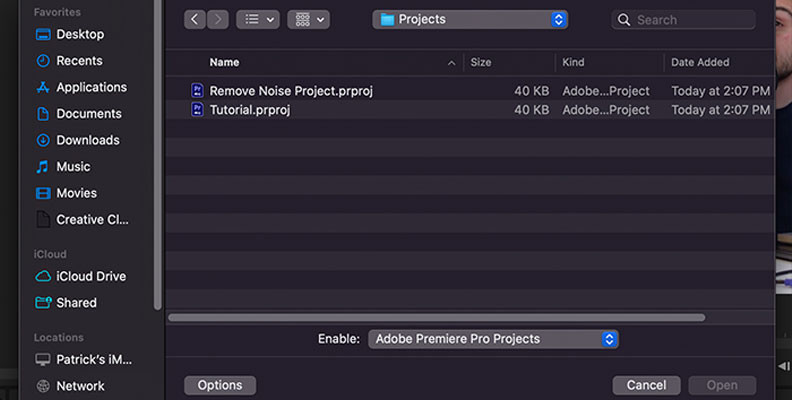
2.1 Step 1: Open Your Project
 Premiere Pro project interface with a video clip loaded
Begin by opening your project in Adobe Premiere Pro. If you have multiple clips that need editing, start with the first one you intend to clean up.
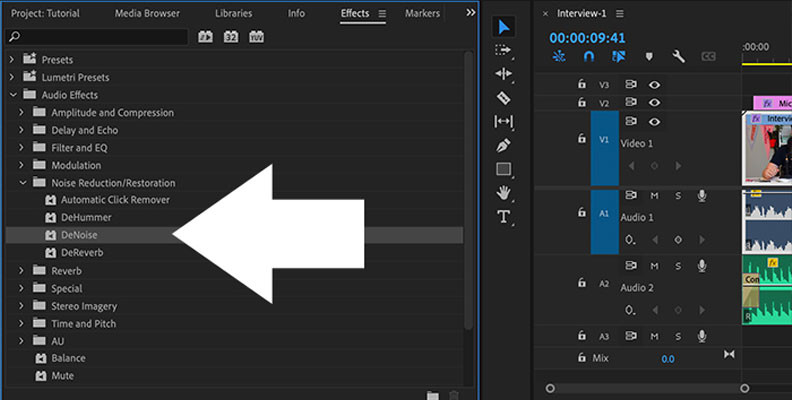
2.2 Step 2: Adding Audio Effects
 Premiere Pro effects panel with the DeNoise effect highlighted
Go to your sound effects window, accessible via Window > Effects, and search for DeNoise. Alternatively, navigate through Audio Effects > Noise Reduction/Restoration > DeNoise. Drag and drop the DeNoise effect onto your audio clip.
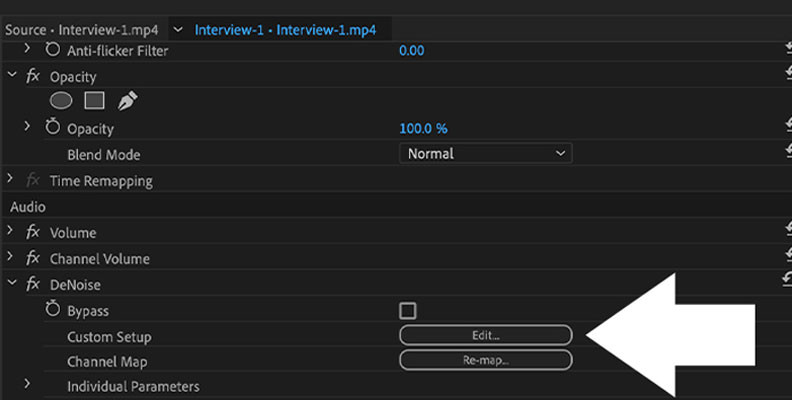
2.3 Step 3: Effects Control Panel
 Premiere Pro Effect Controls panel with DeNoise settings
Access the Effect Controls panel to adjust the DeNoise settings. Click Edit to open a new window where you can modify audio frequencies. You can use the default preset or experiment with the presets provided by Adobe Premiere Pro.
2.4 How To Adjust The Amount Slider?
The Amount slider controls the intensity of the noise reduction effect. Start with the slider in the middle and adjust it while listening to the audio. Increase the amount to reduce more noise, but be cautious not to distort the desired audio, such as speech or music.
2.5 What Is The Importance Of Gain Control?
If the DeNoise effect reduces the overall volume, use the Gain control in Premiere Pro to increase the volume. This ensures that the audio remains at an optimal level while minimizing unwanted noise. Once you are satisfied with the sound quality, close the window.
3. Utilizing The Essential Sound Panel For Enhanced Audio Cleaning
The Essential Sound panel provides a more comprehensive set of tools for audio repair and enhancement. Here’s how to use it:
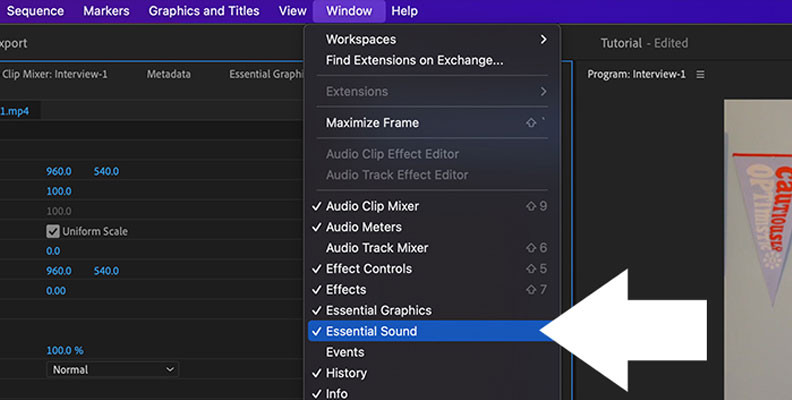
3.1 Step 1: Activate The Essential Sound Panel
 Premiere Pro interface showing how to activate the Essential Sound panel under the Window menu
To activate the Essential Sound panel, go to Window > Essential Sound and ensure it is checked. Once the panel appears, select your audio clip and assign the Dialogue tag.
3.2 Step 2: The Repair Tab
 Essential Sound panel with the Repair tab options highlighted
In the Essential Sound panel, a new menu with powerful features will appear. In this menu, we’ll find a few sliders and options to remove background noise:
- Reduce Noise: Adjusts the amount of noise removal applied to the audio clip. Setting it to 0 leaves the audio unchanged, while 100 applies maximum noise reduction.
- Reduce Rumble: Reduces low-frequency noises, plosives, and microphone rumble caused by movement, wind, or rubbing sounds.
- DeHum: Reduces hum sounds caused by electrical interference.
- DeEss: Reduces harsh ess-like sounds and other high frequencies.
- Reduce Reverb: Reduces reverb from your audio track, helpful when you hear an echo in your recordings.
Adjust each slider by checking the box next to the option and then moving the slider. For the Reduce Noise effect, start with the slider set to 0 and adjust it as you listen to the audio. Be careful not to over-process the audio, which can lead to distortion.
3.3 Step 3: Repair Sound Quality
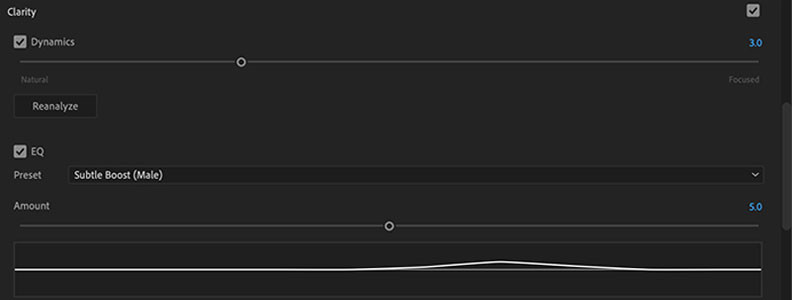 Clarity tab in the Essential Sound panel, showcasing EQ and Enhance Speech options
If the noise removal process affects the voice quality, use the Clarity tab to repair it. Check the box next to Clarity, and a new menu will display below. Here, you can use the EQ option to reduce or boost specific frequencies in the recording. Select a preset (like Podcast Voice) and adjust the amount of EQ with the slider. You can also enhance your video sound with Enhance Speech and choose between high tone (female) or low tone (male). When you’re happy with what you hear, close the window.
4. Using CrumplePop AudioDenoise Plugin
CrumplePop AudioDenoise is an exceptional plugin that uses AI to detect and remove background noise from your audio clips automatically.
4.1 Step 1: Download And Install AudioDenoise
Go to the CrumplePop website and download the AudioDenoise plugin. Ensure it’s properly installed on your computer before running Adobe Premiere Pro. You may need to use Adobe’s plugin manager to install the plugins in Premiere. Go to Preferences > Audio > Audio Plugin Manager and click scan, then enable the plugin.
4.2 Step 2: Add AudioDenoise Effect To Your Audio Clip
Import a video clip with background noise that needs cleanup. Go to the Effects panel, search for AudioDenoise, and drag it to the audio clip in the timeline. The AudioDenoise interface will launch, opening an intuitive interface you can use to make adjustments.
4.3 Step 3: Adjust The Controls
The main control is the strength knob, which affects the amount of noise reduction applied to the clip, while the three knobs at the bottom control how much the plugin affects the low, mid, and high frequencies. If the effect decreases the audio track’s volume, use the slider on the left to increase or decrease the output volume.
4.4 Step 4: Create AudioDenoise Presets
Creating presets allows you to use the same settings for your video clips in other programs like Adobe Audition or Final Cut Pro. To create a preset:
- Click the floppy disk icon to create a preset with the current settings.
- Name the preset and click save.
Load a preset by clicking on the download icon, searching for the preset, and clicking Open.
5. Additional Audio Enhancements And AI Tools
In addition to the techniques above, several other AI-driven tools and enhancements can significantly improve your audio quality:
- Adobe Podcast Enhance: This tool uses AI to clean up speech, remove noise, and enhance the overall clarity of vocal recordings.
- Descript: An all-in-one audio and video editing tool with powerful noise reduction and audio enhancement capabilities.
- Krisp: A real-time noise cancellation app that works with any microphone and removes background noise during recordings and live calls.
6. How Do I Create Presets For Future Use In Premiere Pro?
Creating presets in Premiere Pro allows you to save your preferred settings and apply them quickly to future projects. Here’s how:
6.1 Presets In The Essential Sound Panel
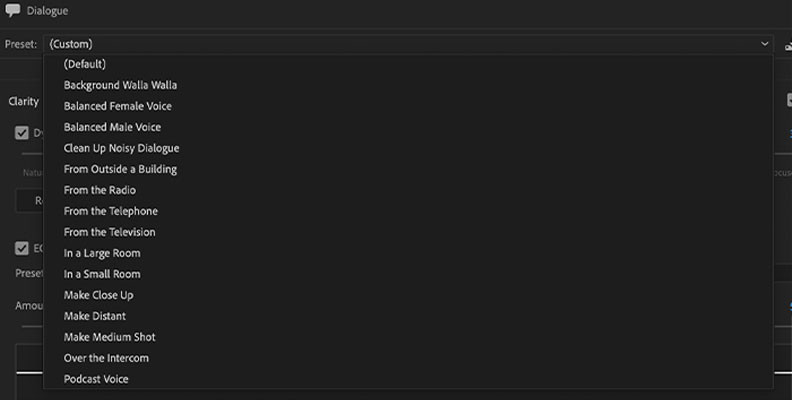 Essential Sound panel highlighting the Preset dropdown menu
- Go to the Essential Sound panel.
- You’ll see the Preset dropdown menu below Dialogue; click on the icon next to it with a down arrow when you finish editing.
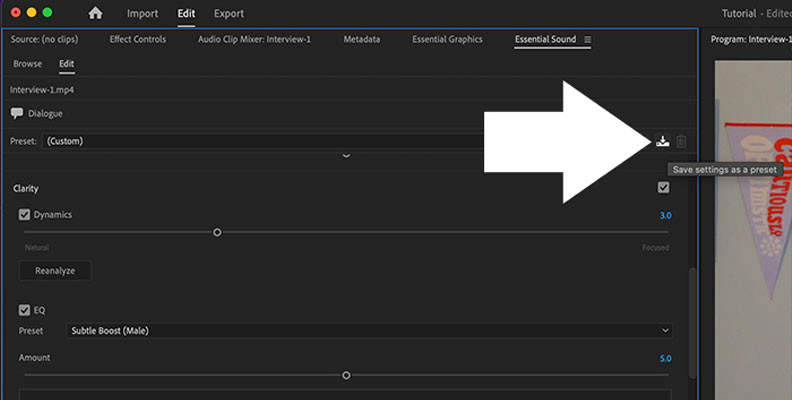 Essential Sound panel showing the save preset option
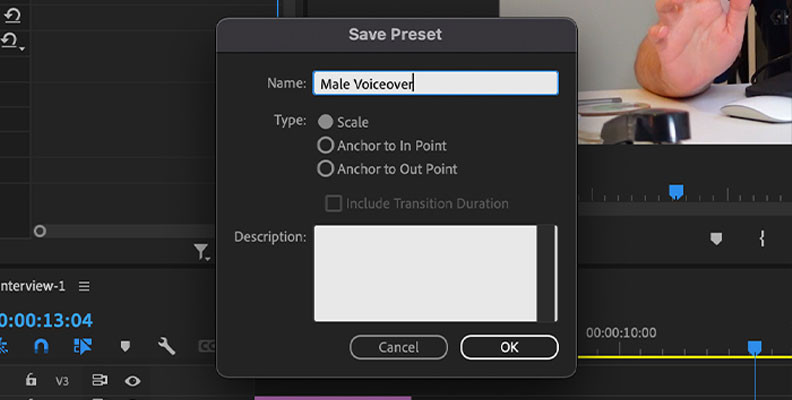
- The Save Preset window will open; name your preset and click OK.
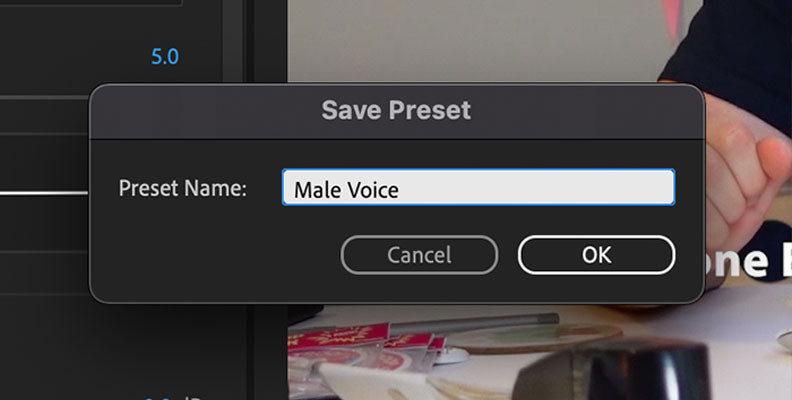 Save Preset window in Premiere Pro
The next time you want to use your preset, select the clips you want to reduce background noise, and choose the new preset from the Preset dropdown menu.
6.2 Presets For The DeNoise Effect
 Premiere Pro Effect Controls panel with the option to save a DeNoise preset highlighted
- After editing the DeNoise effects, right-click DeNoise on your Effect Controls panel and choose Save Preset.
 Save Preset window for the DeNoise effect in Premiere Pro
- Name your preset and click OK.
Even when recorded in the same place, audio clips can differ, so adjustments might be necessary. However, working with presets provides a valuable starting point for future projects.
7. How Can I Improve My Recording Environment To Minimize Background Noise?
Preparing your environment is crucial for capturing high-quality audio with minimal background noise. Here are some tips:
- Use Sound-Absorbing Panels: Treat your recording space with sound-absorbing panels to reduce reverb and ambient noises.
- Invest in Quality Equipment: Use high-quality microphones and recording devices that produce as little background noise as possible.
- Control Ambient Noise: Turn off or move away from noise-generating appliances like air conditioners, fans, and computers.
- Use a Pop Filter and Shock Mount: These accessories can reduce plosives (bursts of air from speech) and vibrations that can create unwanted noise.
- Record in a Quiet Space: Choose the quietest room available and record during times when there is minimal external noise.
Even with these precautions, some background noise is often unavoidable, making post-processing techniques essential for achieving professional-quality audio.
8. Understanding Audio Frequency And Noise
To effectively remove background noise, it’s helpful to understand audio frequency ranges and how noise manifests within those ranges:
8.1 Common Frequency Ranges
- Low Frequencies (20Hz – 250Hz): Often contain rumble, HVAC noise, and low-end hum.
- Mid Frequencies (250Hz – 4kHz): Typically include speech and common environmental sounds.
- High Frequencies (4kHz – 20kHz): Can contain hiss, static, and sibilance (“s” sounds).
8.2 Identifying Noise Frequencies
Using spectral analysis tools in Premiere Pro or dedicated audio editing software like Adobe Audition, you can visually identify the frequencies where unwanted noise is most prominent. This allows you to target specific frequency ranges with noise reduction tools, minimizing the impact on the desired audio.
8.3 Dynamic Processing
Dynamic processing tools, such as compressors and expanders, can also help manage noise. A compressor reduces the dynamic range of the audio, making quiet parts louder and loud parts quieter, while an expander does the opposite, further reducing quiet noises.
9. Best Practices For Audio Editing
Here are some best practices to ensure your audio editing process is as efficient and effective as possible:
- Start with the Best Possible Recording: The better the initial recording, the less work you’ll have to do in post-production.
- Listen Critically: Use high-quality headphones or studio monitors to accurately hear the audio you’re working with.
- Make Small Adjustments: Avoid making drastic changes that can introduce artifacts or distort the audio.
- Regularly A/B Compare: Switch between the original and edited audio to ensure you’re making improvements.
- Save Regularly: Save your project frequently to avoid losing work.
- Use Automation: Utilize automation features in Premiere Pro to make precise adjustments over time.
10. What Are The Common Types Of Background Noise And How To Remove Them?
Different types of background noise require specific approaches for effective removal. Here are some common types and how to address them:
10.1 Hiss
Hiss is a high-frequency noise that sounds like static. It’s often caused by electronic equipment.
- Solution: Use the DeNoise effect or a dedicated noise reduction plugin to target high frequencies. The DeEss tool in the Essential Sound panel can also help reduce hiss.
10.2 Hum
Hum is a low-frequency noise caused by electrical interference.
- Solution: Use the DeHum tool in the Essential Sound panel to specifically target and reduce hum. Ensure your audio equipment is properly grounded to minimize electrical interference.
10.3 Rumble
Rumble is a low-frequency noise caused by vibrations or handling noise.
- Solution: Use the Reduce Rumble tool in the Essential Sound panel. A high-pass filter can also be effective in removing low-frequency rumble.
10.4 Wind Noise
Wind noise is caused by wind blowing across the microphone.
- Solution: Use a windscreen or blimp when recording outdoors. In post-production, use the DeNoise effect or a dedicated wind noise reduction plugin.
10.5 Traffic Noise
Traffic noise includes sounds of cars, trucks, and other vehicles.
- Solution: Record in a quieter location if possible. Use the DeNoise effect or a noise reduction plugin to reduce the traffic noise. Isolate and remove specific traffic sounds using manual editing techniques.
11. How To Remove Specific Sounds From Audio Recordings In Premiere Pro?
Removing specific sounds from audio recordings in Premiere Pro requires a combination of tools and techniques.
11.1 Using The Spectral Frequency Display
The Spectral Frequency Display in Adobe Audition allows you to visualize audio frequencies and identify specific sounds. To access it:
- Right-click on the audio clip in Premiere Pro and select Edit Clip in Adobe Audition.
- In Audition, go to Window > Spectral Frequency Display.
Here, you can visually identify and select unwanted sounds, such as coughs or chair creaks, and remove them.
11.2 Content-Aware Fill
Adobe Audition’s Content-Aware Fill can automatically replace selected sounds with surrounding audio. This tool analyzes the audio around the selection and intelligently fills in the gap, creating a seamless result.
11.3 Manual Editing
For more precise control, manually edit the audio to remove unwanted sounds. This involves cutting out the unwanted sound and crossfading the surrounding audio to create a smooth transition.
12. Exploring The Streetsounds.Net Library For Quality Street Sounds
At streetsounds.net, we offer a rich library of high-quality street sounds perfect for enhancing your audio projects. Whether you’re working on a film, game, or music production, our sounds can add authenticity and depth to your work.
12.1 The Importance Of High-Quality Street Sounds
Using high-quality street sounds can significantly enhance the realism and immersion of your projects. These sounds can bring a scene to life, creating a vivid and engaging experience for your audience.
12.2 Diverse Range Of Sounds
Our library includes a diverse range of sounds, from bustling city traffic and lively street performers to subtle ambient noises that add depth and texture. You can find everything from the roar of a New York City subway to the gentle sounds of a park in autumn.
12.3 Professional Recording
All our sounds are professionally recorded and curated, ensuring the highest quality and fidelity. This means you can use them with confidence, knowing they will integrate seamlessly into your projects.
13. Enhancing The Sound Quality Of Older Recordings
Enhancing the sound quality of older recordings can be challenging, but with the right tools and techniques, it’s possible to achieve significant improvements.
13.1 Noise Reduction
Use noise reduction plugins to remove unwanted background noise and hiss from older recordings. Adjust the settings carefully to avoid removing too much of the original audio.
13.2 Equalization
Use EQ to boost or cut specific frequencies, improving the clarity and balance of the audio. Pay attention to the frequency ranges where the audio sounds muddy or muffled and adjust accordingly.
13.3 Compression
Use compression to reduce the dynamic range of the audio, making quiet parts louder and loud parts quieter. This can help improve the overall loudness and clarity of the recording.
13.4 Restoration Plugins
Consider using dedicated audio restoration plugins designed to address common issues with older recordings, such as clicks, pops, and crackles.
14. Street Sound Stories: How Urban Audio Inspires Creativity
Street sounds are not just background noise; they are a rich source of inspiration for artists, musicians, and filmmakers. The unique sounds of the city can spark creativity and add authenticity to artistic works.
14.1 Street Sounds In Music
Many musicians incorporate street sounds into their music to create a sense of place and realism. From hip-hop artists sampling subway sounds to electronic musicians using traffic noise as a rhythmic element, street sounds can add a unique and compelling dimension to music.
14.2 Street Sounds In Film
Filmmakers use street sounds to create immersive and realistic environments. The sounds of a bustling city street can transport viewers to another world, enhancing the emotional impact of the story.
14.3 Street Sounds In Art
Artists use street sounds to create sound installations and other works that explore the relationship between sound, space, and perception. These works can challenge our understanding of the urban environment and invite us to listen more closely to the world around us.
15. FAQ: Removing Background Sound In Premiere Pro
15.1 What is the best way to remove background noise in Premiere Pro?
The best way involves using the DeNoise effect or the Essential Sound panel, depending on the complexity of the noise and the level of control you need.
15.2 How do I access the DeNoise effect in Premiere Pro?
Go to the Effects panel, search for “DeNoise,” and drag it onto your audio clip in the timeline.
15.3 How do I activate the Essential Sound panel?
Go to Window > Essential Sound and ensure it is checked.
15.4 What are the key tools in the Essential Sound panel for noise reduction?
The key tools include Reduce Noise, Reduce Rumble, DeHum, and DeEss.
15.5 Can I create presets for noise reduction in Premiere Pro?
Yes, you can save presets for both the DeNoise effect and the Essential Sound panel.
15.6 How do I reduce wind noise in Premiere Pro?
Use the DeNoise effect or a dedicated wind noise reduction plugin. The Reduce Rumble tool in the Essential Sound panel can also help.
15.7 What is spectral analysis, and how does it help with noise reduction?
Spectral analysis allows you to visualize audio frequencies and identify specific unwanted sounds. This helps you target those frequencies with noise reduction tools.
15.8 What is the Content-Aware Fill tool in Adobe Audition?
The Content-Aware Fill tool automatically replaces selected sounds with surrounding audio, creating a seamless result.
15.9 How can I improve the sound quality of older recordings?
Use noise reduction plugins, EQ, compression, and dedicated audio restoration plugins to address common issues with older recordings.
15.10 Where can I find high-quality street sounds for my projects?
Visit streetsounds.net to explore our extensive library of professionally recorded street sounds.
Achieving clean and professional audio in your video projects is essential, and Premiere Pro offers several effective tools and techniques for removing background noise. By understanding these methods and utilizing resources like the streetsounds.net library, you can create high-quality audio that enhances your creative work.
Ready to elevate your audio projects? Explore our extensive library of high-quality street sounds and connect with a community of passionate audio enthusiasts at streetsounds.net. Visit our website, contact us at +1 (212) 998-8550, or stop by our New York City office at 726 Broadway, New York, NY 10003, United States. Experience the difference that professional-quality audio can make.