Why Does My Pc Have No Sound? That’s a common question, and thankfully, a problem often easily solved. At streetsounds.net, we understand how crucial audio is, whether you’re producing music, editing video, or just enjoying your favorite tunes, so we’ll walk you through the most common causes and solutions, ensuring you get back to creating and enjoying audio in no time. Explore our website for high-quality street sound effects and urban soundscapes to enhance your audio projects.
1. Basic Checks: Is It Really a Problem?
Before diving into technical solutions, let’s rule out the obvious.
1.1 Is the Volume Turned Up?
It sounds simple, but it’s the most common culprit.
-
Check the system volume: Look for the speaker icon in your system tray (usually in the bottom right corner of your screen). Make sure the volume slider isn’t muted or set too low.
-
Check the application volume: Some applications have their own volume controls. Make sure the volume within the specific app you’re using is turned up.
-
External speaker volume: If you’re using external speakers, ensure they are powered on and the volume knob isn’t turned all the way down.
1.2 Are the Correct Playback Devices Selected?
Your computer might be sending audio to the wrong output.
-
System tray device selection: Click the speaker icon in your system tray. You should see a list of available playback devices. Make sure the correct speakers or headphones are selected.
-
Sound settings: Go to your system’s sound settings (search for “sound settings” in the Windows search bar). Under the “Output” section, choose your desired playback device from the dropdown menu.
-
Check for disabled devices: In the Sound settings, click “Manage sound devices.” Ensure your desired device isn’t disabled. If it is, enable it.
1.3 Is the Audio Cable Connected Properly?
A loose or incorrect connection can prevent sound from reaching your speakers or headphones.
-
Physical inspection: Ensure the audio cable is securely plugged into both your computer and your speakers or headphones.
-
Correct port: Make sure you’re using the correct audio port. Most computers have multiple audio jacks (usually green for audio output, pink for microphone input, and blue for line-in). Refer to your computer’s manual if you’re unsure.
-
Try a different cable: A faulty cable can cause audio problems. Try using a different cable to rule out this possibility.
2. Driver Issues: The Most Common Culprit
Drivers are software that allows your operating system to communicate with your audio hardware. Outdated, corrupted, or incompatible drivers are a frequent cause of sound problems.
2.1 Updating Your Audio Driver
The first step is to ensure your audio driver is up to date.
- Open Device Manager: Search for “device manager” in the Windows search bar and open it.
- Expand “Sound, video and game controllers”: Find this section and click the arrow next to it to expand the list.
- Right-click on your audio device: Look for your sound card or audio device (e.g., “Realtek High Definition Audio,” “NVIDIA High Definition Audio”). Right-click on it and select “Update driver.”
- Search automatically for drivers: Choose this option, and Windows will search for the latest driver software online.
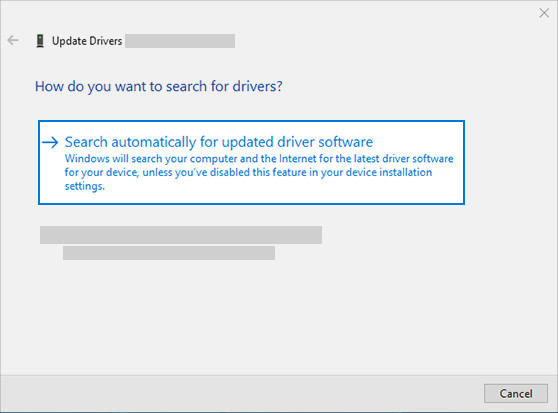 search automatically for updated driver software to update audio driver
 - Follow the instructions: If Windows finds a new driver, follow the on-screen instructions to install it.
- Restart your computer: After the installation, restart your computer for the changes to take effect.
2.2 Manually Installing an Audio Driver
If Windows can’t find a driver automatically, you can download it from the manufacturer’s website.
- Identify your audio device: Determine the exact model of your sound card or audio device. You can find this information in Device Manager (as described above) or by looking at your computer’s specifications.
- Visit the manufacturer’s website: Go to the website of your sound card or motherboard manufacturer (e.g., Realtek, ASUS, MSI, Gigabyte).
- Download the latest driver: Find the drivers section and download the latest audio driver for your specific device and operating system version.
- Extract the driver files: The downloaded file is usually a ZIP or EXE file. Extract the contents to a folder on your computer.
- Update the driver through Device Manager: Follow steps 1-3 in the previous section (“Updating Your Audio Driver”).
- Browse my computer for drivers: Instead of searching automatically, choose “Browse my computer for drivers.”
- Navigate to the driver folder: Locate the folder where you extracted the driver files and select it.
- Follow the instructions: Windows will install the driver from the selected folder.
- Restart your computer: Restart your computer after the installation.
2.3 Uninstalling and Reinstalling Your Audio Driver
Sometimes, a corrupted driver needs to be completely removed and reinstalled.
-
Open Device Manager: Search for “device manager” in the Windows search bar and open it.
-
Expand “Sound, video and game controllers”: Find this section and click the arrow next to it to expand the list.
-
Right-click on your audio device: Right-click on your sound card or audio device and select “Uninstall device.”
-
Delete the driver software: In the confirmation dialog, check the box that says “Delete the driver software for this device” (if available). This will ensure that the driver is completely removed from your system.
-
Uninstall.
-
Restart your PC:
- Note: Be sure to save documents and any other current work before you restart.
- This restart will automatically prompt your PC to reinstall your audio driver.
- To restart, select Start > Power > Restart .
2.4 Using the Generic Audio Driver
If the specific driver for your audio device is causing problems, you can try using the generic audio driver that comes with Windows.
- Open Device Manager: Search for “device manager” in the Windows search bar and open it.
- Expand “Sound, video and game controllers”: Find this section and click the arrow next to it to expand the list.
- Right-click on your audio device: Right-click on your sound card or audio device and select “Update driver.”
- Browse my computer for drivers: Choose this option.
- Let me pick from a list of device drivers on my computer: Select this option.
- Select the audio device: Choose your audio device from the list.
- Click Next.
- Follow the instructions: Windows will install the generic audio driver.
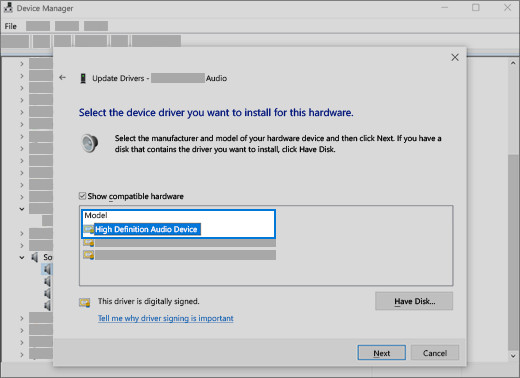 Select the driver and select next to use the generic audio driver
2.5 Rolling Back Your Audio Driver
If you’ve recently updated your audio driver and started experiencing sound problems, rolling back to the previous version might solve the issue.
- Open Device Manager: Search for “device manager” in the Windows search bar and open it.
- Expand “Sound, video and game controllers”: Find this section and click the arrow next to it to expand the list.
- Right-click on your audio device: Right-click on your sound card or audio device and select “Properties.”
- Select the “Driver” tab: Click on the “Driver” tab in the Properties window.
- Click “Roll Back Driver”: If the “Roll Back Driver” button is available (not grayed out), click it.
- Follow the instructions: Windows will guide you through the process of rolling back to the previous driver version.
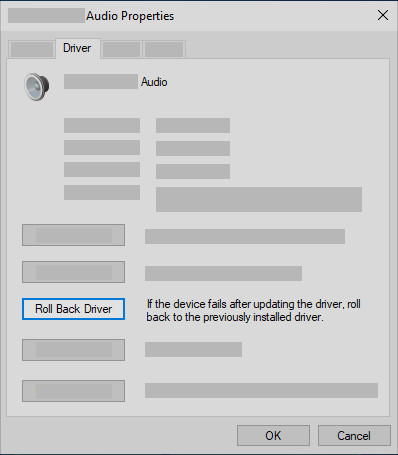 Roll back the audio driver in Device Manager
3. Hardware Conflicts: When Devices Clash
Sometimes, other hardware devices can interfere with your audio device.
3.1 Identifying Hardware Conflicts
Device Manager can help you identify potential hardware conflicts.
-
Open Device Manager: Search for “device manager” in the Windows search bar and open it.
-
Look for warning symbols: Check for any devices with a yellow exclamation mark or a red “X” next to them. These symbols indicate a potential problem or conflict.
-
Check for IRQ conflicts: IRQ (Interrupt Request) conflicts occur when two devices try to use the same interrupt line. This is less common with modern hardware but can still happen. To check for IRQ conflicts:
- In Device Manager, go to “View” > “Resources by type.”
- Expand “Interrupt request (IRQ).”
- Look for any devices sharing the same IRQ line.
3.2 Resolving Hardware Conflicts
The steps to resolve hardware conflicts depend on the specific nature of the conflict. Here are some general approaches:
- Update drivers: As mentioned earlier, updating drivers can often resolve conflicts caused by outdated or incompatible software.
- Reinstall drivers: Reinstalling the drivers for the conflicting devices can also help.
- Change IRQ settings: In some cases, you might be able to manually change the IRQ settings for a device in Device Manager. However, this is an advanced procedure and should only be attempted if you’re comfortable working with hardware settings.
- Remove or disable conflicting devices: If you suspect a specific device is causing the conflict, try temporarily removing it or disabling it in Device Manager to see if the sound problem goes away.
- Check BIOS settings: In rare cases, hardware conflicts can be related to BIOS settings. Consult your motherboard’s manual for information on how to access and modify BIOS settings.
4. Sound Settings Configuration: Getting the Levels Right
Incorrect sound settings can prevent audio from reaching your speakers or headphones.
4.1 Checking Volume Mixer
The Volume Mixer allows you to adjust the volume levels for individual applications.
- Open Volume Mixer: Right-click on the speaker icon in the system tray and select “Open Volume Mixer.”
- Adjust application volumes: Make sure the volume levels for all applications are turned up and not muted.
- Check master volume: Ensure the “Speakers” volume is also at an audible level.
4.2 Configuring Playback Devices
You need to ensure your default playback device is correctly configured.
- Open Sound Settings: Search for “sound settings” in the Windows search bar and open it.
- Select Playback Device: In the “Output” section, make sure your desired playback device is selected.
- Device Properties: Click on “Device properties” to configure the device further.
- Enhancements: Check for any sound enhancements that might be interfering with the audio. Try disabling enhancements to see if it resolves the issue.
- Spatial Sound: If you’re using spatial sound (e.g., Dolby Atmos, Windows Sonic), make sure it’s configured correctly for your headphones or speakers.
4.3 Checking Sound Enhancements
Sound enhancements are effects that can alter the audio output. While they can sometimes improve the sound quality, they can also cause problems.
- Open Sound Control Panel: Search for “sound settings” in the Windows search bar and open it. On the right side, click “Sound Control Panel.”
- Select Playback Device: Select your playback device and click “Properties.”
- Enhancements Tab: Go to the “Enhancements” tab.
- Disable All Enhancements: Check the box that says “Disable all enhancements.”
- Apply and Test: Click “Apply” and then test your audio to see if the problem is resolved.
5. Audio Service Issues: Keeping the Sound Running
The Windows Audio service is responsible for managing audio playback. If this service isn’t running correctly, you might experience sound problems.
5.1 Restarting the Windows Audio Service
Restarting the service can often resolve temporary glitches.
- Open Services: Search for “services” in the Windows search bar and open the Services app.
- Locate Windows Audio: Scroll down and find the “Windows Audio” service.
- Restart the Service: Right-click on “Windows Audio” and select “Restart.”
- Check Dependencies: Ensure the “Windows Audio Endpoint Builder” service is also running. If not, start it as well.
5.2 Setting the Audio Service to Automatic
To ensure the audio service starts automatically when you turn on your computer, follow these steps:
- Open Services: Search for “services” in the Windows search bar and open the Services app.
- Locate Windows Audio: Scroll down and find the “Windows Audio” service.
- Properties: Right-click on “Windows Audio” and select “Properties.”
- Startup Type: In the “General” tab, find the “Startup type” dropdown menu and select “Automatic.”
- Apply and OK: Click “Apply” and then “OK” to save the changes.
5.3 Checking Audio Dependencies
The Windows Audio service relies on other services to function correctly.
- Open Services: Search for “services” in the Windows search bar and open the Services app.
- Locate Windows Audio: Scroll down and find the “Windows Audio” service.
- Properties: Right-click on “Windows Audio” and select “Properties.”
- Dependencies Tab: Go to the “Dependencies” tab.
- Check Dependencies: Note the services listed under “This service depends on the following system components.”
- Verify Status: Make sure all of these dependent services are running. If any of them are stopped, start them.
6. Software Conflicts: When Programs Interfere
Certain software applications can interfere with audio playback.
6.1 Identifying Conflicting Software
Consider any recently installed or updated software that might be related to audio. This could include:
- Audio editing software: Programs like Audacity, Adobe Audition, or similar applications.
- Virtual audio drivers: Software that creates virtual audio devices, such as VoiceMeeter or VB-Audio Virtual Cable.
- Gaming-related audio software: Programs like Razer Synapse or Nahimic audio drivers.
- Video conferencing software: Applications like Zoom, Skype, or Microsoft Teams.
6.2 Troubleshooting Software Conflicts
Here are some steps you can take to troubleshoot software conflicts:
- Close unnecessary applications: Close any applications that might be using audio resources.
- Disable or uninstall conflicting software: Temporarily disable or uninstall any recently installed or updated software that you suspect might be causing the problem.
- Update conflicting software: Make sure the conflicting software is up to date.
- Check compatibility settings: Some older software might not be fully compatible with your operating system. Try running the software in compatibility mode.
- Perform a clean boot: A clean boot starts Windows with a minimal set of drivers and startup programs. This can help you identify if a startup program is causing the audio problem.
7. Virus and Malware Infections: A Rare but Possible Cause
In rare cases, virus or malware infections can interfere with audio playback.
7.1 Scanning for Viruses and Malware
Run a full system scan using your antivirus software.
- Update Your Antivirus: Make sure your antivirus software is up to date with the latest virus definitions.
- Run a Full System Scan: Perform a full system scan to check for any malware infections.
- Remove Threats: If any threats are detected, follow the instructions provided by your antivirus software to remove them.
7.2 Using a Malware Removal Tool
Consider using a dedicated malware removal tool like Malwarebytes to scan for and remove malware.
- Download Malwarebytes: Download the free version of Malwarebytes from their website.
- Install Malwarebytes: Install the program on your computer.
- Run a Scan: Launch Malwarebytes and run a scan to check for malware.
- Remove Threats: Remove any detected threats.
8. BIOS Settings: An Advanced Check
In some cases, the audio settings in your computer’s BIOS (Basic Input/Output System) might be misconfigured.
8.1 Accessing BIOS Settings
The method for accessing BIOS settings varies depending on your computer’s manufacturer. Typically, you need to press a specific key (e.g., Delete, F2, F12, Esc) while the computer is booting up. Consult your computer’s manual or the manufacturer’s website for instructions.
8.2 Checking Audio Settings in BIOS
Once you’re in the BIOS settings, look for audio-related options. These might be located in the “Advanced,” “Integrated Peripherals,” or “Onboard Devices” sections.
- Enable Onboard Audio: Make sure the onboard audio is enabled.
- Check Audio Codec: Verify that the correct audio codec is selected.
- Reset to Default: If you’re unsure about the correct settings, try resetting the BIOS to its default configuration.
9. Hardware Failure: The Worst-Case Scenario
If you’ve tried all the software-based solutions and still have no sound, there’s a possibility that your audio hardware has failed.
9.1 Testing with External Audio Devices
If you’re using onboard audio, try testing with an external USB sound card or USB headphones. If the external device works, it suggests that the onboard audio is faulty.
9.2 Inspecting Audio Hardware
Visually inspect your sound card (if you have one) or the audio ports on your motherboard for any signs of damage.
9.3 Seeking Professional Help
If you suspect a hardware failure, it’s best to seek professional help from a qualified computer technician.
10. System Restore: Turning Back Time
If the audio problem started after making changes to your system, such as installing updates or new software, you can try using System Restore to revert your computer to a previous state.
10.1 Creating a System Restore Point
It’s always a good idea to create a system restore point before making significant changes to your system.
- Search for “Create a restore point”:
- Open System Properties:
- System Protection Tab: In the System Properties window, go to the “System Protection” tab.
- Create: Click the “Create” button to create a new restore point.
- Name: Give the restore point a descriptive name so you can easily identify it later.
- Create.
10.2 Restoring from a System Restore Point
- Search for “Recovery”:
- Open Recovery Options:
- System Restore.
- Choose a Restore Point: Follow the instructions to select a restore point. Choose a restore point that was created before you started experiencing the audio problem.
- Confirm Restore: Confirm that you want to restore your system to the selected restore point.
- Finish.
11. Specific Scenarios and Solutions
Let’s address some specific scenarios that can lead to sound problems.
11.1 No Sound After Windows Update
If your audio stopped working after installing a Windows update, the update might have caused a driver conflict or other issue.
- Roll Back Audio Driver: As described earlier, try rolling back your audio driver to the previous version.
- Uninstall Recent Updates: You can also try uninstalling the recent Windows update to see if it resolves the problem.
- System Restore: Use System Restore to revert your system to a point before the update was installed.
11.2 No Sound in a Specific Application
If you only have sound problems in a specific application, the issue might be related to the application’s settings or compatibility.
- Check Application Volume: Make sure the application’s volume is turned up in the Volume Mixer.
- Check Application Audio Settings: Look for audio settings within the application itself. Make sure the correct playback device is selected and that the volume is turned up.
- Reinstall the Application: Try reinstalling the application to see if it resolves the problem.
- Compatibility Mode: Run the application in compatibility mode for an earlier version of Windows.
11.3 No Sound from Headphones
If you’re not getting any sound from your headphones, but your speakers are working fine, the problem might be related to the headphone jack or the headphone settings.
- Check Headphone Connection: Make sure the headphones are securely plugged into the correct audio jack.
- Test with Different Headphones: Try testing with a different pair of headphones to rule out a faulty headset.
- Check Playback Device: In the Sound settings, make sure your headphones are selected as the default playback device when they are plugged in.
- Clean the Headphone Jack: Use a cotton swab or compressed air to clean the headphone jack.
12. Streetsounds.net: Your Audio Solution Partner
At streetsounds.net, we understand the importance of high-quality audio for your creative projects. Whether you’re a music producer, filmmaker, game designer, or street artist, we offer a vast library of street sound effects and urban soundscapes to enhance your work.
- Explore our extensive library: Find unique and high-quality sound effects to add authenticity and depth to your projects.
- Get inspired by urban sounds: Discover the rich tapestry of sounds that make up the urban environment and use them to fuel your creativity.
- Join our community: Connect with other audio enthusiasts and share your experiences and insights.
- Learn from the experts: Access tutorials and articles on sound recording, editing, and design.
FAQ: Addressing Common Questions About PC Sound Problems
Here are some frequently asked questions related to PC sound problems:
1. Why does my computer suddenly have no sound?
Answer: Several reasons can cause sudden sound loss, including driver issues, incorrect sound settings, hardware conflicts, or software problems. Start by checking the volume levels and playback device selection, then move on to troubleshooting drivers and other potential causes.
2. How do I update my audio drivers?
Answer: You can update your audio drivers through Device Manager by searching automatically for updated drivers or by downloading the latest drivers from the manufacturer’s website and installing them manually.
3. What is a sound driver, and why is it important?
Answer: A sound driver is software that allows your operating system to communicate with your audio hardware. It’s essential for proper audio playback and recording.
4. How do I fix the “No audio output device is installed” error?
Answer: This error usually indicates a problem with your audio driver or hardware. Try updating, reinstalling, or rolling back your audio driver. Also, check for hardware conflicts or physical damage to your audio device.
5. Why is my microphone not working?
Answer: Microphone problems can be caused by incorrect microphone settings, driver issues, or hardware problems. Make sure the correct microphone is selected as the input device in your sound settings, and that the volume is turned up.
6. How do I check if my sound card is working properly?
Answer: You can check if your sound card is working properly by using Device Manager to see if there are any errors or conflicts. You can also try testing with external audio devices to see if they work.
7. Why is the sound distorted or crackling?
Answer: Distorted or crackling sound can be caused by driver issues, hardware problems, or incorrect sound settings. Try updating your audio driver, disabling sound enhancements, or checking your speaker connections.
8. How do I reset my sound settings to default?
Answer: You can reset your sound settings to default by going to Sound settings, selecting your playback device, and clicking “Restore Defaults” (if available). You can also try resetting your computer’s BIOS settings to default.
9. Why is there no sound in my headphones but sound from my speakers?
Answer: This can be caused by incorrect playback device selection, a faulty headphone jack, or a problem with the headphones themselves. Make sure your headphones are selected as the default playback device when they are plugged in.
10. How can I prevent sound problems in the future?
Answer: To prevent sound problems in the future, keep your audio drivers up to date, avoid installing conflicting software, and create system restore points before making significant changes to your system.
Conclusion: Restoring Your Audio Experience
Experiencing sound issues on your PC can be frustrating, but by systematically working through these troubleshooting steps, you can identify and resolve the problem. Remember to start with the basics, check your drivers, and explore the various configuration options. If all else fails, consider seeking professional help or exploring streetsounds.net for alternative audio solutions to enhance your creative endeavors.
Ready to elevate your audio projects? Visit streetsounds.net today to discover a world of captivating street sound effects, connect with a vibrant community of audio enthusiasts, and unlock your creative potential.
Address: 726 Broadway, New York, NY 10003, United States
Phone: +1 (212) 998-8550
Website: streetsounds.net