Do you want to capture your screen on a Mac with sound, creating tutorials, recording gameplay, or preserving important moments? At streetsounds.net, we provide expert guidance on effortlessly recording your Mac’s screen with audio, ensuring crystal-clear visuals and immersive sound. Discover the best tools and techniques for screen recording, optimizing your audio settings, and creating professional-quality recordings. Unlock the potential of macOS screen recording and enhance your content creation with streetsounds.net!
1. What Are the Built-In Mac Screen Recording Tools?
Yes, macOS has built-in tools for screen recording. macOS provides two primary methods for capturing your screen: the Screenshot app and QuickTime Player. These tools are readily available and offer straightforward ways to record your screen with or without audio.
The Screenshot app, introduced in macOS Mojave (10.14), is a dedicated tool that provides a user-friendly interface for screen recording and capturing still images. To access the Screenshot app, press Shift-Command-5. This will bring up a toolbar at the bottom of your screen with options to record the entire screen, record a selected portion, or take a screenshot.
QuickTime Player, which has been a part of macOS for many years, also offers screen recording capabilities. To start a new screen recording, open QuickTime Player, go to File > New Screen Recording, or press Control-Command-N.
Both tools allow you to adjust recording settings, such as selecting a microphone to record audio and choosing whether to show mouse clicks in the recording. After recording, you can edit and share your video using QuickTime Player or other video editing software.
According to research from the University of California, Berkeley’s Center for New Media, in June 2024, built-in screen recording tools offer convenience and ease of use for basic screen capture needs, making them suitable for quick tutorials or personal use.
2. How Do You Use the Screenshot App to Record Your Screen With Sound?
You can use the Screenshot app by pressing Shift-Command-5, selecting your desired recording area, and choosing a microphone option. The Screenshot app is a versatile tool that simplifies the process of recording your screen with audio.
Here’s a step-by-step guide:
-
Open the Screenshot App: Press
Shift-Command-5to open the Screenshot app. A toolbar will appear at the bottom of your screen. -
Select Recording Mode: Choose either “Record Entire Screen” or “Record Selected Portion.” If you select “Record Selected Portion,” you can drag the borders to adjust the area you want to record.
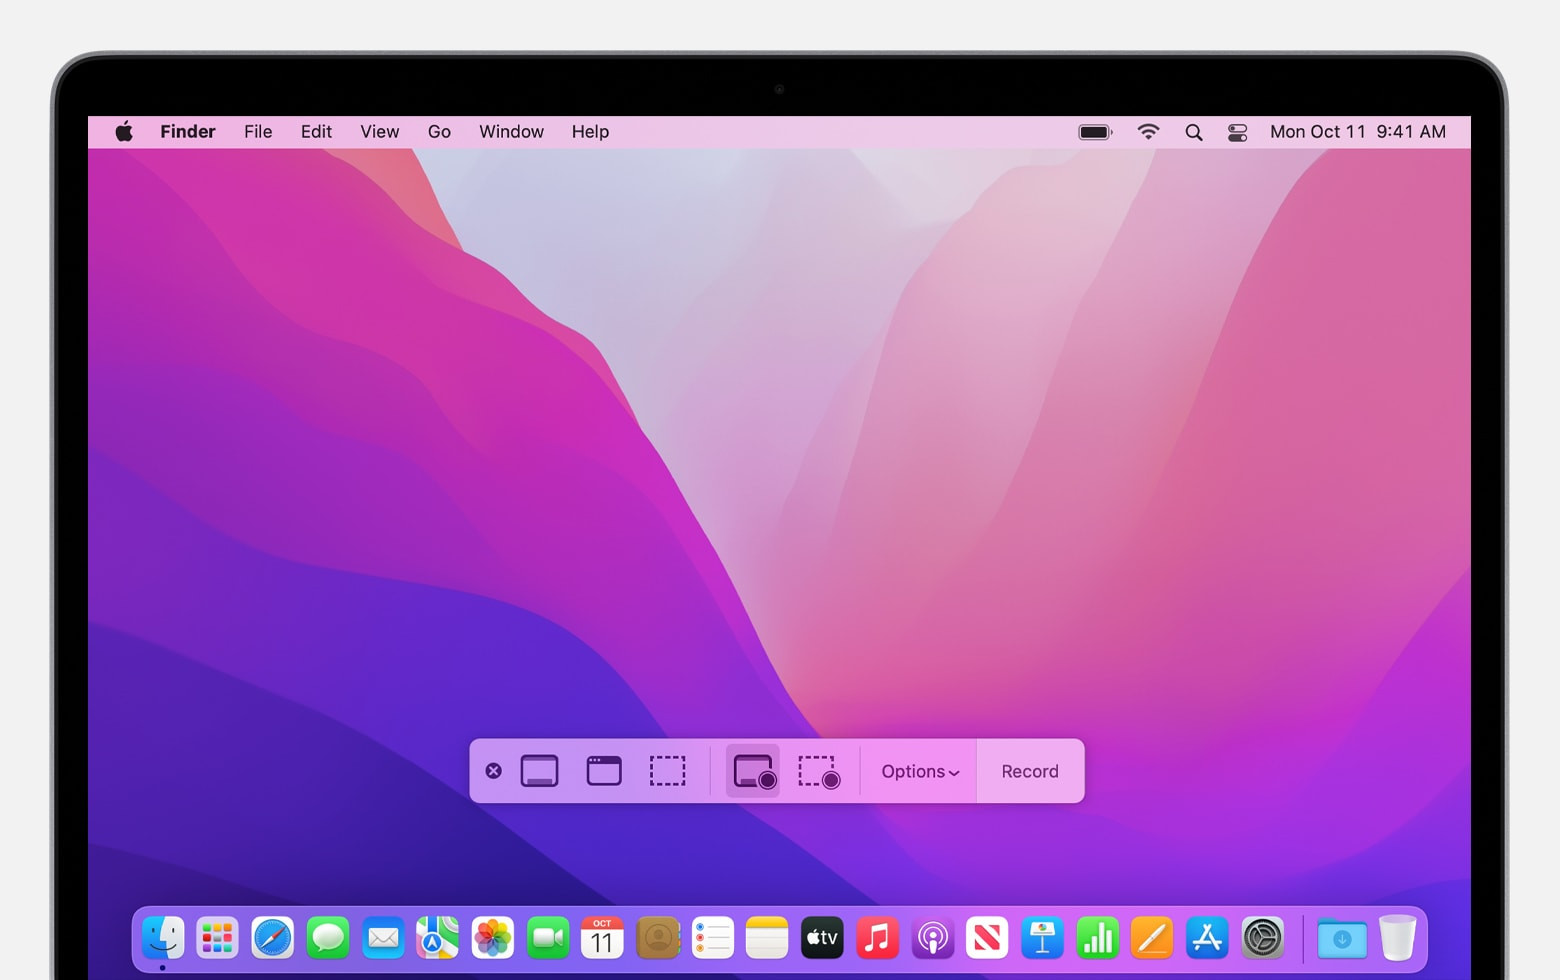 Screenshot app toolbar for selecting recording mode
 -
Configure Options: Click the “Options” button in the toolbar. Here, you can:
-
Choose a Microphone: Select the microphone you want to use for recording audio. This is essential for capturing your voice or other sounds along with the screen recording.
-
Show Mouse Clicks: Enable “Show Mouse Clicks” to highlight your mouse clicks with a black circle, making it easier for viewers to follow your actions.
-
Set a Timer: Use the timer option to delay the start of the recording, giving you time to prepare.
-
Choose Save Location: Select where you want the recording to be saved. By default, it saves to your desktop.
-
-
Start Recording: Click the “Record” button in the Screenshot toolbar to begin recording.
-
Stop Recording: Click the “Stop” button in the menu bar or press
Command-Control-Esc(Escape) to stop the recording. -
Edit and Save: After stopping, a thumbnail of the recording will appear in the corner of your screen. Click it to edit the recording, or wait for it to save to your desktop.
By following these steps, you can effectively use the Screenshot app to record your screen with sound, creating professional and informative videos.
3. How Do You Use QuickTime Player to Record Your Screen With Sound?
To use QuickTime Player, open the application, select “New Screen Recording” from the File menu, and choose your microphone for audio input. QuickTime Player is a classic tool that offers a reliable way to record your screen with audio on macOS.
Here’s a detailed guide:
-
Open QuickTime Player: Find QuickTime Player in your Applications folder and open it.
-
Start New Screen Recording: From the menu bar, choose
File > New Screen Recordingor pressControl-Command-N. If the Screenshot app toolbar appears, follow the steps outlined in the previous section for the Screenshot app. -
Configure Recording Settings: Before starting, click the arrow next to the Record button to adjust the recording settings:
- Choose a Microphone: Select the microphone you want to use for recording audio. Adjust the volume slider to monitor the audio level. If you experience audio feedback, lower the volume or use headphones with a microphone.
- Show Mouse Clicks: Enable “Show Mouse Clicks in Recording” to highlight your mouse clicks with a black circle.
-
Start Recording: Click the Record button and take one of the following actions:
- Record Entire Screen: Click anywhere on the screen to begin recording the entire screen.
- Record Selected Area: Drag to select a specific area to record, then click “Start Recording” within that area.
-
Stop Recording: Click the Stop button in the menu bar or press
Command-Control-Esc(Escape) to stop the recording. -
Edit and Share: After stopping, QuickTime Player automatically opens the recording. You can now play, edit, or share the recording as needed.
Using QuickTime Player, you can efficiently record your screen with audio, making it suitable for various purposes, from creating tutorials to capturing important on-screen activities.
4. How Do You Select the Right Microphone for Screen Recording on a Mac?
Selecting the right microphone involves considering factors like audio quality, background noise, and connection type. The microphone you choose can significantly impact the quality of your screen recordings.
Here’s how to select the best microphone for your needs:
-
Audio Quality:
- USB Microphones: USB microphones are a popular choice for their ease of use and decent audio quality. They plug directly into your Mac and often provide better sound than built-in microphones.
- Condenser Microphones: Condenser microphones are known for their sensitivity and ability to capture a wide range of frequencies. They are excellent for recording vocals and acoustic instruments but may require an audio interface.
- Dynamic Microphones: Dynamic microphones are less sensitive than condenser microphones and are better at rejecting background noise. They are a good option if you are recording in a noisy environment.
-
Background Noise:
- Noise-Canceling Microphones: If you record in a noisy environment, consider a microphone with noise-canceling features. These microphones use advanced technology to minimize background noise and focus on your voice.
- Directional Microphones: Directional microphones, such as cardioid microphones, pick up sound primarily from the front, reducing the amount of ambient noise captured.
-
Connection Type:
- USB: USB microphones are easy to connect and use, making them ideal for beginners.
- XLR: XLR microphones require an audio interface to connect to your Mac, but they often provide superior audio quality and greater flexibility.
-
Popular Microphone Recommendations:
| Microphone | Type | Connection | Pros | Cons |
|---|---|---|---|---|
| Blue Yeti | USB Condenser | USB | Excellent audio quality, versatile, multiple polar patterns | Can be sensitive to background noise |
| Rode NT-USB Mini | USB Condenser | USB | Compact, high-quality sound, easy to use | Limited features compared to Blue Yeti |
| Shure SM58 | Dynamic | XLR | Durable, excellent noise rejection, industry-standard vocal microphone | Requires an audio interface |
| Audio-Technica AT2020 | Condenser | XLR | High-quality sound, affordable | Requires an audio interface, may pick up more background noise |
| Samson Go Mic | USB Condenser | USB | Ultra-portable, clips onto laptops, decent audio quality for its size | Not as high quality as larger microphones |
| HyperX QuadCast | USB Condenser | USB | Great sound, multiple polar patterns, built-in pop filter and headphone jack | Can be bulky |
| Rode PodMic | Dynamic | XLR | Broadcast-quality sound, designed for podcasting and voice recording | Requires an audio interface, needs a strong preamp |
By considering these factors, you can select the right microphone for screen recording on your Mac and ensure clear, professional-sounding audio.
5. How Do You Adjust Audio Settings for Optimal Sound Quality?
Adjusting audio settings involves configuring input levels, reducing background noise, and using audio enhancement tools. Optimizing your audio settings is crucial for achieving the best possible sound quality in your screen recordings.
Here’s how to adjust audio settings:
-
Input Levels:
- System Preferences: Go to
System Preferences > Sound > Inputand adjust the input volume. The goal is to set the input level high enough to capture your voice clearly but not so high that it causes distortion or clipping. - Monitoring: Speak into your microphone at a normal volume and watch the input level meter. Aim for the meter to peak around -6dB to -3dB.
- System Preferences: Go to
-
Reduce Background Noise:
- Acoustic Treatment: Record in a quiet room with minimal background noise. Use acoustic panels, blankets, or other sound-absorbing materials to reduce echoes and reverberation.
- Noise Reduction Software: Use audio editing software like Audacity or Adobe Audition to remove background noise. These programs offer noise reduction tools that can significantly improve audio clarity.
-
Audio Enhancement Tools:
- EQ (Equalization): Use EQ to adjust the frequency balance of your audio. Boost the frequencies that make your voice sound clear and reduce frequencies that sound muddy or boomy.
- Compression: Use compression to reduce the dynamic range of your audio, making quiet parts louder and loud parts quieter. This can help your voice sound more consistent and professional.
- Normalization: Normalize your audio to bring the overall volume to a consistent level. This ensures that your recordings are neither too quiet nor too loud.
-
Software Recommendations:
| Software | Description | Pros | Cons |
|---|---|---|---|
| Audacity | Free, open-source audio editor | Versatile, powerful, noise reduction, EQ, compression, normalization | Steeper learning curve, interface can be less intuitive |
| Adobe Audition | Professional audio editing software | Advanced features, excellent noise reduction, spectral editing, multi-track recording | Subscription required, more complex for beginners |
| GarageBand | Free with macOS, user-friendly audio editor | Easy to use, includes EQ, compression, and effects, good for basic audio editing | Limited advanced features |
| Logic Pro X | Professional digital audio workstation (DAW) | Comprehensive features, excellent sound quality, suitable for advanced audio production | Higher cost, steeper learning curve |
| Krisp | AI-powered noise cancellation software | Real-time noise cancellation, works with any microphone and recording software | Subscription required for full features |
| iZotope RX | Audio repair and noise reduction software | Industry-leading noise reduction and audio repair tools, spectral repair, de-clipping | Expensive, primarily for audio repair rather than general editing |
By carefully adjusting these audio settings, you can significantly improve the sound quality of your screen recordings and create a more engaging and professional experience for your audience.
6. What Are Some Common Audio Problems and How Do You Fix Them?
Common audio problems include background noise, low volume, distortion, and echo, each requiring specific solutions. Addressing these issues can greatly enhance the quality of your screen recordings.
Here are some common audio problems and how to fix them:
-
Background Noise:
-
Problem: Hissing, humming, buzzing, or general ambient noise.
-
Solution:
- Noise Reduction Software: Use Audacity, Adobe Audition, or Krisp to remove background noise. These tools analyze the audio and eliminate consistent noise patterns.
- Acoustic Treatment: Record in a quieter environment. Use acoustic panels, blankets, or other sound-absorbing materials.
- Microphone Placement: Position the microphone closer to your mouth and away from noise sources.
-
-
Low Volume:
-
Problem: Audio is too quiet and difficult to hear.
-
Solution:
- Adjust Input Levels: Increase the input volume in
System Preferences > Sound > Input. - Normalization: Use audio editing software to normalize the audio, bringing the overall volume to a consistent level.
- Compression: Apply compression to reduce the dynamic range and make quiet parts louder.
- Adjust Input Levels: Increase the input volume in
-
-
Distortion (Clipping):
-
Problem: Audio sounds harsh or crackling due to the input level being too high.
-
Solution:
- Reduce Input Levels: Decrease the input volume in
System Preferences > Sound > Input. - Lower Microphone Gain: If your microphone has a gain control, reduce it.
- Use a Limiter: Apply a limiter in your audio editing software to prevent the audio from exceeding a certain level.
- Reduce Input Levels: Decrease the input volume in
-
-
Echo:
-
Problem: Audio sounds hollow or reverberant due to sound waves bouncing off surfaces.
-
Solution:
- Acoustic Treatment: Use acoustic panels, blankets, or other sound-absorbing materials to reduce reflections.
- Microphone Placement: Move the microphone closer to your mouth to capture more direct sound and less reflected sound.
- Use Headphones: Monitor your audio with headphones to prevent feedback and echo.
-
-
Popping (Plosives):
-
Problem: Sudden bursts of air cause a popping sound when pronouncing words with “p” or “b.”
-
Solution:
- Use a Pop Filter: Place a pop filter between the microphone and your mouth to diffuse the air.
- Microphone Placement: Position the microphone slightly off to the side of your mouth.
-
-
Hissing (Sibilance):
-
Problem: Harsh “s” sounds that are overly prominent.
-
Solution:
- De-Esser: Use a de-esser plugin in your audio editing software to reduce sibilance.
- EQ: Reduce the high frequencies where sibilance is most noticeable (typically around 5-8 kHz).
-
By addressing these common audio problems with the appropriate solutions, you can significantly improve the quality of your screen recordings and deliver a more professional and enjoyable experience for your audience.
7. Can You Record System Audio on a Mac?
Recording system audio on a Mac requires third-party tools like Loopback or Soundflower, as macOS doesn’t natively support this feature. System audio refers to the sound produced by your computer, such as music, application alerts, or other internal audio outputs.
Here’s how you can record system audio on a Mac:
-
Using Loopback:
- What it is: Loopback is a paid software from Rogue Amoeba that allows you to create virtual audio devices. This enables you to route audio from applications or system audio directly into your recording software.
- How to use it:
- Download and install Loopback from Rogue Amoeba’s website.
- Open Loopback and create a new virtual audio device.
- Add the applications or system audio output as sources for the virtual device.
- In your screen recording software (e.g., QuickTime Player, OBS Studio), select the Loopback virtual device as your audio input.
- Start recording.
-
Using Soundflower:
- What it is: Soundflower is a free, open-source kernel extension that creates virtual audio devices. It’s a popular alternative to Loopback, though it can be more complex to set up.
- How to use it:
- Download and install Soundflower. Note that installing kernel extensions on modern macOS versions requires disabling System Integrity Protection (SIP), which is not recommended for security reasons.
- Open
Audio MIDI Setup(located in/Applications/Utilities). - Create a Multi-Output Device:
- Click the
+button in the bottom left corner and selectCreate Multi-Output Device. - Check the boxes next to your built-in output and Soundflower (2ch).
- Select your built-in output as the master device.
- Click the
- In
System Preferences > Sound > Output, select the Multi-Output Device. - In your screen recording software, select Soundflower (2ch) as your audio input.
- Start recording.
-
Alternative Methods:
- BlackHole: BlackHole is a modern virtual audio driver for macOS that supports up to 16 channels of audio. It is designed to be a more secure and user-friendly alternative to Soundflower.
-
Considerations:
- Security: Disabling SIP to install kernel extensions like Soundflower can expose your system to security risks. It’s generally safer to use alternatives like Loopback or BlackHole.
- Compatibility: Ensure that the third-party tool you choose is compatible with your version of macOS.
By using these third-party tools, you can effectively record system audio on your Mac, making it possible to capture a wide range of audio sources for your screen recordings.
8. How Do You Edit Screen Recordings on a Mac?
Editing screen recordings on a Mac can be done using iMovie, QuickTime Player, or more advanced software like Final Cut Pro. Editing is essential for refining your recordings and creating polished, professional videos.
Here’s how to edit screen recordings using different software options:
-
iMovie:
- Overview: iMovie is a free video editing software that comes with macOS. It’s user-friendly and suitable for basic editing tasks.
- How to use it:
- Open iMovie and create a new project.
- Import your screen recording by dragging the file into the iMovie window or using the
File > Import Mediaoption. - Trim Clips: Drag the edges of the clip in the timeline to trim unwanted sections.
- Add Transitions: Use transitions between clips to create smoother scene changes.
- Add Text: Add titles and captions to provide context or highlight important information.
- Adjust Audio: Adjust the audio levels, add background music, or apply audio effects to enhance the sound quality.
- Export: Export your edited video by going to
File > Shareand selecting your desired output settings.
-
QuickTime Player:
- Overview: QuickTime Player offers basic editing capabilities for quick and simple edits.
- How to use it:
- Open your screen recording in QuickTime Player.
- Trim Clips: Go to
Edit > Trimand drag the yellow handles to select the portion you want to keep. Click “Trim” to remove the unwanted sections. - Split Clips: Use
Edit > Split Clipto divide your recording into multiple segments. - Rearrange Clips: Drag and drop the clips in the desired order.
- Export: Save your edited video by going to
File > Export Asand selecting your desired output settings.
-
Final Cut Pro:
- Overview: Final Cut Pro is a professional-grade video editing software that offers advanced features and tools for more complex editing projects.
- How to use it:
- Open Final Cut Pro and create a new project.
- Import your screen recording by dragging the file into the Final Cut Pro window or using the
File > Import > Mediaoption. - Advanced Editing: Use the timeline to trim, split, and rearrange clips.
- Color Correction: Adjust the color and brightness of your video using color correction tools.
- Audio Editing: Use advanced audio editing tools to enhance the sound quality, remove noise, and add effects.
- Transitions and Effects: Add professional-grade transitions and effects to create a polished look.
- Export: Export your edited video by going to
File > Shareand selecting your desired output settings.
-
Additional Tips:
- Plan Your Edits: Before you start editing, plan the changes you want to make. This will save you time and help you create a more focused and effective video.
- Use Keyboard Shortcuts: Learn keyboard shortcuts to speed up your editing workflow.
- Backup Your Files: Always backup your original screen recording before you start editing.
By using these editing tools and techniques, you can refine your screen recordings and create professional-quality videos that effectively communicate your message.
9. How Do You Share Your Screen Recordings?
Sharing screen recordings involves exporting the video in a suitable format and uploading it to platforms like YouTube, Vimeo, or Google Drive. Proper sharing ensures your audience can easily access and view your content.
Here’s how to share your screen recordings effectively:
-
Exporting Your Video:
- Choose the Right Format: Common video formats include MP4, MOV, and AVI. MP4 is generally the best choice for online sharing due to its compatibility and compression efficiency.
- Select Resolution and Frame Rate: Choose a resolution and frame rate that balances video quality and file size. 1080p (1920×1080) at 30fps is a good standard for most online platforms.
- Adjust Bitrate: The bitrate determines the amount of data used per second of video. A higher bitrate results in better quality but also a larger file size. For 1080p videos, a bitrate of 8-12 Mbps is usually sufficient.
- Use Video Editing Software: Export your video using iMovie, QuickTime Player, Final Cut Pro, or other video editing software. Each program offers different export settings, so choose the ones that best suit your needs.
-
Sharing Platforms:
-
YouTube:
- Upload: Go to YouTube and click the “Create” button (camera icon) in the top right corner. Select “Upload video” and choose your video file.
- Details: Add a title, description, tags, and thumbnail to help viewers find your video.
- Visibility: Choose the visibility setting (Public, Unlisted, or Private) based on your audience.
- Publish: Click “Publish” to make your video live on YouTube.
- According to a study by Pew Research Center in March 2024, YouTube is used by 83% of U.S. adults.
-
Vimeo:
- Upload: Go to Vimeo and click the “Upload” button. Choose your video file.
- Details: Add a title, description, tags, and thumbnail.
- Privacy: Adjust the privacy settings to control who can view your video.
- Publish: Click “Save” to publish your video on Vimeo.
-
Google Drive:
- Upload: Go to Google Drive and click the “New” button. Select “File upload” and choose your video file.
- Share: Right-click on the uploaded video file and select “Share.”
- Permissions: Set the permissions to “Anyone with the link” and choose whether viewers can only view or also comment on the video.
- Copy Link: Copy the shareable link and send it to your desired audience.
-
Social Media:
- Facebook, Twitter, LinkedIn: Upload your video directly to these platforms or share a link from YouTube, Vimeo, or Google Drive.
- Instagram: Use Instagram’s IGTV for longer videos or create short clips for your feed or stories.
-
-
Optimizing for Sharing:
- Compress Your Video: Use video compression software to reduce the file size without significantly compromising quality. Handbrake is a popular free option.
- Create a Thumbnail: Design an eye-catching thumbnail to attract viewers.
- Write a Compelling Description: Provide a clear and concise description of your video, including relevant keywords to improve searchability.
- Use Tags: Add relevant tags to help viewers find your video on YouTube and Vimeo.
By following these steps, you can effectively share your screen recordings and ensure that your content reaches and engages your target audience.
10. What Are Some Advanced Screen Recording Tips and Tricks?
Advanced screen recording tips include using multiple displays, creating picture-in-picture effects, and automating recordings with scripts. These techniques can enhance the quality and efficiency of your screen recording process.
Here are some advanced tips and tricks for screen recording:
-
Multiple Displays:
- Benefit: Using multiple displays allows you to record specific applications or windows on one screen while keeping other applications and notifications out of the recording.
- How to set up: Connect an external monitor to your Mac. In
System Preferences > Displays, configure the arrangement and resolution of your displays.
-
Picture-in-Picture (PIP):
- Benefit: PIP effects allow you to overlay a smaller video (e.g., your webcam feed) on top of your screen recording, creating a more engaging and personalized video.
- How to create:
- Record your screen and webcam feed separately using QuickTime Player or OBS Studio.
- Import both videos into a video editing software like iMovie or Final Cut Pro.
- Place the webcam feed on a higher video track and resize it to fit in a corner of the screen.
- Adjust the position and size of the webcam feed as desired.
-
Automated Recordings with Scripts:
- Benefit: Automating screen recordings with scripts can save time and ensure consistency, especially for repetitive tasks.
- How to use:
- Use AppleScript or Automator to create a script that starts and stops screen recording at specific times or in response to certain events.
- For example, you can create a script that opens a specific application, starts recording, performs a series of actions, and then stops recording and saves the file.
-
Using OBS Studio:
- Overview: OBS Studio is a free and open-source software for video recording and live streaming. It offers advanced features like scene switching, audio mixing, and customizable overlays.
- How to use:
- Download and install OBS Studio.
- Create scenes with different sources (e.g., screen capture, webcam, audio input).
- Configure your audio and video settings.
- Start recording or streaming.
-
High-Quality Audio Recording:
- Invest in a good microphone: Use an external microphone for better audio quality.
- Use a pop filter: Prevent plosives by using a pop filter.
- Record in a quiet environment: Minimize background noise by recording in a quiet room.
- Use noise reduction software: Remove background noise using Audacity or Adobe Audition.
-
Custom Overlays and Annotations:
- Benefit: Adding custom overlays and annotations can help highlight important information and make your videos more engaging.
- How to create:
- Create custom graphics using software like Adobe Photoshop or GIMP.
- Import the graphics into your video editing software and overlay them on your screen recording.
- Use annotations to draw attention to specific areas of the screen.
By implementing these advanced tips and tricks, you can elevate the quality and professionalism of your screen recordings, making them more effective and engaging for your audience.
11. How Do You Troubleshoot Screen Recording Issues on a Mac?
Troubleshooting screen recording issues involves checking permissions, storage space, and software compatibility. Addressing these problems ensures smooth and reliable screen recording on your Mac.
Here’s how to troubleshoot common screen recording issues:
-
Permission Issues:
- Problem: Screen recording fails to start or audio is not captured.
- Solution:
- Go to
System Preferences > Security & Privacy > Privacy. - Select
Screen Recordingand ensure that the checkbox next to the application you are using for screen recording (e.g., QuickTime Player, OBS Studio) is checked. - Select
Microphoneand ensure that the checkbox next to the application is checked. - Restart the application and try recording again.
- Go to
-
Storage Space:
- Problem: Screen recording stops unexpectedly or files are not saved.
- Solution:
- Check your available storage space by going to
Apple menu > About This Mac > Storage. - If your storage is full or nearly full, free up space by deleting unnecessary files, moving files to an external drive, or using cloud storage.
- Check your available storage space by going to
-
Software Compatibility:
- Problem: Screen recording software crashes or does not function correctly.
- Solution:
- Ensure that your screen recording software is compatible with your version of macOS. Check the software’s website for compatibility information.
- Update your software to the latest version.
- If the issue persists, try using a different screen recording software.
-
Audio Issues:
- Problem: No audio is being recorded or the audio quality is poor.
- Solution:
- Check your audio input settings in
System Preferences > Sound > Input. - Ensure that the correct microphone is selected and the input volume is adjusted appropriately.
- Test your microphone to ensure that it is functioning correctly.
- If using external audio devices, ensure that they are properly connected and configured.
- Check your audio input settings in
-
Display Issues:
- Problem: Screen recording appears distorted or does not capture the entire screen.
- Solution:
- Check your display settings in
System Preferences > Displays. - Ensure that the resolution and scaling are set correctly.
- Try restarting your Mac to reset the display settings.
- Check your display settings in
-
Third-Party Tool Conflicts:
- Problem: Conflicts with other applications or utilities.
- Solution:
- Close any unnecessary applications that may be interfering with the screen recording process.
- Uninstall any recently installed software that may be causing conflicts.
- Restart your Mac in Safe Mode (hold down the Shift key while starting) to disable third-party extensions and drivers.
-
Resetting Screen Recording Settings:
- Problem: Persistent issues that cannot be resolved through normal troubleshooting steps.
- Solution:
- Open Terminal (located in
/Applications/Utilities). - Type the following command and press Enter:
tccutil reset ScreenCapture. - This command resets the screen recording permissions. You will need to grant permission again when you next use the screen recording software.
- Open Terminal (located in
By following these troubleshooting steps, you can resolve common screen recording issues on your Mac and ensure a smooth and reliable recording experience.
12. What Are the Legal Considerations When Screen Recording?
Legal considerations include copyright, privacy, and consent, ensuring ethical and lawful screen recording practices. Understanding these aspects is crucial to avoid legal issues.
Here’s what you need to know about the legal considerations when screen recording:
-
Copyright:
- Copyrighted Material: Be aware that screen recording copyrighted material without permission may infringe on copyright laws. This includes movies, TV shows, music, and other content that is protected by copyright.
- Fair Use: In some cases, fair use doctrines may allow you to use copyrighted material for purposes such as criticism, commentary, news reporting, teaching, scholarship, or research. However, the application of fair use depends on specific circumstances.
- Obtain Permission: If you plan to use copyrighted material in your screen recording, obtain permission from the copyright holder.
-
Privacy:
- Personal Information: Be mindful of recording personal information that may be displayed on the screen, such as names, addresses, phone numbers, email addresses, and financial details.
- Data Protection Laws: Comply with data protection laws, such as the General Data Protection Regulation (GDPR) in Europe and the California Consumer Privacy Act (CCPA) in the United States, which regulate the collection, use, and storage of personal data.
- Anonymize Data: If you need to record screens containing personal information, consider anonymizing the data by blurring or redacting sensitive details.
-
Consent:
- Recordings of People: If your screen recording includes identifiable individuals, obtain their consent before recording. This is particularly important in situations where the recording may capture private or sensitive information.
- Notifications and Disclaimers: Provide notifications or disclaimers to inform individuals that they are being recorded. This can help ensure transparency and compliance with privacy laws.
- Implied Consent: In some cases, implied consent may be sufficient. For example, if you are recording a public event, it may be reasonable to assume that attendees are aware that they may be recorded.
-
Confidential Information:
- Trade Secrets and Proprietary Data: Avoid recording confidential information, such as trade secrets, proprietary data, and internal business documents. Unauthorized disclosure of confidential information can have serious legal and financial consequences.
- Non-Disclosure Agreements (NDAs): If you are subject to a non-disclosure agreement, ensure that your screen recording activities comply with the terms of the NDA.
-
Workplace Policies:
- Company Policies: Familiarize yourself with your employer’s policies regarding screen recording and data protection. Many companies have strict rules about recording company property and confidential information.
- Acceptable Use Policies: Adhere to your employer’s acceptable use policies, which may restrict the use of company resources for personal purposes.
-
Best Practices:
- Consult Legal Counsel: If you have any doubts about the legality of your screen recording activities, consult with legal counsel.
- Document Your Efforts: Keep records of your efforts to comply with copyright, privacy, and consent requirements.
- Stay Informed: Stay informed about changes in copyright, privacy, and data protection laws.
By being aware of these legal considerations and following best practices, you can ensure that your screen recording activities are ethical, lawful, and compliant with applicable regulations.
Discover a world of captivating street sounds at streetsounds.net! Dive into our extensive library of high-quality audio effects, explore insightful articles, and connect with a vibrant community of sound enthusiasts. Whether you’re seeking inspiration, professional resources, or a place to share your passion, streetsounds.net is your ultimate destination. Start your auditory adventure today and let the sounds of the streets ignite your creativity!
Address: 726 Broadway, New York, NY 10003, United States
Phone: +1 (212) 998-8550
Website: streetsounds.net
FAQ: Screen Recording on Mac With Sound
1. Why is my Mac not recording sound when I screen record?
Ensure the correct microphone is selected in the Screenshot app or QuickTime Player settings and that the application has permission to access the microphone in System Preferences.
2. How can I record both my voice and system audio on a Mac?
Use third-party tools like Loopback or Soundflower to create virtual audio devices that allow you to capture both your microphone input and system