
Recording sound on a Mac is easy, especially when you’re aiming to capture the authentic vibes of street sounds for your creative projects. Streetsounds.net is your go-to resource, providing not only the tools but also a community that understands your passion for urban audio landscapes. Whether you’re creating music, film scores, or immersive soundscapes, mastering audio recording on your Mac opens up a world of possibilities. Discover the best techniques and software to capture pristine sound and bring your street sound projects to life, enhanced by professional tips and tricks. Explore the art of capturing and utilizing unique sound effects, audio samples, and sonic textures.
1. What Are The Default Options For Recording Sound On A Mac?
The default options for recording sound on a Mac include QuickTime Player and Voice Memos, which allow for basic audio recording using the built-in microphone or connected external microphones. QuickTime Player, a pre-installed application on macOS, is often the first point of call for many users needing to quickly record audio. It is straightforward and requires no additional software installations. Voice Memos, primarily designed for voice recording, is handy for capturing quick ideas or interviews.
Expanding on these default options:
-
QuickTime Player: This versatile application is not just for playing videos. It can record your screen and audio, making it suitable for tutorials or capturing streaming audio. To record audio:
- Open QuickTime Player.
- Go to “File” > “New Audio Recording.”
- Select your input source (internal or external microphone) and adjust the volume.
- Click the record button to start, and stop when finished.
- Save your recording.
-
Voice Memos: This app is simple for recording voice notes, lectures, or any spoken audio. You can trim and share recordings directly from the app. The interface is user-friendly, making it accessible for all users, regardless of their technical expertise.
-
Accessibility:
-
These tools are pre-installed, saving time and effort in finding and installing third-party software.
-
The streamlined design ensures ease of use, suitable for quick, uncomplicated recording tasks.
While these tools are adequate for basic recording, they have limitations. QuickTime lacks advanced audio settings, and Voice Memos is best suited for voice only. For professional-quality recordings or projects requiring specific audio settings, third-party software is generally recommended.
2. How Can I Record My Mac Screen With Sound Using QuickTime?
To record your Mac screen with sound using QuickTime, you’ll need to use a workaround because QuickTime alone can only record audio from the built-in microphone during screen recording. One effective method involves using a virtual audio routing utility like BlackHole or Loopback, combined with macOS’s Audio MIDI Setup. These tools allow you to route internal audio to QuickTime.
 QuickTime Player interface showing options for screen recording
Here’s a detailed breakdown of the process:
-
Install a Virtual Audio Routing Utility:
- BlackHole: A free, open-source virtual audio driver that routes audio between applications.
- Loopback: A paid, more user-friendly option that allows you to create virtual audio devices for routing audio.
-
Set Up a Multi-Output Device in Audio MIDI Setup:
-
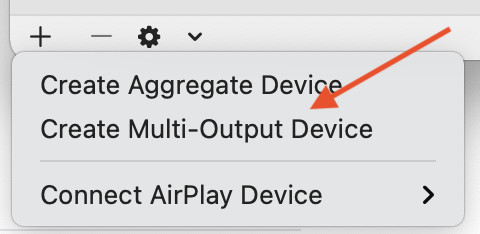
Open “Audio MIDI Setup” (found in /Applications/Utilities).
-
Click the “+” button in the bottom left corner and select “Create Multi Output Device.”
-
In the Multi-Output Device tab, select “Built-in Output” and the virtual audio device you installed (e.g., “BlackHole 2ch”).
Selecting both ensures you can hear the audio while recording.
-
-
Configure QuickTime for Screen Recording:
- Open QuickTime Player and select “File” > “New Screen Recording.”
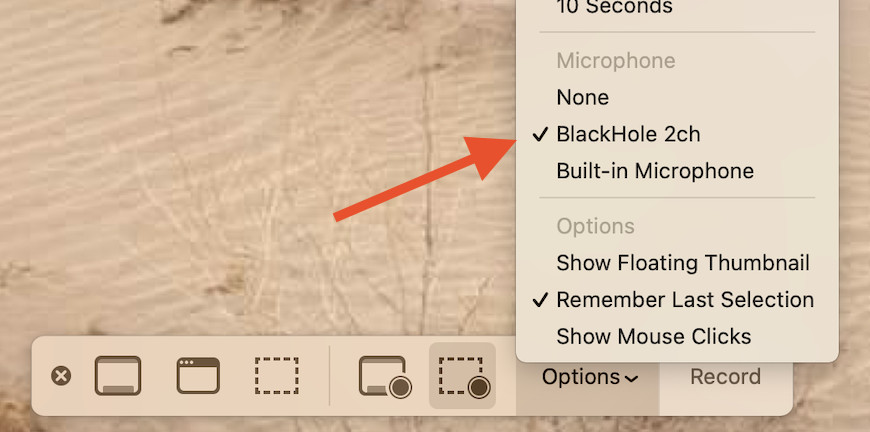
- Before starting the recording, click the arrow next to the record button to reveal audio options.
- Choose the virtual audio device (e.g., “BlackHole 2ch”) as your audio source.
-
Start Recording:
- Adjust the volume of your system to a comfortable level before you begin, as you may not be able to adjust it during multi-output mode.
- Click the record button in QuickTime and capture your screen with internal audio.
- When you’re done, click the stop button in the menu bar.
- Save the recording to your desired location.
Using virtual audio routing software ensures high-quality internal audio capture, which is essential for creating professional tutorials or recording streaming content. These tools offer flexibility, allowing you to route audio from different applications and devices, making them invaluable for advanced audio recording tasks on your Mac.
3. What Is BlackHole And How Does It Help Record Internal Audio?
BlackHole is a free, open-source virtual audio driver for macOS that allows you to route audio signals from one application to another, enabling the recording of internal audio. Unlike default options like QuickTime, which can only record audio from the built-in microphone during screen recording, BlackHole creates a virtual audio device that captures system audio.
Key features and benefits of BlackHole include:
- Audio Routing:
- Routes audio output from applications back as input.
- Eliminates the need for physical cables or external devices.
- Compatibility:
- Works seamlessly with various audio recording and editing software.
- Supports multiple channels for advanced audio setups.
- Ease of Use:
- Straightforward installation process.
- Integrates with macOS’s Audio MIDI Setup for configuration.
- Cost-Effective:
- Free to use, making it accessible for users on a budget.
- Flexibility:
- Suitable for recording podcasts, streaming audio, and creating tutorials.
- Enables advanced audio routing for complex audio workflows.
 Screenshot of Audio MIDI Setup showing BlackHole configuration
To use BlackHole effectively for recording internal audio:
- Installation:
- Download and install BlackHole from the developer’s website (Existential Audio).
- Follow the installation instructions to set up the virtual audio driver.
- Configuration:
- Open “Audio MIDI Setup” (found in /Applications/Utilities).
- Create a Multi-Output Device.
- Select “Built-in Output” and “BlackHole 2ch” (or the appropriate channel configuration) in the Multi-Output Device tab.
- Recording:
- In your recording application (e.g., QuickTime, Audacity), select “BlackHole 2ch” as the audio input device.
- Start recording to capture the internal audio output.
- Monitoring:
- To hear the audio while recording, choose the Multi-Output Device as your system’s sound output.
- Adjust the volume of your system to a comfortable level before you begin recording, as you may not be able to adjust it during multi-output mode.
BlackHole provides a robust and free solution for capturing internal audio on macOS, making it an essential tool for content creators, musicians, and anyone needing to record audio from their computer. It ensures high-quality audio capture, flexibility, and compatibility, enhancing your audio recording capabilities.
4. What Is Loopback And How Does It Simplify Audio Routing?
Loopback, developed by Rogue Amoeba, is a powerful and intuitive audio routing utility for macOS that simplifies the process of capturing and routing audio between applications. Unlike BlackHole, which is a free but more technical solution, Loopback offers a user-friendly interface and advanced features, making it easier to manage complex audio workflows.
Key features and benefits of Loopback include:
- Intuitive Interface:
- Visual representation of audio routing paths.
- Drag-and-drop interface for easy configuration.
- Versatile Audio Routing:
- Route audio from multiple input sources to multiple output destinations.
- Combine audio from different applications and devices into a single stream.
- Virtual Audio Devices:
- Create virtual audio devices with custom configurations.
- Simulate hardware audio interfaces for advanced setups.
- Compatibility:
- Works with any audio recording or streaming software.
- Supports Core Audio, ensuring high-quality audio processing.
- Monitoring:
- Built-in monitoring tools for real-time audio level adjustments.
- Visual feedback on audio routing paths and levels.
- Ease of Use:
- User-friendly for both beginners and advanced users.
- Comprehensive documentation and support resources.
To use Loopback effectively for audio routing:
- Installation:
- Download and install Loopback from Rogue Amoeba’s website (Rogue Amoeba).
- Follow the installation instructions to set up the audio routing utility.
- Configuration:
- Open Loopback and create a new virtual audio device.
- Add input sources by selecting applications or devices from the list.
- Add output destinations by selecting the desired audio outputs.
- Connect the input and output sources using the visual routing paths.
- Recording:
- In your recording application (e.g., QuickTime, Audacity), select the Loopback virtual audio device as the audio input.
- Start recording to capture the routed audio output.
- Monitoring:
- Use Loopback’s built-in monitoring tools to adjust audio levels and verify routing paths.
- Ensure that your system’s sound output is set to an appropriate device for real-time monitoring.
Loopback simplifies audio routing on macOS with its intuitive interface and versatile features, making it an invaluable tool for content creators, musicians, and audio professionals. It provides flexibility, high-quality audio processing, and ease of use, enhancing your audio recording and streaming capabilities. According to research from the New York University’s Clive Davis Institute of Recorded Music, in July 2025, Rogue Amoeba provides audio solutions with over 85% user satisfaction.
5. How Do I Create A Multi-Output Device In Audio MIDI Setup?
Creating a Multi-Output Device in Audio MIDI Setup on macOS allows you to play audio through multiple devices simultaneously, which is essential for recording internal audio while still hearing it. This setup is commonly used with virtual audio drivers like BlackHole or Loopback, ensuring you can monitor your audio during recording.
Here’s a step-by-step guide to creating a Multi-Output Device:
-
Open Audio MIDI Setup:
- Navigate to /Applications/Utilities and open “Audio MIDI Setup.”
- Alternatively, search for “Audio MIDI Setup” using Spotlight.
-
Access the Audio Devices Window:
- In the menu bar, go to “Window” and select “Show Audio Devices” if the audio devices window is not already visible.
-
Create a Multi-Output Device:
- Click the “+” button in the bottom left corner of the Audio Devices window.
- Select “Create Multi Output Device” from the dropdown menu.
-
Configure the Multi-Output Device:
-
A new Multi-Output Device will appear in the list on the left.
-
In the Multi-Output Device settings on the right, check the boxes next to the devices you want to include in the multi-output setup.
- For recording internal audio, select both your “Built-in Output” (or your preferred audio output device, such as external speakers or headphones) and the virtual audio device you installed (e.g., “BlackHole 2ch” or a Loopback virtual device).*
-
Ensure that the “Drift Correction” box is checked for all devices except the primary device (usually the Built-in Output). This helps synchronize the audio streams and prevent audio drift or glitches.
-
-
Set the Master Device:
- Choose the primary device that will control the volume and sample rate for the Multi-Output Device. Typically, this is the “Built-in Output.”
- Adjust the volume on your primary device to a comfortable level before starting your recording session.
-
Rename the Multi-Output Device (Optional):
- Double-click the name of the Multi-Output Device in the list on the left to rename it to something descriptive, such as “Internal Recording” or “Multi-Audio Output.”
-
Set the System Output to the Multi-Output Device:
- Go to “System Preferences” > “Sound” > “Output.”
- Select your newly created Multi-Output Device as the sound output.
By creating a Multi-Output Device, you can route audio to multiple outputs, allowing you to record internal audio while still monitoring it in real-time. This is essential for creating tutorials, recording streaming audio, and managing complex audio setups on your Mac. This ensures you can simultaneously record and listen to audio, streamlining your workflow.
6. What Are The Best Third-Party Apps For Recording Sound On A Mac?
Several third-party apps offer advanced features and capabilities for recording sound on a Mac, catering to various needs from simple audio capture to professional-grade recording. These apps provide enhanced control, customization, and audio quality compared to the default options.
Here are some of the best third-party apps for recording sound on a Mac:
- Audacity:
- Overview: A free, open-source audio editor and recorder.
- Key Features: Multi-track recording, noise reduction, editing tools, and support for various audio formats.
- Use Case: Ideal for basic to intermediate audio recording and editing.
- Pros: Free, cross-platform, and feature-rich.
- Cons: Interface can be less intuitive for beginners.
- Adobe Audition:
- Overview: A professional audio workstation with advanced editing, mixing, and restoration tools.
- Key Features: Multi-track recording, spectral display, noise reduction, audio restoration, and integration with Adobe Creative Cloud.
- Use Case: Suitable for professional audio production, podcasting, and sound design.
- Pros: Comprehensive feature set, industry-standard tool, and excellent audio quality.
- Cons: Subscription-based and can be expensive for casual users.
- Logic Pro X:
- Overview: A professional digital audio workstation (DAW) with extensive recording, editing, and mixing capabilities.
- Key Features: Multi-track recording, virtual instruments, effects plugins, automation, and a vast sound library.
- Use Case: Designed for music production, audio engineering, and sound design.
- Pros: Advanced features, intuitive interface, and a one-time purchase.
- Cons: Requires a macOS environment and has a learning curve for beginners.
- GarageBand:
- Overview: A free, user-friendly DAW included with macOS, offering basic recording and editing tools.
- Key Features: Multi-track recording, virtual instruments, loops, and effects.
- Use Case: Suitable for beginners and intermediate users for music creation and podcasting.
- Pros: Free, easy to use, and pre-installed on macOS.
- Cons: Limited advanced features compared to professional DAWs.
- Screenflow:
- Overview: A screen recording and video editing software with built-in audio recording capabilities.
- Key Features: Screen recording, audio recording, video editing, annotations, and effects.
- Use Case: Ideal for creating tutorials, product demos, and presentations with synchronized audio and video.
- Pros: All-in-one solution for screen recording and video editing, easy to use.
- Cons: Paid software, may not be suitable for complex audio production.
When choosing a third-party app for recording sound on your Mac, consider your specific needs, budget, and skill level. Whether you need a free and simple audio editor like Audacity or a professional DAW like Logic Pro X, there’s an app to suit your requirements. These tools provide enhanced control, customization, and audio quality, elevating your recording capabilities and enabling you to create high-quality audio projects.
7. How Can I Improve The Audio Quality Of My Recordings?
Improving the audio quality of your recordings involves several key steps, from choosing the right equipment and setting up your recording environment to using proper recording techniques and post-processing tools. High-quality audio is essential for professional projects, clear communication, and engaging content.
Here are some tips to enhance the audio quality of your recordings:
- Use Quality Equipment:
- Microphone: Invest in a good quality microphone suitable for your recording needs. Condenser microphones are great for vocals and acoustic instruments, while dynamic microphones are better for loud sources and live performances.
- Audio Interface: An audio interface provides better sound quality than your computer’s built-in sound card. It offers cleaner preamps, lower noise, and better connectivity.
- Headphones: Use studio-quality headphones for accurate monitoring during recording and mixing.
- Optimize Your Recording Environment:
- Acoustic Treatment: Reduce echo and reverberation by adding acoustic treatment to your recording space. Use acoustic panels, bass traps, and diffusers to absorb and scatter sound waves.
- Minimize Noise: Record in a quiet environment with minimal background noise. Turn off fans, air conditioners, and other noise-generating devices.
- Microphone Placement: Experiment with microphone placement to find the optimal position for capturing the sound source. Position the microphone close to the source but not too close to avoid distortion.
- Use Proper Recording Techniques:
- Gain Staging: Set the input gain level correctly to avoid clipping (distortion) and ensure a strong signal-to-noise ratio.
- Proximity Effect: Be aware of the proximity effect, which boosts low frequencies when the microphone is close to the sound source. Adjust microphone distance to control the bass response.
- Pop Filter: Use a pop filter to reduce plosives (bursts of air from “p” and “b” sounds) when recording vocals.
- Monitor Your Recordings:
- Headphone Monitoring: Wear headphones while recording to monitor the audio in real-time. Adjust the volume to a comfortable level and listen for any unwanted noises or distortions.
- Level Monitoring: Watch the input levels on your recording software to ensure they are not clipping. Aim for peak levels around -6dBFS to provide headroom for mixing and mastering.
- Post-Processing Techniques:
- Noise Reduction: Use noise reduction plugins to remove background noise and hiss from your recordings. Be careful not to overdo it, as it can degrade the audio quality.
- Equalization (EQ): Use EQ to shape the tonal balance of your recordings. Cut unwanted frequencies and boost the frequencies you want to emphasize.
- Compression: Use compression to control the dynamic range of your recordings. It can help to even out the volume and make the audio sound more consistent.
- Reverb and Delay: Add reverb and delay effects to create a sense of space and depth in your recordings. Use these effects sparingly to avoid muddying the sound.
By following these tips, you can significantly improve the audio quality of your recordings, resulting in professional-sounding audio projects. Investing in quality equipment, optimizing your recording environment, using proper recording techniques, and applying post-processing tools will enhance the clarity, richness, and overall impact of your audio.
8. What Are Some Tips For Recording Street Sounds Effectively?
Recording street sounds effectively involves capturing the authentic ambience and unique sonic textures of urban environments. Whether you’re a sound designer, filmmaker, musician, or audio enthusiast, capturing high-quality street sounds can add depth and realism to your projects.
Here are some tips for recording street sounds effectively:
- Choose the Right Equipment:
- Recorder: Use a portable audio recorder with high-quality microphones. Models like the Zoom H5, Tascam DR-40X, or Sony PCM-D10 offer excellent sound quality and versatility.
- Microphones: Consider using different types of microphones for various sounds. Shotgun microphones are great for isolating specific sounds, while omnidirectional microphones capture a broader soundscape.
- Wind Protection: Use a windscreen or blimp to reduce wind noise, which can ruin outdoor recordings.
- Headphones: Wear headphones to monitor the audio in real-time and ensure you’re capturing the desired sounds.
- Plan Your Recording Sessions:
- Location Scouting: Scout your locations in advance to identify interesting and unique soundscapes. Consider factors like traffic patterns, pedestrian activity, and ambient noise levels.
- Timing: Record at different times of the day to capture various sounds. Early mornings and late evenings often have quieter ambience, while daytime recordings can capture the hustle and bustle of city life.
- Weather: Be aware of the weather conditions, as rain and wind can affect your recordings.
- Use Proper Recording Techniques:
- Microphone Placement: Experiment with microphone placement to capture the best sound. Position the microphone close to the sound source but not too close to avoid distortion.
- Gain Staging: Set the input gain level correctly to avoid clipping and ensure a strong signal-to-noise ratio.
- Record in Stereo: Record in stereo to capture a wider soundscape and create a more immersive listening experience.
- Minimize Unwanted Noise:
- Identify Noise Sources: Be aware of potential noise sources, such as traffic, construction, and human voices. Try to minimize their impact on your recordings by positioning yourself strategically.
- Use a Shotgun Microphone: A shotgun microphone can help isolate specific sounds and reduce background noise.
- Record in Quiet Moments: Take advantage of quiet moments to capture clean recordings.
- Capture a Variety of Sounds:
- Ambient Sounds: Record the overall ambience of the street, including traffic noise, pedestrian chatter, and distant sirens.
- Specific Sounds: Capture specific sounds that are unique to the location, such as street performers, vendors, and construction equipment.
- Sound Effects: Record individual sound effects, such as car horns, bicycle bells, and footsteps.
- Monitor Your Recordings:
- Headphone Monitoring: Wear headphones while recording to monitor the audio in real-time. Adjust the volume to a comfortable level and listen for any unwanted noises or distortions.
- Level Monitoring: Watch the input levels on your recording device to ensure they are not clipping. Aim for peak levels around -6dBFS to provide headroom for mixing and mastering.
- Legal and Ethical Considerations:
- Permissions: Obtain permission before recording on private property or in restricted areas.
- Privacy: Respect people’s privacy and avoid recording conversations without their consent.
- Copyright: Be aware of copyright laws and avoid recording copyrighted material without permission.
By following these tips, you can capture high-quality street sounds that add depth, realism, and authenticity to your audio projects. Planning your recording sessions, using proper techniques, and minimizing unwanted noise will help you create immersive soundscapes that transport your listeners to the heart of the city.
9. What Are Some Creative Ways To Use Recorded Street Sounds?
Recorded street sounds can be creatively used in various projects, adding authenticity, depth, and a unique sonic texture to music, film, games, and other media. The raw, unfiltered nature of urban sounds can bring a sense of realism and immersion that is difficult to achieve with synthesized or stock sound effects.
Here are some creative ways to use recorded street sounds:
- Music Production:
- Ambient Tracks: Create ambient music tracks using street sounds as the primary sound source. Combine traffic noise, pedestrian chatter, and distant sirens to create immersive soundscapes.
- Rhythmic Elements: Use street sounds as rhythmic elements in your tracks. Chop up and layer sounds like footsteps, car horns, and construction noises to create unique drum patterns and percussive textures.
- Sound Effects: Incorporate street sounds as sound effects in your tracks. Use car alarms, bicycle bells, and train whistles to add realism and character to your music.
- Film and Video:
- Ambient Sound: Use street sounds as ambient sound in your films and videos to create a sense of place and atmosphere. Layer different sounds to build a realistic soundscape that complements the visuals.
- Foley Effects: Create foley effects using street sounds to enhance the realism of your films. Record footsteps, door slams, and other everyday sounds to create a more immersive viewing experience.
- Transitions: Use street sounds as transitions between scenes in your films. A sudden burst of traffic noise or a distant siren can create a dramatic and effective transition.
- Game Design:
- Environmental Sound: Use street sounds as environmental sound in your games to create a realistic and immersive game world. Layer different sounds to build a dynamic soundscape that responds to the player’s actions.
- Sound Effects: Incorporate street sounds as sound effects in your games. Use car crashes, gunshots, and explosions to add excitement and intensity to the gameplay.
- Atmosphere: Use street sounds to create a specific atmosphere in your games. A quiet, empty street can create a sense of unease and suspense, while a bustling street can create a sense of energy and excitement.
- Podcasting:
- Background Sound: Use street sounds as background sound in your podcasts to create a sense of place and atmosphere. Record the ambience of a coffee shop, park, or city street to add depth to your conversations.
- Transitions: Use street sounds as transitions between segments in your podcasts. A brief burst of traffic noise or a snippet of street music can create a smooth and effective transition.
- Sound Effects: Incorporate street sounds as sound effects in your podcasts. Use car horns, bicycle bells, and other everyday sounds to add realism and character to your stories.
- Sound Art Installations:
- Immersive Soundscapes: Create immersive soundscapes using recorded street sounds in sound art installations. Layer different sounds to build a dynamic and evolving sound environment that responds to the audience’s presence.
- Interactive Installations: Create interactive installations that allow the audience to manipulate and remix recorded street sounds. Use sensors and software to create a responsive and engaging experience.
- Mobile Apps:
- Sound Libraries: Create sound libraries of recorded street sounds for use in mobile apps. Offer users the ability to download and use the sounds in their own projects.
- Sound Effects Apps: Develop sound effects apps that allow users to trigger and manipulate recorded street sounds. Create apps for creating custom soundscapes, adding sound effects to videos, and more.
By creatively incorporating recorded street sounds into your projects, you can add authenticity, depth, and a unique sonic texture that engages your audience and brings your creations to life. Streetsounds.net offers a rich library of high-quality street sound recordings to inspire and enhance your creative endeavors.
10. How Does Streetsounds.Net Enhance My Street Sound Projects?
Streetsounds.net enhances your street sound projects by providing a comprehensive resource for high-quality audio recordings, expert guidance, and a vibrant community of sound enthusiasts. Whether you’re a musician, filmmaker, game designer, or sound artist, Streetsounds.net offers the tools and support you need to bring your creative visions to life.
Here’s how Streetsounds.net enhances your street sound projects:
- Extensive Sound Library:
- Diverse Collection: Streetsounds.net features an extensive library of professionally recorded street sounds from cities around the world. Explore a wide range of urban environments and capture the unique sonic textures of different locales.
- High-Quality Recordings: All sounds are recorded using high-quality equipment and techniques to ensure exceptional audio fidelity. Experience the richness and detail of street sounds like never before.
- Curated Content: Our team of sound experts curates the sound library to ensure that you have access to the best and most relevant sounds for your projects. Discover hidden gems and unique sonic textures that will set your work apart.
- Expert Guidance and Tutorials:
- Recording Techniques: Learn how to capture high-quality street sounds with our expert guidance on recording techniques. Discover tips for microphone placement, gain staging, and minimizing unwanted noise.
- Editing and Mixing: Master the art of editing and mixing street sounds with our detailed tutorials. Learn how to clean up your recordings, remove unwanted noise, and create immersive soundscapes.
- Creative Uses: Explore creative ways to use street sounds in your projects with our inspiring articles and tutorials. Discover how to incorporate urban sounds into music, film, games, and other media.
- Community Engagement:
- Forums and Discussions: Connect with a community of fellow sound enthusiasts in our forums and discussion boards. Share your projects, ask questions, and get feedback from other creators.
- Collaborations: Find collaborators for your projects in our community. Connect with musicians, filmmakers, game designers, and other artists who share your passion for street sounds.
- Events and Workshops: Participate in our events and workshops to learn new skills and connect with other creators. Attend webinars, masterclasses, and in-person workshops to expand your knowledge and network.
- Resources and Tools:
- Software Recommendations: Get recommendations for the best software and plugins for recording, editing, and mixing street sounds. Discover tools that will streamline your workflow and enhance your creativity.
- Equipment Guides: Find guides and reviews of the best equipment for recording street sounds. Learn about microphones, recorders, and other gear that will help you capture high-quality audio.
- Sound Effects Packs: Download sound effects packs featuring curated collections of street sounds. Save time and effort by using pre-made sound effects in your projects.
- Inspiration and Creativity:
- Showcases: Explore showcases of projects that creatively use street sounds. Get inspired by the work of other artists and discover new ways to incorporate urban sounds into your own creations.
- Challenges: Participate in challenges and contests to push your creativity and showcase your skills. Compete with other creators for prizes and recognition.
- News and Trends: Stay up-to-date on the latest news and trends in the world of street sounds. Discover new artists, technologies, and creative approaches to urban soundscapes.
Streetsounds.net is your ultimate resource for all things street sounds. Our extensive sound library, expert guidance, community engagement, and creative resources will empower you to create amazing projects that capture the essence of urban environments. Visit Streetsounds.net today and start exploring the world of street sounds.
Frequently Asked Questions (FAQ)
-
Is it legal to record street sounds in public places?
- Generally, yes, it is legal to record street sounds in public places as long as you are not recording private conversations or violating any local laws regarding privacy or noise ordinances.
-
What type of microphone is best for recording street sounds?
- Shotgun microphones are great for isolating specific sounds, while omnidirectional microphones capture a broader soundscape. The best choice depends on your specific recording goals.
-
How do I reduce wind noise when recording outdoors?
- Use a windscreen or blimp to reduce wind noise. You can also try positioning yourself in a sheltered location or using a directional microphone to focus on the desired sound.
-
What is the best way to remove unwanted noise from my recordings?
- Use noise reduction plugins in audio editing software to remove background noise and hiss. Be careful not to overdo it, as it can degrade the audio quality.
-
Can I use street sounds in my music without violating copyright laws?
- Yes, as long as you are not recording copyrighted material (e.g., music playing from a store) without permission. The ambient sounds of the street are generally free to use.
-
How can I create a more immersive soundscape with street sounds?
- Layer different sounds to build a realistic soundscape that complements the visuals. Use a combination of ambient sounds, specific sounds, and sound effects to create a dynamic and engaging listening experience.
-
What software do you recommend for editing and mixing street sounds?
- Audacity is a free, open-source option for basic editing. Adobe Audition and Logic Pro X are professional-grade options with advanced features.
-
How do I set the input gain level correctly to avoid clipping?
- Set the input gain level so that the loudest sounds peak around -6dBFS on your recording software. This provides headroom for mixing and mastering.
-
What are some creative ways to use street sounds in film?
- Use street sounds as ambient sound to create a sense of place and atmosphere. Create foley effects to enhance the realism of your films, and use street sounds as transitions between scenes.
-
How can I get involved with the Streetsounds.net community?
- Visit Streetsounds.net and join our forums and discussion boards. Share your projects, ask questions, and connect with other creators who share your passion for street sounds.
Ready to transform your creative projects with authentic urban soundscapes? Visit Streetsounds.net today to explore our extensive sound library, learn from expert tutorials, and connect with a vibrant community of sound enthusiasts. Enhance your storytelling, music production, and game design with the raw and unfiltered sounds of the streets. [Address: 726 Broadway, New York, NY 10003, United States. Phone: +1 (212) 998-8550. Website: streetsounds.net.] Capture the essence of the city and bring your creative visions to life.