
Changing your PC notification sound allows you to personalize your computer and make it more enjoyable to use. Are you looking to customize your Windows experience beyond the default settings? This guide from streetsounds.net provides simple, step-by-step instructions on how to change notification sounds on Windows, including customizing notification duration and exploring sound packs for a unique auditory experience. Dive into our collection of urban soundscapes and street sounds to inspire your personalized alerts, and join our community to share your favorite sound customizations.
1. Why Change Your PC Notification Sound?
Changing your PC notification sound offers a variety of benefits. Why should you consider personalizing these sounds?
- Personalization: Customizing notification sounds allows you to express your individuality and create a more personalized computing experience.
- Identification: Unique sounds make it easier to identify which application or event is triggering the notification, improving your workflow and focus.
- Mood Setting: The right sound can enhance your mood, whether it’s a calming tone or an energizing alert.
- Accessibility: For users with visual impairments, distinct notification sounds can improve accessibility by providing auditory cues for important events.
- Fun: Experimenting with different sounds can be a fun way to refresh your digital environment and keep things interesting.
2. How to Change Notification Sound via Settings on Windows
Changing your notification sound through the Windows Settings app is a straightforward process. How can you customize your notification sounds using this method?
Step 1: Open the Settings App
- Click on the Start button.
- Select the Settings icon (gear icon) from the Start menu.
 Open the Windows Settings App by clicking on the gear icon in the start menu.
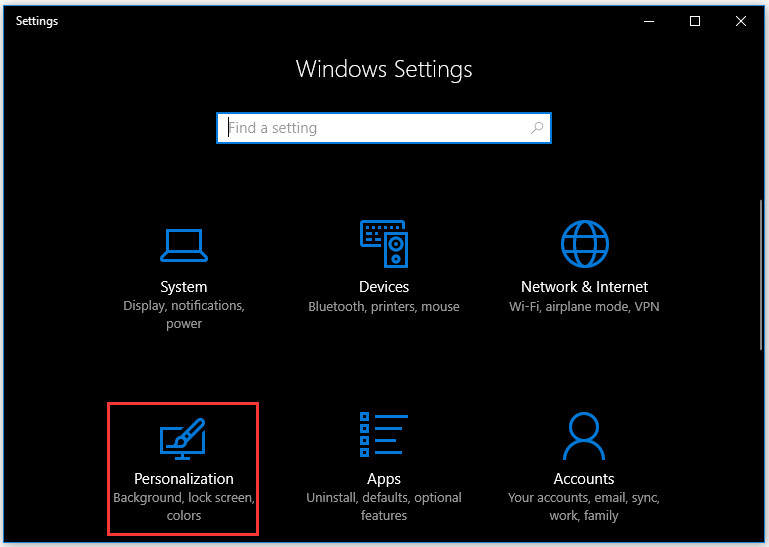
Step 2: Navigate to Personalization
- In the Settings window, click on the Personalization option.
Step 3: Access the Themes settings
- In the left sidebar, click on Themes.
- Under the Themes section, find and click on Sound. This will open the Sound settings dialog.
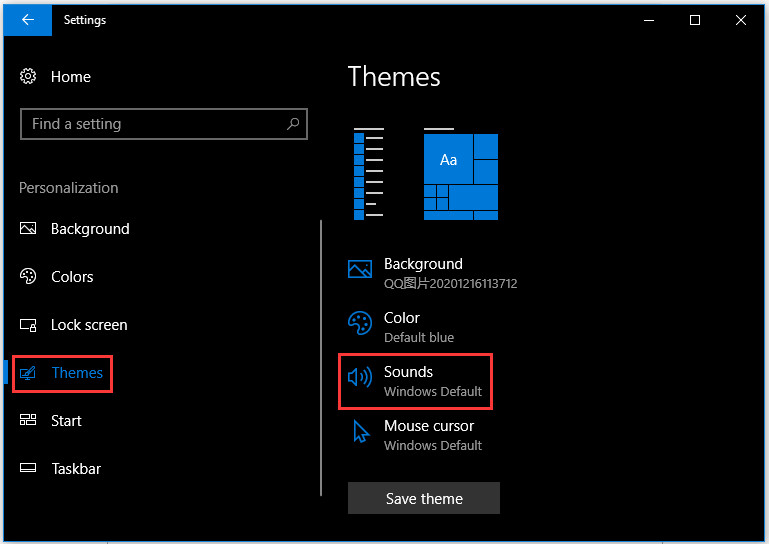 Access the Sound settings by selecting Themes in Personalization and then clicking on Sound.
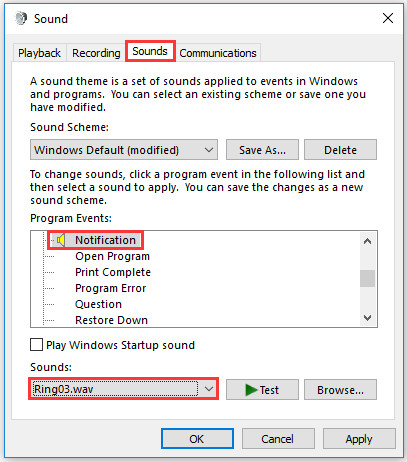
Step 4: Select Your New Notification Sound
- In the Sound dialog, under the Sounds tab, scroll through the Program Events list to find Notification.
- Once you select Notification, use the Sounds dropdown menu to choose your desired sound. You can preview the sound by clicking the Test button.
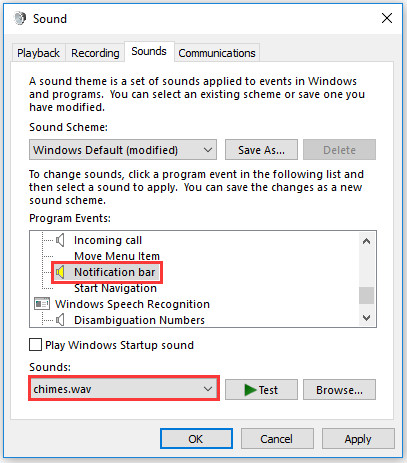 In the Sound dialog, choose a new sound from the Sounds dropdown menu and test it.
Step 5: Apply the Changes
- Click Apply to save your changes.
- Click OK to close the Sound dialog.
3. How to Change Notification Sound via Control Panel on Windows
The Control Panel also offers a way to customize your notification sounds. What steps do you need to take to change the sound via the Control Panel?
Step 1: Open the Control Panel
- Type Control Panel in the Windows search bar and press Enter.
Step 2: Access the Sound Settings
- In the Control Panel, change the View by option to Large icons or Small icons.
- Locate and click on the Sound option.
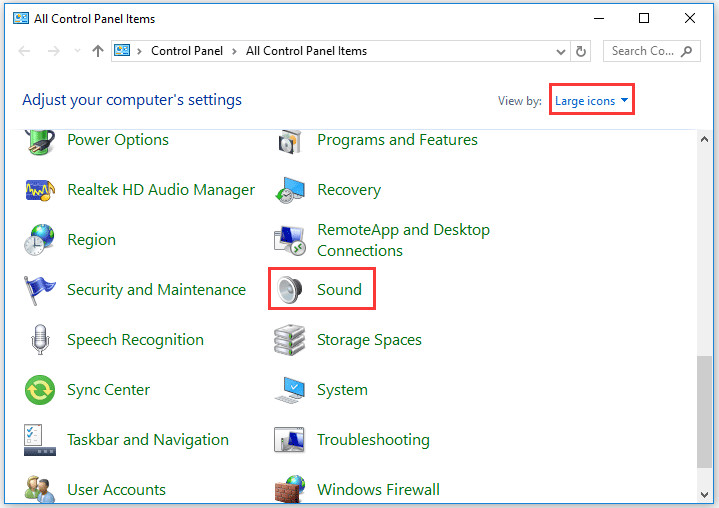 Find the Sound option in the Control Panel after setting View by to Large icons.
Step 3: Select Your New Notification Sound
- In the Sound window, go to the Sounds tab.
- Under Program Events, find and select Notification.
- Use the Sounds dropdown menu to choose your preferred notification sound. You can test the sound by clicking the Test button.
 Choose a sound from the dropdown list in the Sound tab of the Sound window.
Step 4: Apply the Changes
- Click Apply to save the new notification sound.
- Click OK to close the Sound window.
4. Where to Find New Notification Sounds?
Finding new notification sounds can add a unique flair to your system. Where can you source new and interesting sounds?
4.1. Online Sound Libraries
Websites like streetsounds.net offer a vast collection of sound effects and urban soundscapes perfect for customizing your notifications. These sites often provide sounds that are free or available for purchase, ensuring you find the perfect tone.
4.2. Sound Design Communities
Platforms like Soundcloud and freesound.org host communities where sound designers share their creations. These sites often feature unique, user-generated sounds that can add a distinctive touch to your notifications.
4.3. Create Your Own Sounds
You can record your own sounds using a microphone and audio editing software. This option allows you to create truly unique notifications tailored to your personal preferences.
4.4. Sound Packs
Many websites offer sound packs that include a variety of related sounds, such as retro game sounds or nature soundscapes. These packs provide a cohesive theme for your notifications.
4.5. Using Audio Editing Software
Software like Audacity or Adobe Audition can be used to edit and customize existing sound files. This allows you to adjust the length, pitch, and other characteristics of your notification sounds.
5. How to Add Custom Notification Sounds to Windows
Adding custom notification sounds to Windows involves a few simple steps. How do you make your custom sounds available for use?
Step 1: Locate the Sounds Folder
- Open File Explorer and navigate to the Windows media folder, typically located at:
C:WindowsMedia. This is where Windows stores its default sound files.
Step 2: Copy Your Custom Sounds
- Copy the custom sound files (usually in .wav format) that you want to use into the
C:WindowsMediafolder. Ensure that the files are easily identifiable.
Step 3: Select the New Sound in Settings
- Follow the steps in either Method 1 or Method 2 to access the Sound settings.
- In the Sounds dropdown menu, your custom sounds should now be listed along with the default Windows sounds.
- Select your new sound and click Test to preview it.
- Click Apply and then OK to save the changes.
6. Changing Notification Duration on Windows
Adjusting the duration of notifications can help ensure you don’t miss important alerts. How can you change how long a notification appears on your screen?
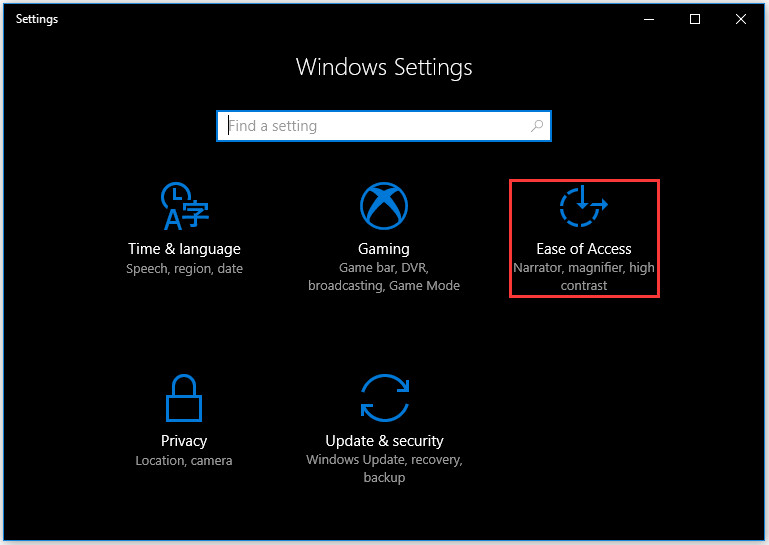
Step 1: Open Settings
- Press Windows + I to open the Settings app.
 Open the Windows Settings app to access customization options.
Step 2: Go to Ease of Access
- Click on Ease of Access.
Step 3: Select Display Settings
- In the Ease of Access settings, choose Display from the left sidebar.
Step 4: Adjust Notification Duration
- Scroll down to the Show notifications for option.
- Use the dropdown menu to select the desired duration for notifications: 5 seconds, 7 seconds, 15 seconds, 30 seconds, 1 minute, or 5 minutes.
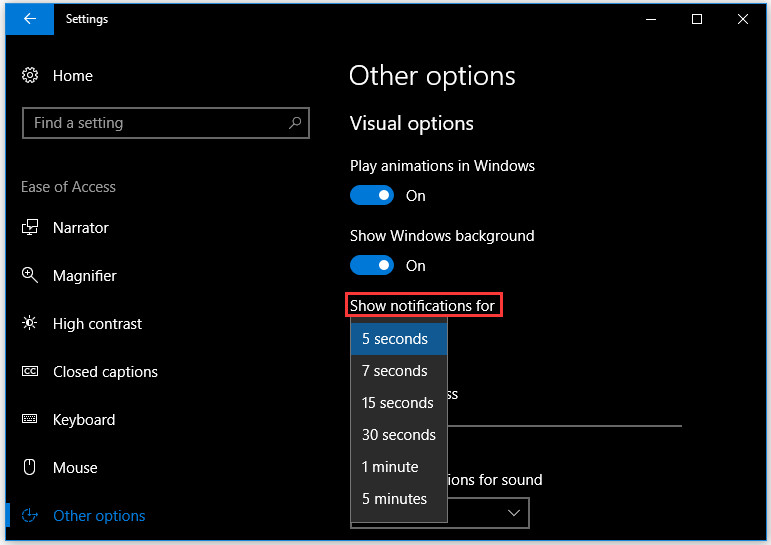 Select a new notification duration from the dropdown menu under Display settings.
Step 5: Apply Changes
- The change is applied automatically, so you can simply close the Settings window.
7. Troubleshooting Common Notification Sound Issues
Sometimes, notification sounds may not work as expected. What are some common issues and how can you fix them?
7.1. No Sound Playing
- Check Volume Levels: Ensure that your system volume and application volume are not muted or set too low.
- Sound Device: Verify that the correct sound output device is selected in your system settings.
- Sound Settings: Confirm that the notification sound is properly set in the Sound settings (as described in Methods 1 and 2).
- Driver Issues: Update or reinstall your audio drivers to resolve any potential driver conflicts.
7.2. Incorrect Sound Playing
- Verify Settings: Double-check that the correct sound file is selected for the notification in the Sound settings.
- File Corruption: If a custom sound is corrupted, replace it with a new, working file.
- Application Settings: Some applications have their own notification settings, so check within the app to ensure the correct sound is selected.
7.3. Notifications Not Appearing
- Notification Settings: Ensure that notifications are enabled in the Windows settings. Go to Settings > System > Notifications & actions and make sure the toggle is on.
- Focus Assist: Check if Focus Assist is enabled, as it can suppress notifications. Disable Focus Assist if you want to receive all notifications.
- Application Permissions: Verify that the application has permission to send notifications. You can manage app permissions in the Notifications & actions settings.
7.4. Sound Delay
- System Performance: A slow or overloaded system can cause delays in playing notification sounds. Close unnecessary applications and processes to improve performance.
- Audio Enhancements: Disable any audio enhancements or effects that might be causing latency.
- Driver Issues: Update your audio drivers to ensure they are functioning correctly.
7.5. Custom Sounds Not Appearing
- Location: Ensure that custom sound files are placed in the correct directory (
C:WindowsMedia). - File Format: Custom sounds must be in the correct file format (usually .wav).
- Permissions: Make sure you have the necessary permissions to add files to the
C:WindowsMediafolder.
8. The Impact of Urban Soundscapes on Notification Sounds
Urban soundscapes can significantly influence the types of notification sounds you choose. How do street sounds inspire digital alerts?
8.1. Authenticity
Using real urban sounds, such as recordings from streetsounds.net, can add a layer of authenticity to your digital environment, making notifications feel more connected to the real world.
8.2. Emotional Connection
Familiar sounds of the city can evoke specific emotions and memories, creating a more personal and engaging experience.
8.3. Uniqueness
Urban soundscapes offer a vast and diverse range of sounds that can help you create unique and distinctive notifications, setting you apart from generic alerts.
8.4. Inspiration
Listening to urban soundscapes can spark creativity and inspire new ideas for your personal and professional projects.
8.5. Cultural Relevance
Using sounds from your local urban environment can help you stay connected to your community and celebrate its unique culture.
9. How Urban Soundscapes Enhance Your Digital Experience
Integrating urban soundscapes into your digital notifications can transform your computer interactions. In what ways do these sounds improve your daily experience?
9.1. Increased Awareness
Distinct sounds from different urban environments can help you quickly identify the type of notification you are receiving, improving your response time and focus.
9.2. Reduced Stress
Choosing calming urban sounds, such as gentle rain or distant traffic, can create a more relaxing and stress-free digital environment.
9.3. Enhanced Productivity
Personalized notification sounds can help you stay motivated and engaged, boosting your productivity and overall work satisfaction.
9.4. Improved Accessibility
Urban soundscapes can provide auditory cues for users with visual impairments, making digital interfaces more accessible and user-friendly.
9.5. Creative Inspiration
Exposure to diverse urban sounds can stimulate your creativity and inspire new ideas for your artistic and professional endeavors.
10. Call to Action: Explore Streetsounds.net
Ready to transform your notification sounds with the authentic sounds of the city? Discover a world of urban soundscapes at streetsounds.net. Browse our extensive library of high-quality sound effects, learn how to professionally record and process urban sounds, and connect with a community of fellow sound enthusiasts. Whether you’re a music producer, filmmaker, or simply someone who loves the sounds of the city, streetsounds.net has something for you. Visit us today and start creating a more immersive and personalized digital experience.
Address: 726 Broadway, New York, NY 10003, United States.
Phone: +1 (212) 998-8550.
Website: streetsounds.net.
Frequently Asked Questions (FAQ)
1. How do I change the default notification sound on Windows 10?
You can change the default notification sound through the Settings app or the Control Panel. In Settings, go to Personalization > Themes > Sound. In Control Panel, go to Sound > Sounds tab. Choose “Notification” under Program Events and select a new sound from the dropdown menu.
2. Can I use custom sound files for my notifications?
Yes, you can use custom .wav files for your notifications. Copy the sound files into the C:WindowsMedia folder, and they will appear in the list of available sounds in the Sound settings.
3. How do I disable notification sounds altogether?
To disable notification sounds, go to the Sound settings (via Settings or Control Panel), select “Notification” under Program Events, and choose “(None)” from the Sounds dropdown menu.
4. Why is my notification sound not playing?
Check your volume levels, ensure the correct sound output device is selected, verify that the notification sound is properly set in the Sound settings, and update your audio drivers.
5. How do I change the duration of time that a notification is displayed?
You can change the notification duration in the Ease of Access settings. Go to Settings > Ease of Access > Display and adjust the “Show notifications for” setting.
6. Can I set different notification sounds for different apps?
While Windows doesn’t natively support different notification sounds for each app, some third-party applications allow you to customize notification sounds within their settings.
7. What file format should my custom notification sounds be in?
Custom notification sounds should be in .wav format for best compatibility with Windows.
8. How do I revert back to the default Windows notification sound?
To revert to the default Windows notification sound, go to the Sound settings, select “Notification” under Program Events, and choose “Windows Notify.wav” from the Sounds dropdown menu.
9. Why are my custom sounds not appearing in the Sound settings?
Ensure that the custom sound files are placed in the C:WindowsMedia folder and that they are in the correct .wav format. Also, make sure you have the necessary permissions to add files to this folder.
10. How can I find high-quality urban soundscapes for my notifications?
Websites like streetsounds.net offer a wide selection of high-quality urban soundscapes that you can use for your notifications. You can also explore sound design communities and create your own sounds using audio editing software.