
Street style photography captures the raw energy and unique aesthetics of urban life. But the journey from capturing a great street style shot to creating a truly compelling image often lies in the editing process. This guide dives into essential Street Style Photo Editing techniques, focusing on how to enhance your images and develop a signature visual style, especially when working with the challenges and beauty of night photography.
Understanding the Essentials of Street Style Photo Editing
Effective street style photo editing isn’t about drastic transformations; it’s about refining your vision and enhancing the inherent mood and story within each photograph. Whether you’re shooting during the bright daylight or embracing the dramatic shadows of night, understanding fundamental editing principles is crucial.
Color Grading: Setting the Mood
Color plays a vital role in street style photography. It dictates the atmosphere and emotional impact of your images. Adobe Lightroom, a powerful and widely used photo editing software, offers several tools for color grading.
One of the most straightforward methods is adjusting the Temperature slider in the Basic panel. This mimics white balance adjustments and can dramatically shift the overall color cast of your image. For a cooler, more atmospheric feel often associated with urban nights or a sense of solitude, move the slider towards blue. For warmer, more vibrant tones, shift it towards yellow. Experiment to find the temperature that best complements the scene and your artistic intent.
 Temperature adjustment in Lightroom for color grading
While temperature adjustments are a great starting point, Lightroom’s HSL (Hue, Saturation, Luminance) panel provides granular control over individual colors.
- Hue: Allows you to shift the tint of specific colors. For example, you can subtly adjust the hue of yellows to lean more towards orange or greens. In street style, playing with contrasting hues can create visually striking images. Consider making warm tones (yellows, oranges, reds) more distinct against cooler blues and cyans.
- Saturation: Controls the intensity of colors. While vibrant colors can be captivating, over-saturation can look artificial. For street style, selectively boosting the saturation of specific colors, like the warm hues of city lights against a cool night sky, can be very effective. Conversely, reducing overall saturation can create a more muted, gritty aesthetic.
- Luminance: Adjusts the brightness of individual colors. This is particularly useful for controlling how certain elements within your image stand out. For instance, in night shots, increasing the luminance of yellows and oranges can make streetlights and neon signs appear to glow, adding depth and contrast to the scene.
Remember, moderation is key. Over-processed colors can detract from the authenticity of street style photography. The goal is to enhance, not overwhelm, the natural colors of the urban environment.
Essential Edits: Refining Light and Detail
Beyond color grading, several other adjustments are essential for refining your street style photos and ensuring they are visually impactful.
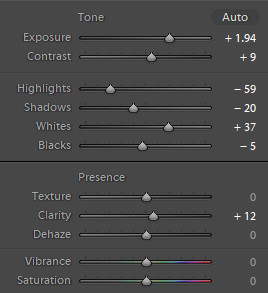 Basic editing adjustments in Lightroom
- Exposure: The fundamental control for image brightness. Begin by adjusting exposure to achieve a balanced overall brightness. It’s crucial to edit with your monitor at full brightness to accurately judge exposure levels.
- Contrast: Contrast separates tones and adds depth. While Lightroom offers a Contrast slider, the Curves tool provides more nuanced control. An “S-curve,” where you lift the highlights and deepen the shadows, is a classic technique to enhance contrast naturally. Experiment with subtly raising the black point (the bottom right of the curve) to create a faded shadow effect, a stylistic choice popular in urban photography.
- Highlights & Shadows: These sliders are invaluable for recovering detail in bright highlights or dark shadows, especially in high-contrast street scenes. Pulling down highlights can bring back detail in overexposed areas like bright skies or light sources. Lifting shadows can reveal details in darker areas, though be mindful of not making shadows appear unnaturally bright, which can flatten the image.
- Clarity & Texture: Clarity enhances mid-tone contrast, adding sharpness and definition. It can be particularly effective for emphasizing the textures of urban environments like brick walls or wet streets. However, excessive clarity can create an overly harsh look. Texture is a newer Lightroom tool that refines fine details. Experimenting with a combination of increased texture and slightly reduced clarity can yield interesting results, adding a unique tactile quality to your images.
- Dehaze: Primarily used to reduce atmospheric haze or fog, Dehaze can also be creatively applied to enhance mood. Subtly decreasing dehaze can create a slightly dreamlike or stylized effect, particularly in night street photography, contributing to a unique visual signature.
- Vignetting: Adding a subtle vignette – darkening the edges of the frame – can draw the viewer’s eye towards the center of the image, focusing attention on the subject. Vignetting often works well with darker, moodier street style shots, especially night scenes. Use the Feather slider to soften the vignette for a more natural look.
- Saturation & Vibrance: While HSL offers precise color control, the global Saturation and Vibrance sliders can be used sparingly for overall color adjustments. Vibrance is often preferred as it selectively boosts the saturation of less saturated colors, preserving skin tones and preventing over-saturation. In most cases, especially after HSL adjustments, it’s best to use these sliders subtly or even reduce saturation slightly to maintain a natural and refined look.
Calibrating Your Display: Ensuring Accurate Edits
Before diving deep into editing, it’s essential to ensure your display is accurately calibrated. An uncalibrated monitor can display colors inaccurately, leading to edits that look different on other screens. Devices like Macs and iPhones generally have well-calibrated displays by default. However, many Windows laptops and monitors can benefit significantly from calibration. Consider investing in a color calibration device for professional-level accuracy and consistency in your editing workflow. Editing on a poorly calibrated screen can lead to frustrating inconsistencies, making your images appear different across platforms and devices.
Developing Your Street Style Editing Signature
Ultimately, the best street style photo editing is an extension of your artistic vision. Experiment with these techniques, develop your own presets in Lightroom to streamline your workflow, and consistently refine your approach. The key is to find a balance between technical proficiency and artistic expression, creating images that not only capture the essence of street style but also reflect your unique photographic voice.
By mastering these editing techniques and continually practicing, you can elevate your street style photography, crafting compelling images that resonate with viewers and showcase the captivating beauty of urban life, day or night.