

I’ve always been drawn to the beauty of secondary patterns in quilts. There’s something so satisfying about discovering hidden designs within a seemingly simple block. That’s the inspiration behind the Bradley Street quilt, an easy-to-make project that uses contrasting fabrics to bring a delightful secondary pattern to life. I’m thrilled to share this quilt pattern with you.
The name “Bradley Street” holds a special place in my heart. It’s the street where my beloved grandma lived, and summer visits there were always the highlight of my year. I have so many cherished memories of walking along Bradley Street and around the little circle across from her house. This quilt pattern is a little piece of that nostalgia, and I hope you find as much joy in creating it as I do.
For my Bradley Street quilt, I chose Creekside fabrics by Sherri & Chelsi, and I felt they were absolutely perfect for capturing the cozy, homespun feel I envisioned. If you’re curious to see what else I’m working on, you can find my latest creations in my shop or by following me on Instagram.
This finished Bradley Street quilt project will measure approximately 68″ x 68″, making it a wonderful size for a throw quilt or even a cozy bed quilt.
[ Image of a finished Bradley Street quilt block
Ready to get started? Here’s what you’ll need to create your own Bradley Street quilt:
Materials:
- 5 charm packs of the same fabric line (for a coordinated look)
- 1.5 yards of print fabric for the flying geese (choose a contrasting color for impact)
- 2.0 yards of white fabric (or another neutral solid for the background)
- 4.5 yards of fabric for the quilt backing
Cutting Instructions:
Let’s begin by cutting our fabric pieces. Accuracy in cutting is key for quilt blocks that fit together perfectly!
-
Flying Geese Print (Dark Fabric): Cut eighteen 2.75” strips from your chosen print fabric. Then, sub-cut these strips into 2.75” X 5” pieces. You will need a total of 144 of these rectangles for all your flying geese units.
-
Background Fabric (White Fabric): Cut twenty-four 2.75” strips from your white background fabric. Sub-cut these strips into 2.75” x 2.75” squares. You will need 288 white squares for the flying geese. Set aside the remaining 36 white 2.75” squares – we’ll use these later in the block assembly.
-
Charm Packs: Open your charm packs. Carefully remove any charm squares that are the same color as your flying geese fabric or any very light prints. These lighter prints will blend too much with the flying geese and background, and we want to ensure a strong contrast to highlight the Bradley Street quilt’s secondary pattern. You should be left with 144 charm squares for your quilt blocks.
General Sewing Instructions:
- Throughout this Bradley Street quilt pattern, please use a 1/4” seam allowance unless specified otherwise. Consistent seam allowance is crucial for accurate block sizes.
- Press your seams in the direction indicated by the arrows in the diagrams as you go. This helps the blocks lay flat and reduces bulk, especially at seam intersections.
Assembly – Creating the Flying Geese Units:
The flying geese blocks are the stars of the Bradley Street quilt. Let’s make them!
-
Take your 288 white 2.75” x 2.75” squares. On the wrong side of each square, use a pencil or fabric marker to draw a diagonal line from one corner to the opposite corner.
-
Take one dark print 2.75” x 5” rectangle. Place a marked white square on one end of the rectangle, right sides together, aligning the edges.
-
Sew directly on the drawn diagonal line.
-
Trim away the excess fabric by cutting .25” (a quarter of an inch) away from the sewn line, towards the corner you just sewed.
-
Press the seam open, pressing towards the white triangle.
-
Repeat steps 2-5 on the other end of the dark print rectangle with another marked white square.
-
You have now completed one flying geese unit! It should measure 2.75” x 5” inches.
-
Repeat this process until you have made a total of 144 flying geese units. Each Bradley Street quilt block will use 4 flying geese.
 Diagram showing how to assemble flying geese units for the Bradley Street quilt
Assembly – Constructing the Bradley Street Quilt Blocks:
Now we’ll assemble the individual quilt blocks using the charm squares, flying geese, and those set-aside white squares. We need to make 36 blocks in total.
-
Row 1: Choose two coordinating charm squares. Take one charm square and sew one flying geese unit to its right side, positioning the flying geese point to the left. Then, sew the second charm square to the right side of the flying geese unit.
-
Row 2 (Middle Row): Take one of the reserved white 2.75” x 2.75” background squares. Sew a flying geese unit to the right side of this white square, pointing upwards. Next, sew another flying geese unit to the right side of the white square, this time pointing downwards.
-
Row 3: Take two more coordinating charm squares. For this row, take a charm square and sew a flying geese unit to its right side, pointing to the right. Sew the final charm square to the right side of the flying geese unit.
-
Now, carefully sew Row 1, Row 2, and Row 3 together, matching seams as you go.
-
Your completed Bradley Street block should measure 11.75” square.
-
Repeat steps 1-5 to make a total of 36 Bradley Street blocks.
 Diagram showing how to assemble the middle row of a Bradley Street quilt block
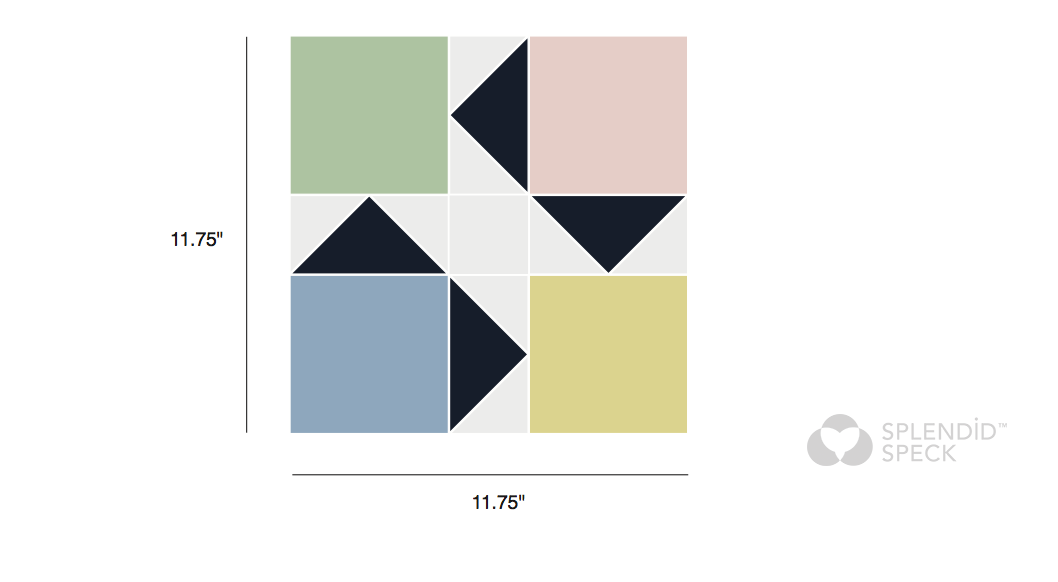 Image of a finished Bradley Street quilt block
Four-Block Assembly (Creating Larger Blocks):
To speed up the quilt top assembly, we’ll sew the blocks together in groups of four to create larger blocks, sometimes referred to as “super blocks”.
-
Arrange four of your finished Bradley Street blocks in a 2×2 grid, following the rotation shown in the diagram below. Note that some blocks are rotated to create the overall design.
-
Sew the top two blocks together, and then sew the bottom two blocks together.
-
Finally, sew the top row to the bottom row to create one large four-block unit.
-
This larger block unit should measure approximately 23” finished.
-
Repeat this process until you have created nine large four-block units.
 Diagram showing the four-block assembly and block rotation for the Bradley Street quilt
Quilt Top Assembly:
We’re in the home stretch! Let’s put the quilt top together.
-
Arrange your nine large four-block units in a 3×3 grid, three rows with three blocks each.
-
Sew the blocks together row by row.
-
Sew the rows together to complete your Bradley Street quilt top!
-
The finished quilt top should measure approximately 68” x 68”.
 Image of the completed Bradley Street quilt top
Your beautiful Bradley Street quilt top is now complete and ready for quilting and binding! Enjoy the process of choosing your quilting design and finishing touches to make this quilt truly your own.
This quilt finishes at 68″ x 68″.
Want to explore more of my quilt patterns? Visit my Etsy store to find a wide selection of designs! To see what I’m currently working on and get a peek into my quilting life, follow me on Instagram.
Suzanne Jackman
Etsy: Splendid Speck
Instagram: @splendidspeck
Email: [email protected]
Web: splendidspeck.com
Download the printable PDF version of the Bradley Street Quilt Pattern