
Can You Get Sound On A Screen Recording? Absolutely! Screen recording with audio is essential for various purposes, from creating tutorials to capturing gameplay. At streetsounds.net, we understand the importance of high-quality audio for your screen recordings, offering a vast library of street sounds to enhance your projects.
1. Understanding Screen Recording with Audio
Screen recording with audio is the process of capturing the visual content of your computer screen along with synchronized audio. This combination is invaluable for creating engaging and informative content. Whether you are producing tutorials, recording gameplay, or sharing presentations, capturing both visuals and audio ensures your audience fully understands the message.
1.1. Why is Audio Important in Screen Recordings?
Audio is crucial in screen recordings because it provides context, explanations, and enhances viewer engagement. A screen recording without audio can leave viewers confused or require them to make assumptions about the content being presented. Clear and well-recorded audio ensures that your audience understands the nuances of your presentation, leading to better comprehension and retention.
1.2. Types of Audio You Can Record
There are two primary types of audio you can record during a screen recording:
- Microphone Audio: This captures your voice or any other sound picked up by your microphone. It is perfect for narrations, commentaries, and adding personal explanations to your screen recordings.
- System Audio: Also known as internal audio or computer audio, this captures the sound produced by your computer, such as music, application alerts, or in-game sounds. Recording system audio is vital for showcasing application features, demonstrating software functionalities, or capturing the complete experience of a video game.
1.3. Common Uses for Screen Recording with Audio
Screen recording with audio has become an indispensable tool in various fields. Here are some prevalent applications:
- Educational Tutorials: Educators and trainers use screen recordings to create comprehensive tutorials, guiding students through software applications, coding exercises, or any digital process.
- Software Demonstrations: Businesses use screen recordings to showcase their software’s features and functionalities, providing potential customers with a clear understanding of their products.
- Gaming Content: Gamers record their gameplay to share strategies, provide commentary, or create entertaining content for platforms like YouTube and Twitch.
- Presentations: Professionals use screen recordings to share presentations with remote teams, ensuring everyone can follow along with the speaker’s explanations.
- Customer Support: Support teams create screen recordings to visually guide customers through troubleshooting steps, enhancing customer satisfaction and reducing support tickets.
 Laptops displaying video tutorials on screen recording, showcasing the importance of audio.
2. Setting Up Your Devices for Screen Recording with Audio
Getting the right setup is key to ensuring high-quality screen recordings with audio. Here’s how to prepare your devices:
2.1. Choosing the Right Microphone
The choice of microphone significantly impacts the audio quality of your screen recordings. Here are several types to consider:
- Built-in Microphones: These are integrated into laptops and smartphones. While convenient, they often produce lower-quality audio, capturing more ambient noise.
- USB Microphones: These offer better audio quality than built-in microphones and are easy to set up. They are an excellent option for beginners and intermediate users.
- Condenser Microphones: These provide professional-grade audio quality, making them ideal for high-end recordings. They typically require an audio interface for connection.
- Lavalier Microphones: Also known as lapel mics, these are small and discreet, clipping onto your clothing. They are great for capturing clear audio with minimal background noise.
2.2. Adjusting Audio Input Settings
Properly adjusting your audio input settings ensures that your microphone captures sound effectively. Here’s how to do it:
- Volume Levels: Adjust the input volume to a level where your voice is clear without clipping or distortion. Most operating systems have a volume meter to help you monitor levels.
- Noise Reduction: Enable noise reduction features in your recording software or operating system settings to minimize background noise.
- Echo Cancellation: Turn on echo cancellation to prevent sound from bouncing back into the microphone, which can cause distracting echoes in your recordings.
2.3. Configuring System Audio Settings
Configuring your system audio settings correctly is essential for capturing the sound produced by your computer. Here’s what to do:
- Enable System Audio Recording: Ensure that your screen recording software has permission to record system audio. This setting is often found in the audio preferences of the software.
- Choose the Correct Output Device: Select the correct audio output device to record. This is usually your default speakers or headphones.
- Adjust System Volume: Set the system volume to a comfortable level to avoid distortion in your recordings.
3. Screen Recording with Audio on Different Platforms
The method for screen recording with audio varies depending on the platform you are using. Here are detailed instructions for Mac, Windows, and iOS devices:
3.1. Mac
3.1.1. Using QuickTime Player
QuickTime Player is a native application on macOS that allows you to record your screen with audio.
- Open QuickTime Player: Find QuickTime Player in your Applications folder or use Spotlight search.
- Access Screen Recording: Click on “File” in the menu bar and select “New Screen Recording.”
- Choose Audio Source: Before starting the recording, click the arrow next to the record button to select your audio source. Choose either the built-in microphone or an external microphone.
- Select Recording Area: Click and drag to select the area of the screen you want to record, or click anywhere on the screen to record the entire screen.
- Start and Stop Recording: Click the “Record” button to begin. To stop recording, click the stop button in the menu bar or press Command + Control + Esc.
3.1.2. Using Third-Party Applications
Several third-party applications offer advanced features for screen recording on Mac, such as screenflow and OBS Studio.
- Download and Install: Download and install your chosen screen recording application.
- Configure Settings: Open the application and configure your audio and video settings. Select your preferred microphone and set the recording quality.
- Start and Stop Recording: Follow the application’s instructions to start and stop your screen recording.
3.2. Windows
3.2.1. Using Xbox Game Bar
Xbox Game Bar is a built-in tool in Windows 10 and 11 that allows you to record your screen with audio.
- Open Application: Open the application or window you want to record.
- Activate Xbox Game Bar: Press Windows Key + G to open the Xbox Game Bar.
- Enable Microphone: Click the microphone icon to enable audio recording.
- Start and Stop Recording: Click the “Start Recording” button or press Windows Key + Alt + R to begin. To stop recording, click the “Stop” button or press Windows Key + Alt + R again.
3.2.2. Using Third-Party Applications
Many third-party applications, such as OBS Studio and Camtasia, offer more advanced screen recording features on Windows.
- Download and Install: Download and install your preferred screen recording application.
- Configure Settings: Open the application and configure your audio and video settings. Select your microphone and adjust the recording quality.
- Start and Stop Recording: Follow the application’s instructions to start and stop your screen recording.
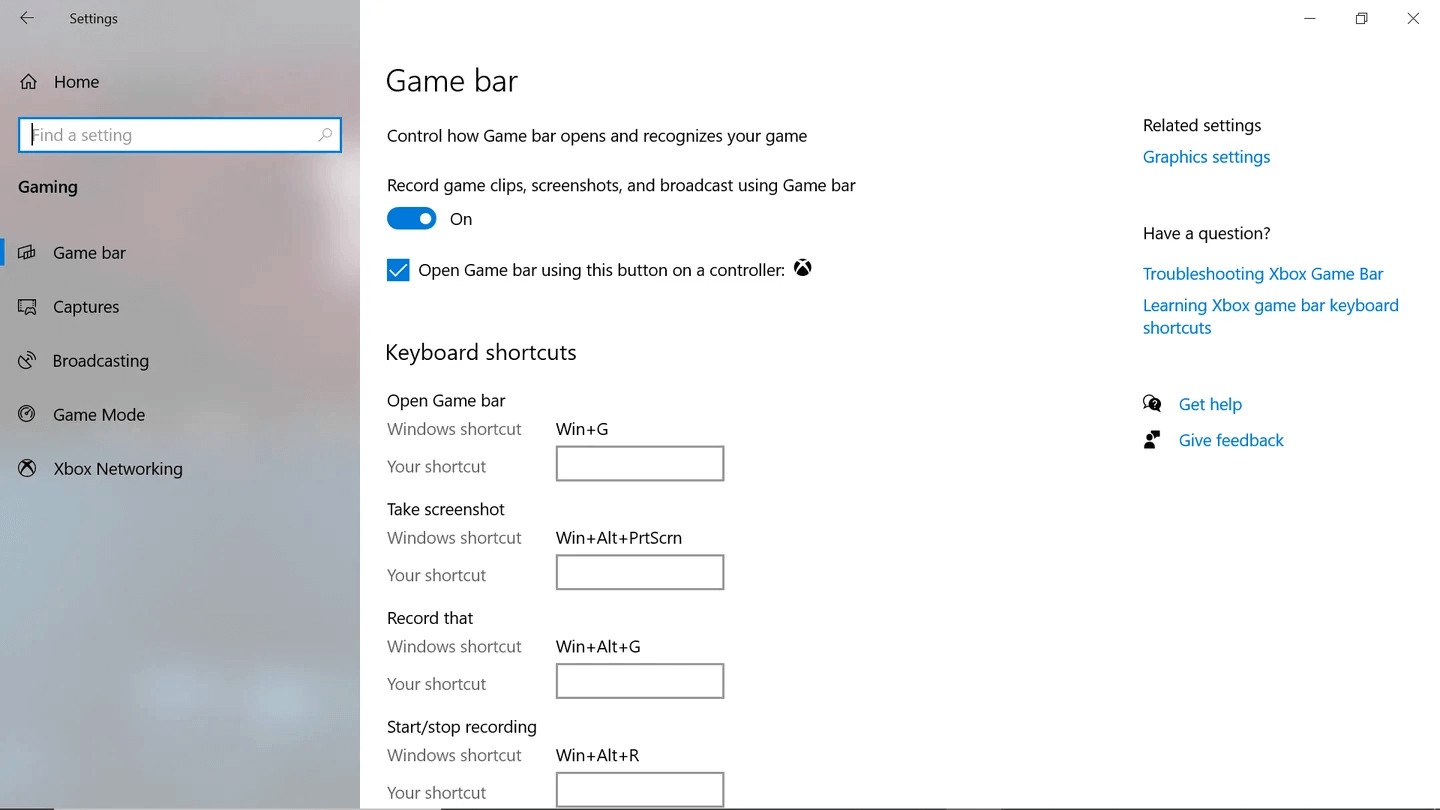 Activating the Xbox Game Bar for screen recording on Windows, demonstrating ease of use.
3.3. iOS (iPhone/iPad)
3.3.1. Using the Built-In Screen Recorder
iOS devices come with a built-in screen recorder that allows you to capture your screen with audio.
- Enable Screen Recording: Go to “Settings” > “Control Center” and add “Screen Recording” to the included controls.
- Open Control Center: Swipe down from the top-right corner of your screen to open the Control Center.
- Turn on Microphone: Long-press the screen recording icon, then tap the microphone icon to turn on audio recording.
- Start and Stop Recording: Tap the screen recording icon to start. A three-second countdown will appear. To stop recording, tap the red status bar at the top of the screen and select “Stop.”
3.3.2. Using Third-Party Applications
While the built-in screen recorder is convenient, some third-party apps offer additional features.
- Download and Install: Download and install a screen recording application from the App Store.
- Configure Settings: Open the application and configure your audio and video settings.
- Start and Stop Recording: Follow the application’s instructions to start and stop your screen recording.
4. Addressing Common Audio Issues
Even with the best setup, you may encounter audio issues during screen recording. Here are some common problems and how to fix them:
4.1. No Audio Recorded
- Check Microphone Connection: Ensure your microphone is properly connected to your computer or device.
- Verify Audio Input Settings: Confirm that your screen recording software is set to use the correct microphone.
- Enable System Audio Recording: Make sure system audio recording is enabled in your software settings.
4.2. Low Audio Quality
- Use an External Microphone: Switch to an external microphone for better audio quality.
- Adjust Bitrate and Sample Rate: Increase the bitrate to at least 128 kbps and set the sample rate to 44.1 kHz for clearer sound.
- Reduce Background Noise: Record in a quiet environment or use noise reduction software.
4.3. Distorted Audio
- Adjust Input Volume: Lower the input volume to prevent clipping or distortion.
- Check for Interference: Keep your microphone away from other electronic devices that may cause interference.
- Use a Pop Filter: A pop filter can help reduce plosive sounds (such as “p” and “b”) that can cause distortion.
4.4. Echoing Audio
- Use Echo Cancellation: Enable echo cancellation in your recording software or operating system settings.
- Record in a Soundproofed Environment: Recording in a room with soundproofing can reduce echoes.
- Use Headphones: Monitoring your audio with headphones can help you identify and eliminate echoes.
5. Advanced Techniques for Enhancing Audio Quality
For those looking to achieve professional-grade audio quality, here are some advanced techniques:
5.1. Using Audio Editing Software
Audio editing software like Audacity, Adobe Audition, and iZotope RX can significantly improve the quality of your recordings.
- Noise Reduction: Use noise reduction tools to eliminate background noise and improve clarity.
- Equalization: Adjust the frequencies to balance the sound and enhance specific aspects of your voice.
- Compression: Compress the audio to reduce the dynamic range and make your voice sound more consistent.
- Normalization: Normalize the audio to bring the overall volume to an optimal level.
5.2. Creating a Soundproof Recording Environment
A soundproof recording environment can dramatically reduce ambient noise and improve audio quality.
- Use Acoustic Panels: Install acoustic panels on the walls to absorb sound reflections.
- Add Bass Traps: Place bass traps in the corners of the room to reduce low-frequency reverberation.
- Use a Reflection Filter: A reflection filter can be placed behind the microphone to block sound reflections.
5.3. Incorporating Sound Effects and Background Music
Adding sound effects and background music can make your screen recordings more engaging.
- Streetsounds.net: Explore streetsounds.net for high-quality street sounds to add authenticity and depth to your recordings.
- Royalty-Free Music: Use royalty-free music to avoid copyright issues.
- Sound Effects Libraries: Utilize sound effects libraries to add emphasis and enhance the overall viewing experience.
 Accessing screen recording from iPhone, highlighting accessibility and ease of use.
6. Choosing the Right Screen Recording Software
Selecting the right screen recording software is crucial for achieving the desired results. Here are some popular options:
6.1. Free Options
- QuickTime Player (Mac): A basic but reliable option for Mac users.
- Xbox Game Bar (Windows): A convenient tool for Windows users, especially for gaming content.
- OBS Studio (Cross-Platform): A powerful, open-source option with advanced features.
6.2. Paid Options
- Camtasia (Windows and Mac): A feature-rich option with excellent editing capabilities.
- Screenflow (Mac): Known for its user-friendly interface and robust editing tools.
- Descript (Windows and Mac): A versatile tool that combines screen recording with advanced audio and video editing.
6.3. Features to Look For
- Audio Recording Options: The ability to record both microphone and system audio.
- Video Quality: Support for high-resolution recording.
- Editing Tools: Built-in editing tools for trimming, adding annotations, and enhancing audio.
- Export Options: Flexible export options for different formats and platforms.
- User-Friendliness: An intuitive interface that is easy to navigate.
7. Ethical Considerations and Copyright Issues
When screen recording with audio, it’s important to be mindful of ethical considerations and copyright issues:
7.1. Obtaining Permission
Always obtain permission before recording someone else’s voice or screen content. This is particularly important for meetings, webinars, and online courses.
7.2. Respecting Privacy
Be respectful of people’s privacy when recording their screen content. Avoid capturing sensitive information such as passwords, credit card details, or personal messages.
7.3. Understanding Copyright Laws
Be aware of copyright laws when recording copyrighted material, such as music, videos, or software. Obtain the necessary licenses or permissions before using copyrighted content in your recordings.
7.4. Fair Use Doctrine
Familiarize yourself with the fair use doctrine, which allows limited use of copyrighted material for purposes such as criticism, commentary, news reporting, teaching, scholarship, or research.
8. Optimizing Your Content for Different Platforms
Once you have created your screen recording with audio, it’s important to optimize it for different platforms to ensure the best viewing experience.
8.1. YouTube
- Resolution: Upload videos in the highest possible resolution (e.g., 1080p or 4K).
- Audio Quality: Ensure audio is clear and balanced.
- Thumbnails: Create eye-catching thumbnails to attract viewers.
- Descriptions: Write detailed descriptions with relevant keywords to improve search visibility.
- Tags: Use relevant tags to help viewers find your content.
8.2. Vimeo
- Resolution: Upload high-resolution videos for the best quality.
- Audio Quality: Ensure audio is clear and professional.
- Privacy Settings: Adjust privacy settings to control who can view your content.
- Embed Options: Use embed options to share your videos on websites and blogs.
8.3. Social Media Platforms
- Video Length: Keep videos short and engaging to capture attention.
- Captions: Add captions to make your videos accessible to viewers who watch without sound.
- Aspect Ratio: Optimize videos for the platform’s recommended aspect ratio (e.g., 9:16 for TikTok and Instagram Stories).
- Call to Action: Include a clear call to action to encourage viewers to engage with your content.
9. Case Studies: Successful Screen Recordings with Audio
Analyzing successful examples can provide valuable insights into creating effective screen recordings with audio.
9.1. Educational Tutorials
- Khan Academy: Offers a vast library of educational videos with clear explanations and visuals.
- Coursera: Provides online courses with screen recordings of lectures and demonstrations.
- Udemy: Features tutorials on various topics, from software development to graphic design.
9.2. Software Demonstrations
- Salesforce: Uses screen recordings to showcase its CRM platform’s features and benefits.
- Adobe: Provides tutorials on using its creative software, such as Photoshop and Premiere Pro.
- Microsoft: Offers demonstrations of its software and services, such as Microsoft Office and Azure.
9.3. Gaming Content
- PewDiePie: Creates entertaining gaming content with commentary and gameplay footage.
- Shroud: Streams live gameplay with professional commentary and analysis.
- Ninja: Offers tutorials and gameplay videos for various games.
10. Future Trends in Screen Recording with Audio
The field of screen recording with audio is constantly evolving. Here are some future trends to watch for:
10.1. AI-Powered Audio Enhancement
AI technology will play an increasingly important role in enhancing audio quality, with features such as automatic noise reduction, echo cancellation, and voice enhancement.
10.2. Real-Time Collaboration
Screen recording software will increasingly support real-time collaboration, allowing multiple users to record and edit content simultaneously.
10.3. Integration with Virtual and Augmented Reality
Screen recording will be integrated with virtual and augmented reality technologies, allowing users to capture immersive experiences.
10.4. Enhanced Accessibility Features
Screen recording software will include enhanced accessibility features, such as automatic captions, transcriptions, and audio descriptions, to make content more inclusive.
11. FAQs About Screen Recording with Audio
11.1. How do I record my screen with sound?
Use a screen recording tool like QuickTime (Mac), Xbox Game Bar (Windows), or the built-in iOS screen recorder. Ensure your microphone is enabled and system audio is set up correctly.
11.2. What is the best software for screen recording with audio?
Popular options include Camtasia, Screenflow, OBS Studio, and Descript. The best choice depends on your specific needs and budget.
11.3. How can I improve the audio quality of my screen recordings?
Use an external microphone, record in a quiet environment, adjust audio settings, and use audio editing software to enhance the sound.
11.4. Can I record system audio on a Mac?
Yes, but you may need to install additional tools like BlackHole to capture system audio effectively.
11.5. How do I enable microphone access on my iPhone for screen recording?
Long-press the screen recording icon in the Control Center and tap the microphone icon to enable audio recording.
11.6. What should I do if my screen recording audio is low quality?
Check your microphone connection, adjust audio settings, reduce background noise, and use audio editing software to improve clarity.
11.7. Is it legal to record someone without their permission?
Laws vary by location, but generally, it is illegal to record someone without their consent in situations where they have a reasonable expectation of privacy.
11.8. How can I add background music to my screen recordings?
Use audio editing software to import and mix background music with your screen recording audio. Ensure you have the necessary licenses for the music you use.
11.9. What is the ideal bitrate and sample rate for screen recording audio?
Aim for a bitrate of at least 128 kbps and a sample rate of 44.1 kHz for clear and professional audio.
11.10. How can I remove background noise from my screen recordings?
Use noise reduction tools in audio editing software or record in a quiet environment to minimize background noise.
12. Call to Action
Ready to take your screen recordings to the next level? Visit streetsounds.net to explore our vast library of high-quality street sounds, perfect for adding depth and authenticity to your projects. Whether you’re creating tutorials, gameplays, or presentations, our sounds will help you captivate your audience and enhance their experience.
Don’t miss out on the opportunity to elevate your content with unique and immersive audio. Explore streetsounds.net today and join our community of creators who are passionate about sound!
Address: 726 Broadway, New York, NY 10003, United States
Phone: +1 (212) 998-8550
Website: streetsounds.net
13. Final Thoughts
Screen recording with audio is an essential skill for anyone creating digital content. By understanding the basics, addressing common issues, and exploring advanced techniques, you can create high-quality recordings that engage and inform your audience. Remember to explore the resources at streetsounds.net to add unique and captivating soundscapes to your projects.
