
Are you wondering, “Can You Screen Record Ft With Sound?” Absolutely! Streetsounds.net is here to provide you with the solutions. While Apple’s built-in screen recorder doesn’t capture audio during FaceTime calls, there are still several ways to record your FaceTime conversations with both video and sound. In this guide, we’ll explore multiple methods using third-party tools and Mac integrations to help you capture those important moments. Let’s dive into capturing high-quality audio, urban soundscapes, and unique sonic textures.
1. Understanding the Basics of Screen Recording on iPhone and iPad
Apple’s built-in screen recorder is a convenient tool, but it has limitations. While it can record the video portion of your FaceTime calls, it doesn’t capture the audio. This can be frustrating if you need to record a conversation or capture important sound elements. Let’s explore how to use this tool and understand its constraints.
1.1 How to Use the Built-In Screen Recorder on iPhone/iPad
The built-in screen recorder is easily accessible through the Control Center. Here’s how to set it up and use it:
- Access Control Center: Open the “Settings” app, then tap “Control Center”.
- Add Screen Recording: Scroll down and find “Screen Recording”. Tap the plus (+) button to add it to your Control Center.
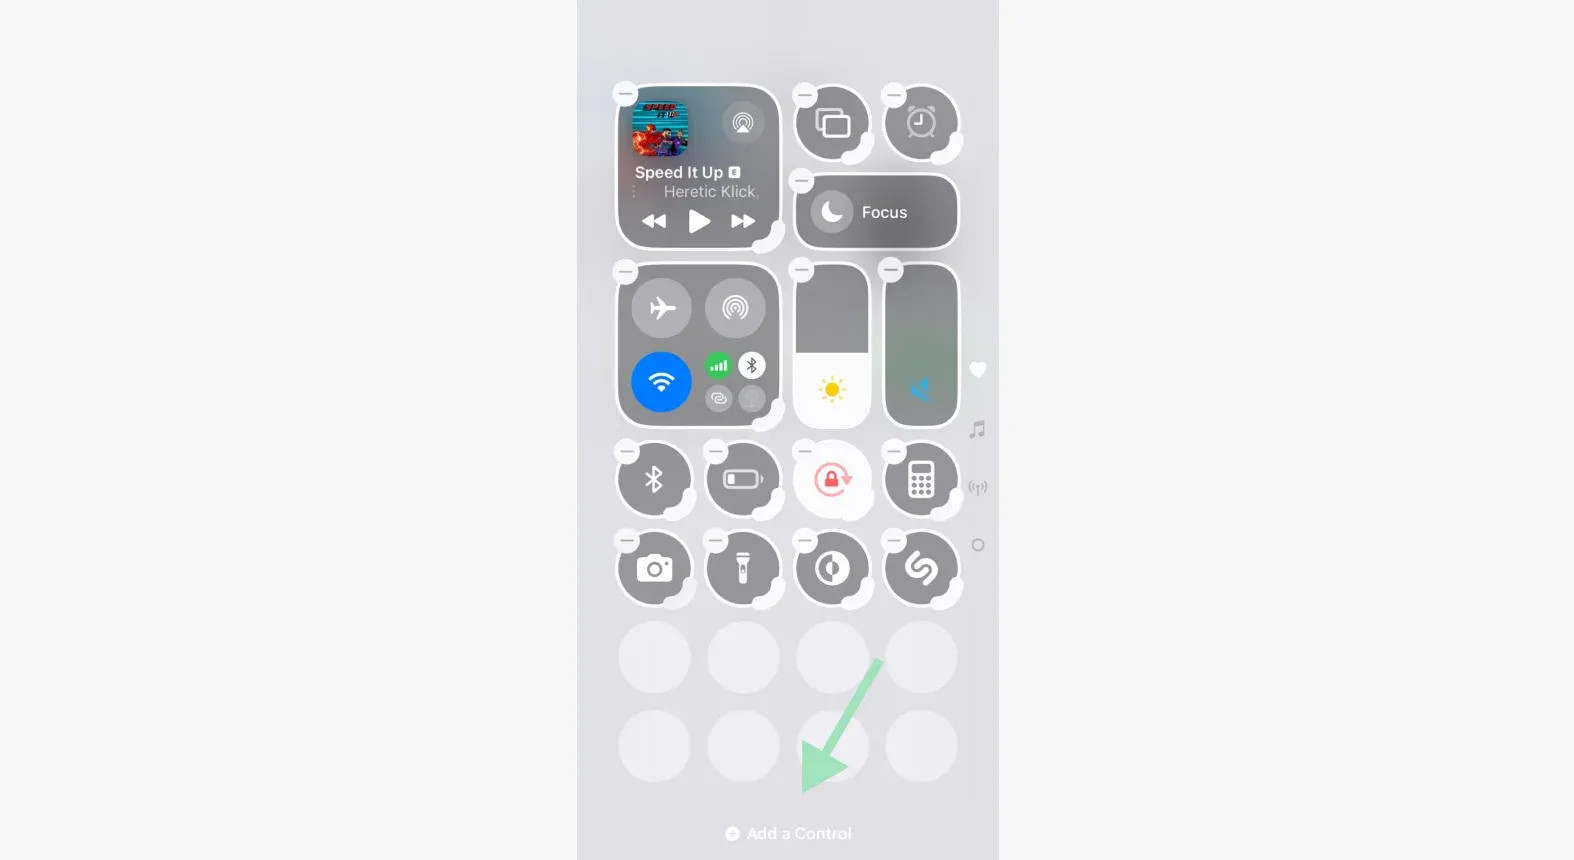 Adding your screen recorder to the control centre on iPhone
- Start Recording: Swipe down from the top-right corner of your screen to open the Control Center. Tap the Screen Recording button (a circle icon). You’ll see a 3-second countdown before recording begins.
- Record FaceTime: Open the FaceTime app and start your call. The screen will record the video, but not the audio directly from the call.
- Stop Recording: To stop, open the Control Center again and tap the Screen Recording button. The video will be saved to your Photos app.
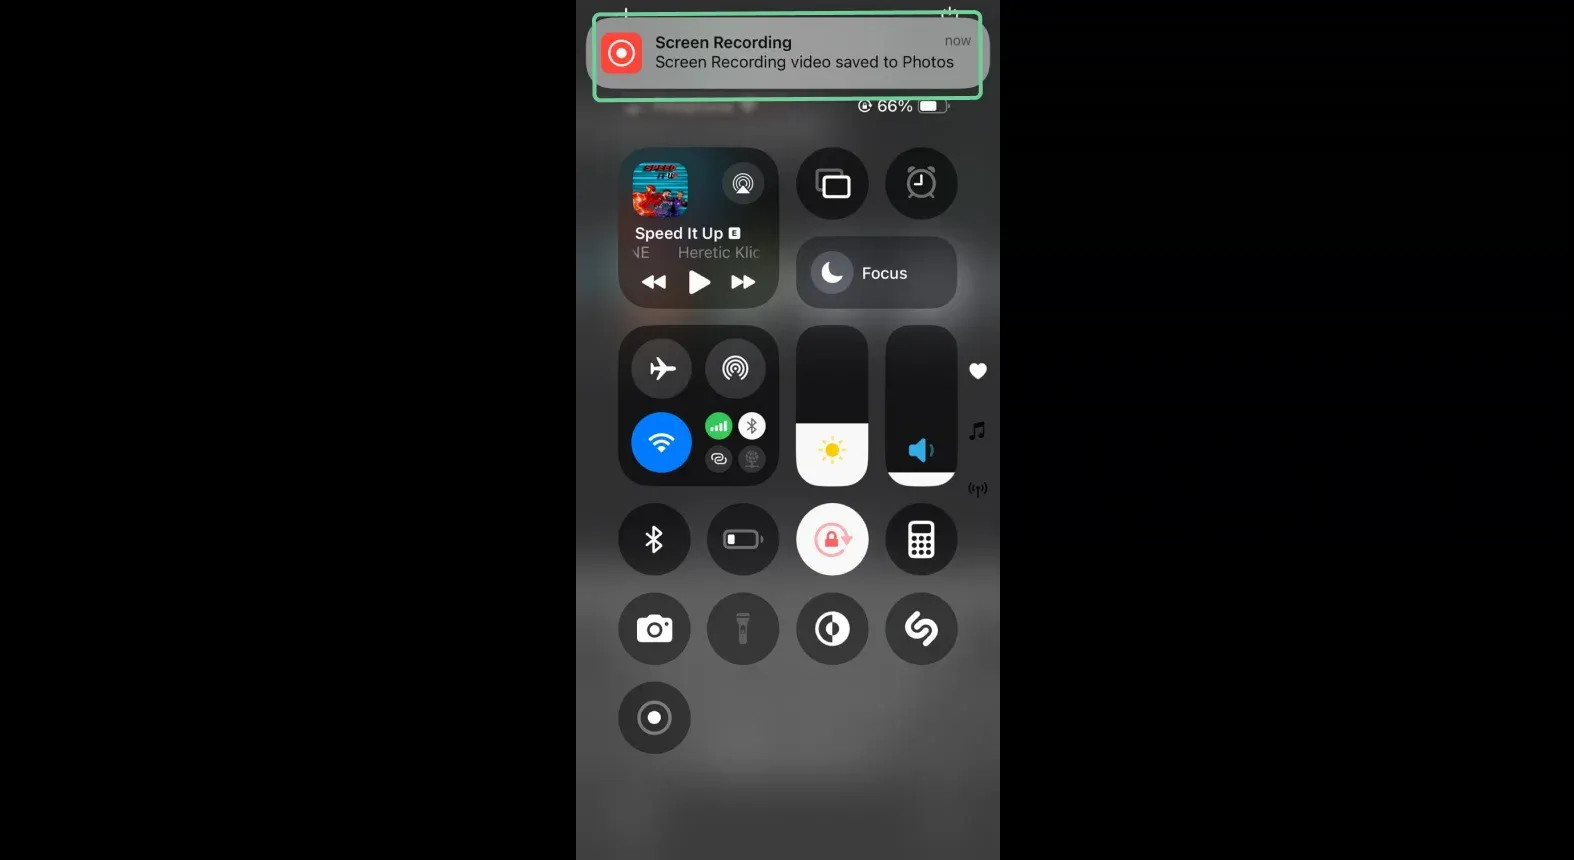 Saving a screen recording of your FaceTime call
1.2 Limitations of Apple’s Built-In Screen Recorder
The primary limitation is the inability to record internal audio. According to Apple’s official documentation, the built-in screen recorder is designed to capture on-screen activity and external audio through the microphone, but not the audio from apps like FaceTime. This means you won’t capture the voices of the people you’re talking to, which is crucial for many recording purposes.
1.3 Why Record FaceTime Calls?
Recording FaceTime calls can be valuable for several reasons:
- Documenting Important Conversations: Preserve important discussions, meetings, or interviews.
- Creating Tutorials: Record yourself explaining something visually.
- Capturing Memories: Save special moments shared with family and friends.
- Content Creation: Use recordings for podcasts, videos, or social media content.
2. Using Third-Party Apps for FaceTime Recording with Audio
Since the built-in screen recorder falls short, third-party apps offer a comprehensive solution. Apps like Riverside are designed to record both audio and video in high quality. Let’s explore how to use these apps for recording FaceTime calls.
2.1 Introduction to Riverside
Riverside is a powerful platform for recording high-quality audio and video. It is particularly useful for recording podcasts, interviews, and important conversations. The mobile app is designed to record FaceTime calls with ease and high-quality resolution.
2.2 Step-by-Step Guide to Recording with Riverside
Here’s how to record FaceTime calls using Riverside:
- Download and Install: Download the Riverside app from the App Store and install it on your iPhone.
- Create an Account: Open the app and create an account or log in if you already have one.
- Create a Studio: Tap “Create a New Studio” to set up a new recording space. This is where your recordings will be stored.
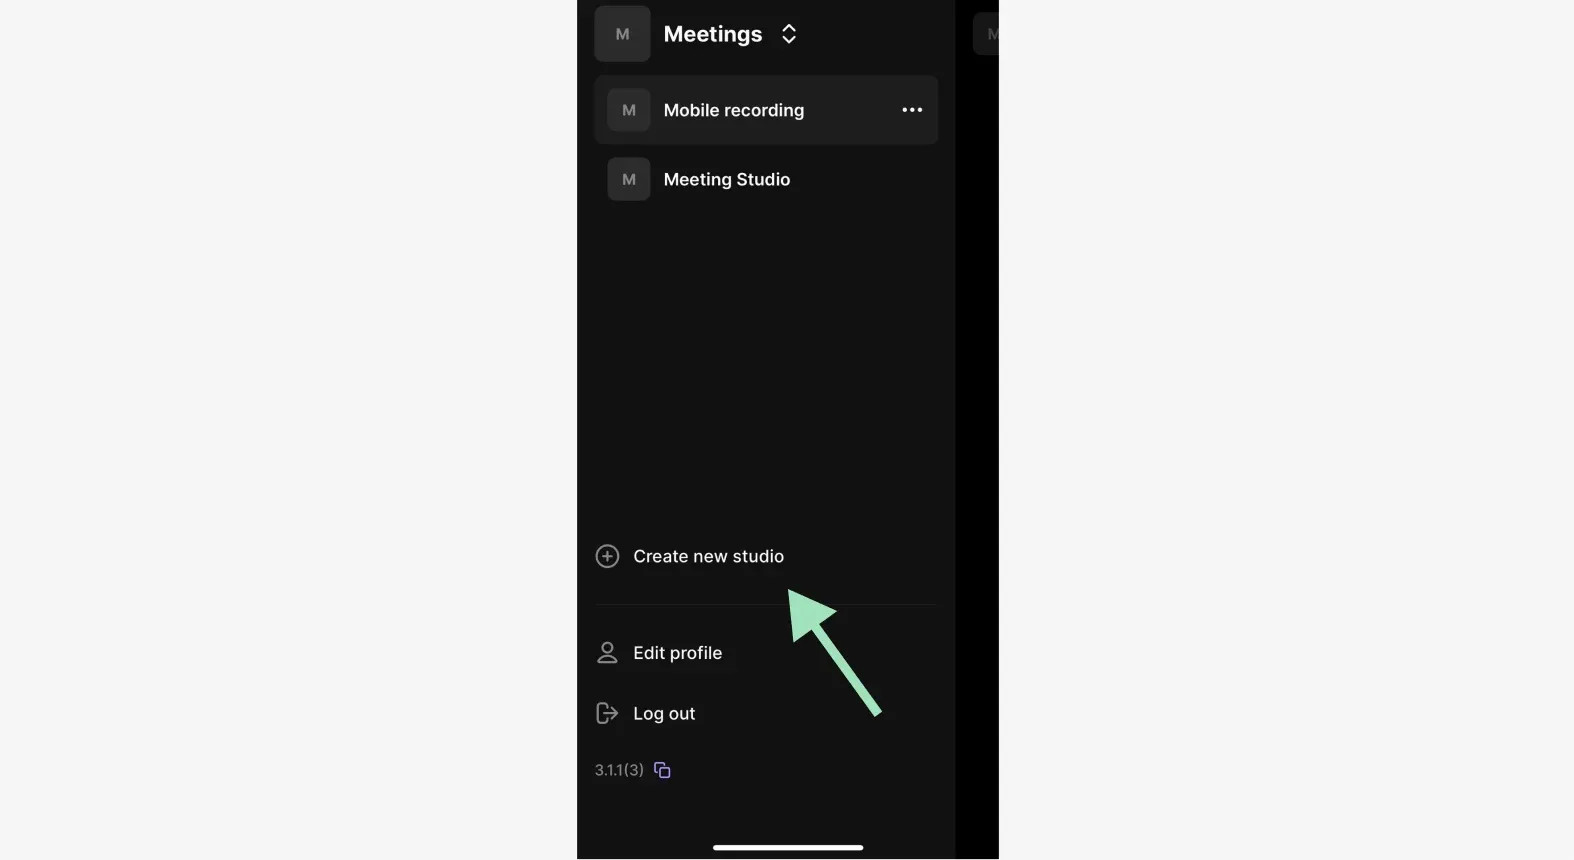 Creating a facetime call recording studio on Riverside
- Start Recording: Click the “Record” button to start a new recording.
- Grant Permissions: Allow access to your camera and microphone when prompted. Click “I’m ready” to proceed.
- Invite Guests: In the studio, click the three dots in the toolbar below to invite participants. Send your guests the invite link.
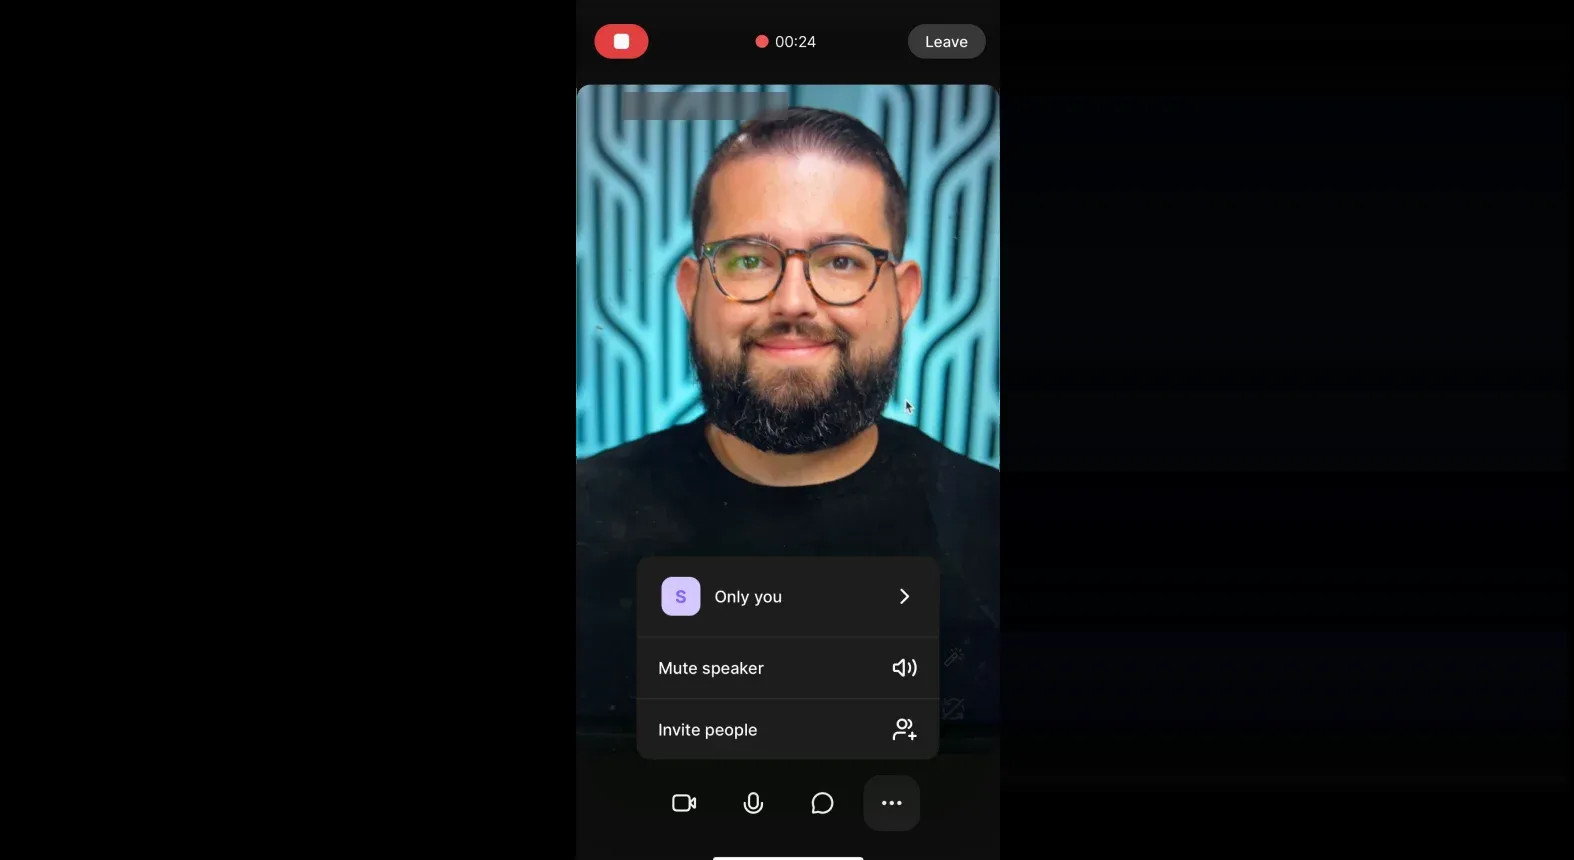 Inviting guests to record a FaceTime call
- Record the Call: Once everyone is in the call, click the REC button on the top left to start recording. This will turn into a Stop button when you’re done.
 Recording a FaceTime call on Riverside
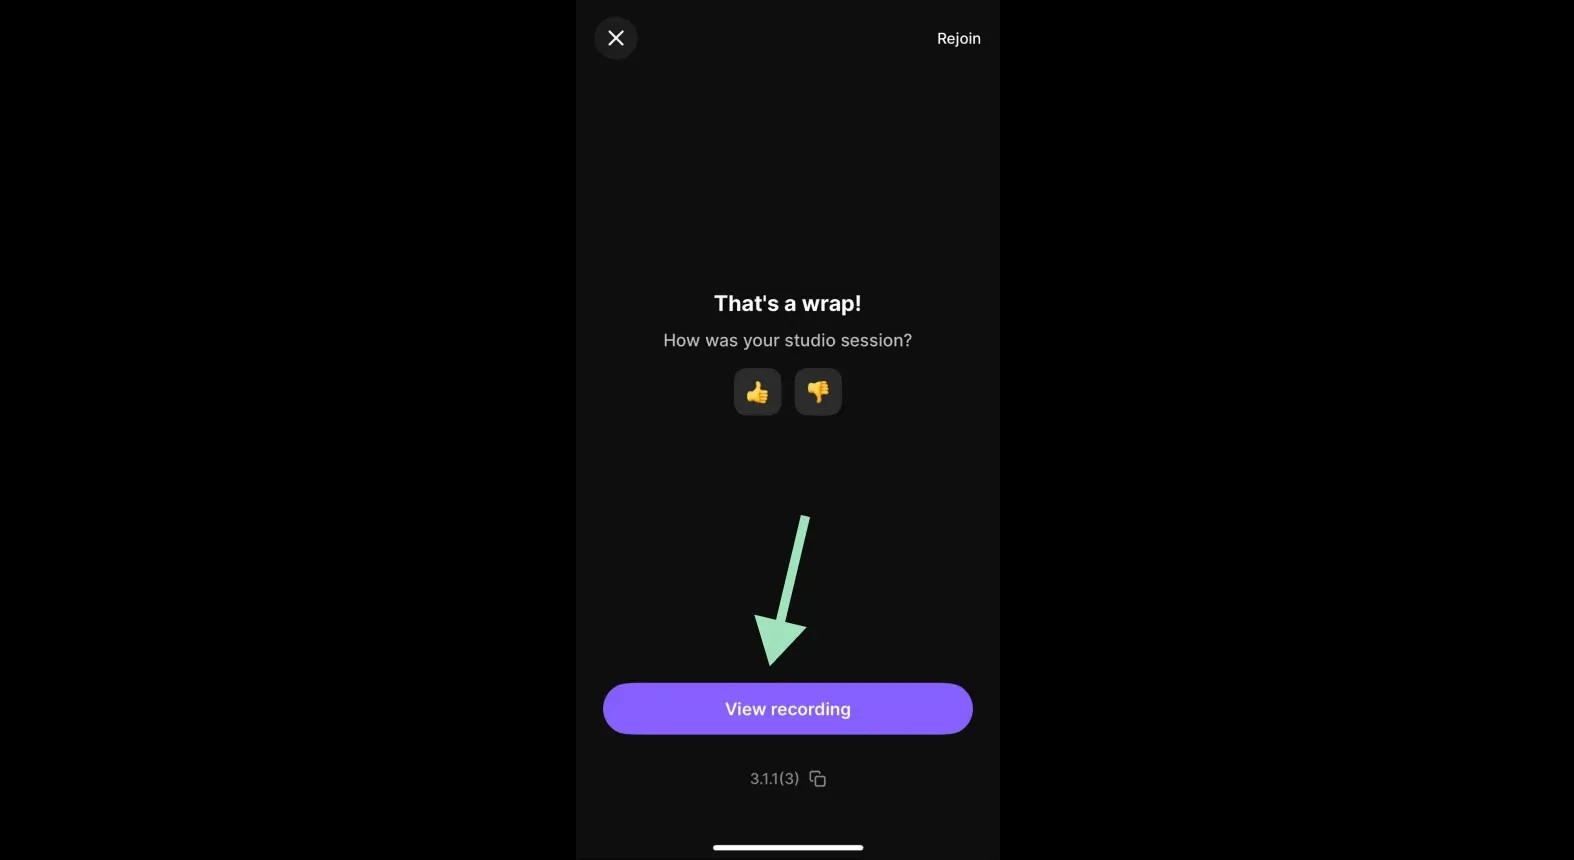
- End and Upload: End the call and wait for your recordings to finish uploading. You can access them in your mobile studio.
2.3 Key Features of Riverside for FaceTime Recording
Riverside offers several features that make it an excellent choice for recording FaceTime calls:
- High-Quality Recording: Records in up to 4K resolution.
- Separate Audio and Video Tracks: Provides individual tracks for each participant, giving you more control during editing.
- Easy-to-Use Interface: Designed for users of all skill levels.
- Local Recording: Ensures quality by recording directly on each participant’s device.
- AI Transcriptions and Summaries: Automatically generates transcripts and summaries of your calls.
- Device Compatibility: Available for iOS, Android, Mac, and Windows.
According to a study by the University of Southern California, recording with separate audio tracks significantly improves the editing process and final sound quality. Riverside’s local recording feature ensures that even with unstable internet connections, the audio and video quality remain high.
2.4 Why Choose Riverside?
Choosing Riverside for recording FaceTime calls provides several advantages:
- Professional Quality: Ensures high-resolution audio and video.
- Flexibility: Allows for extensive editing and customization.
- Convenience: Easy to use on multiple devices.
- Comprehensive Features: Offers tools for recording, editing, and sharing content.
3. Recording FaceTime Calls on Mac
Using your Mac to record FaceTime calls with audio is another viable option. Apple products integrate seamlessly, making the process relatively straightforward.
3.1 Using QuickTime Player
QuickTime Player is a built-in application on macOS that can record your screen and audio. Here’s how to use it for recording FaceTime calls:
- Open QuickTime Player: Find QuickTime Player in your Applications folder and open it.
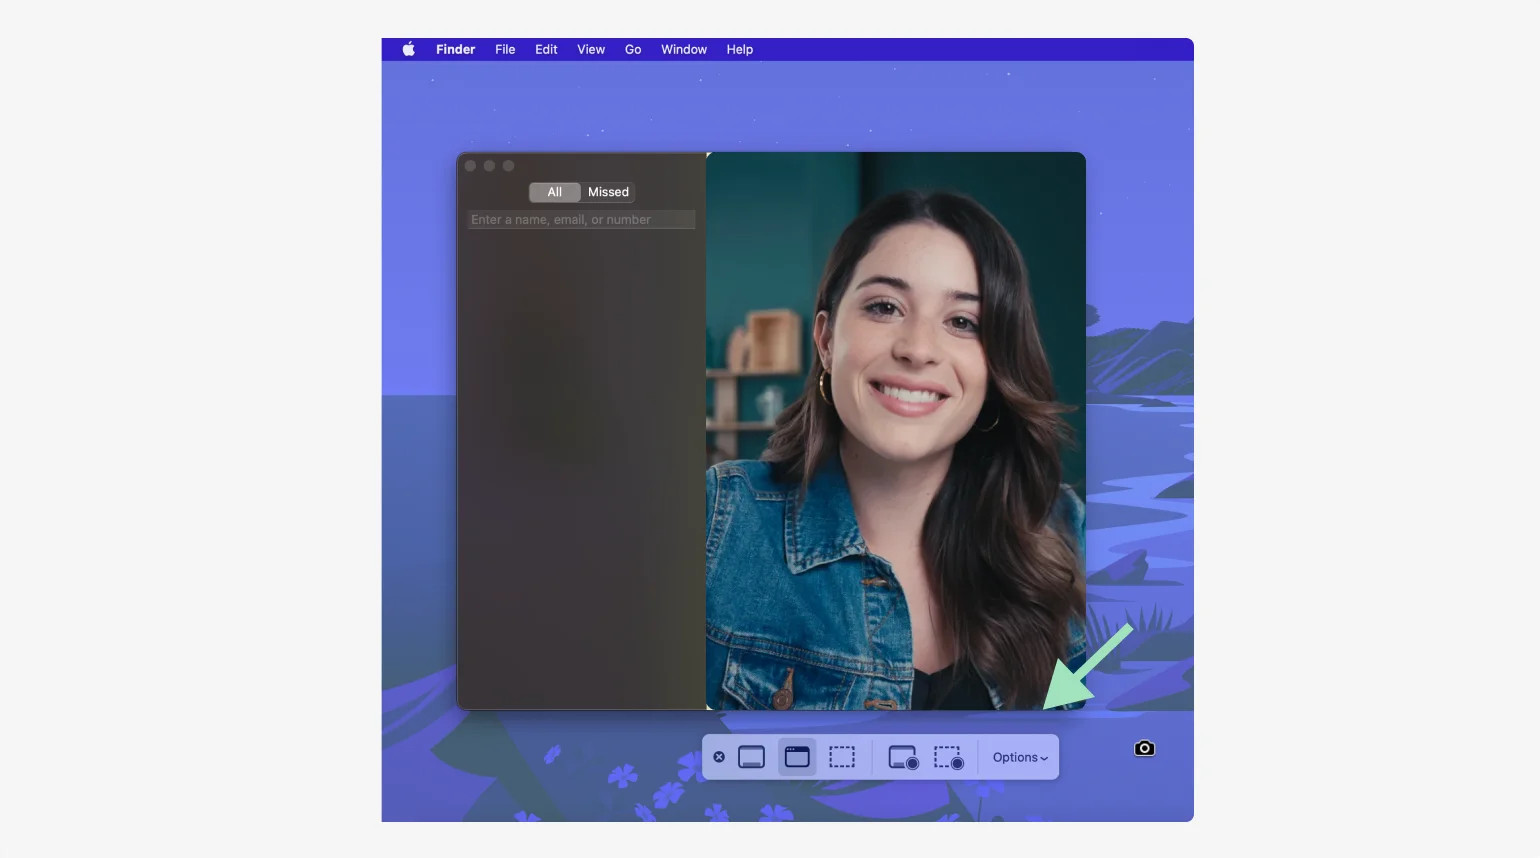
- New Screen Recording: In the menu bar, click “File” and select “New Screen Recording”.
- Configure Options: A small recording panel will appear. Click the arrow next to the record button to configure your settings. Choose your computer’s built-in microphone as your audio source.
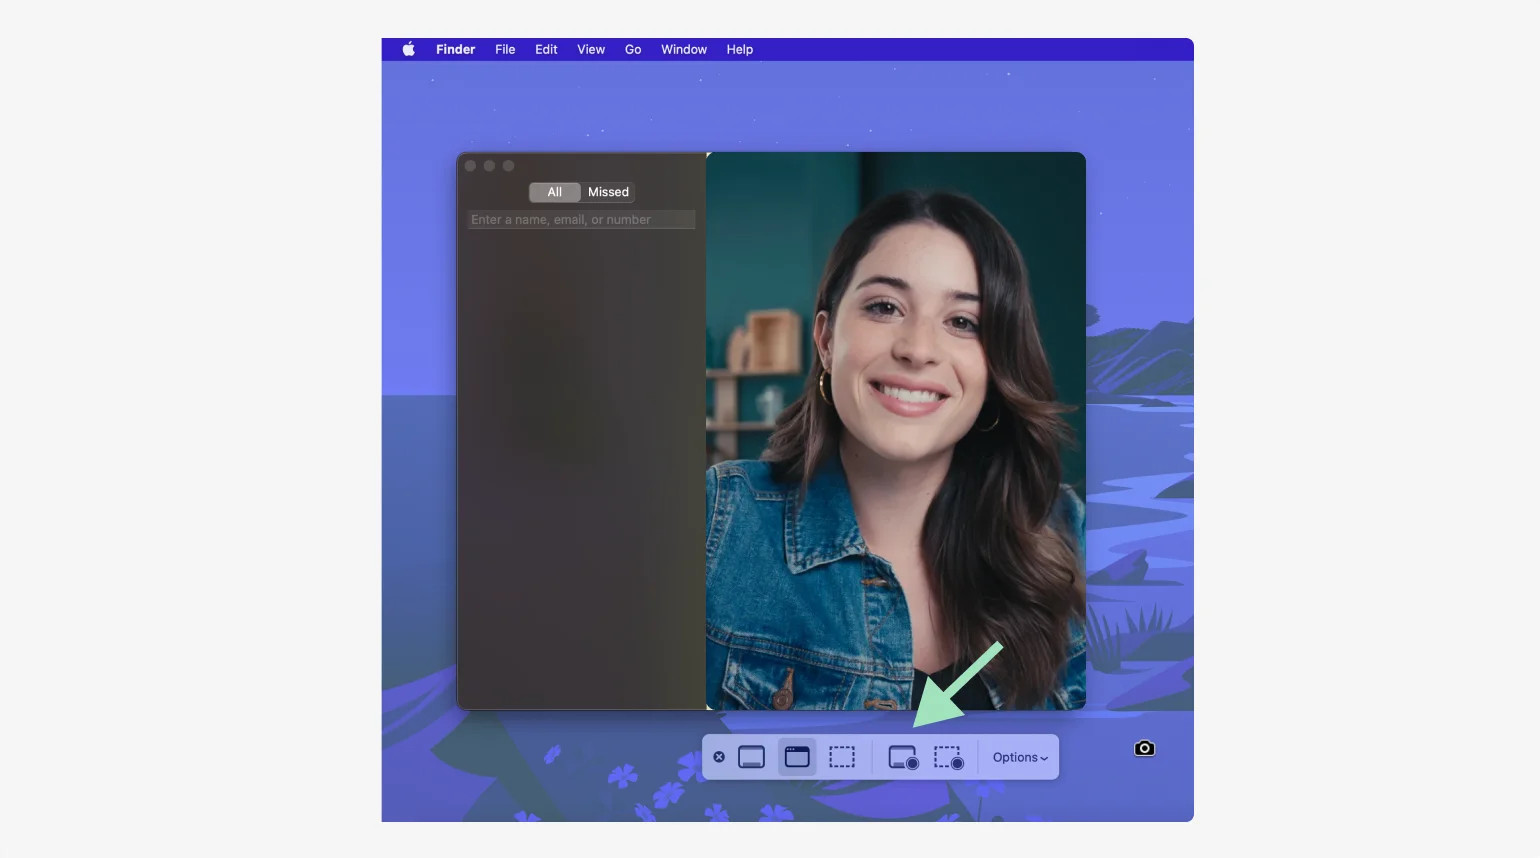
- Start Recording: Click the record button to start recording. You can choose to record the entire screen or a selected portion.
- Make the FaceTime Call: Open FaceTime and start your call.
- Stop Recording: When your call is finished, click the stop button in the menu bar.
- Save the Recording: QuickTime will open the recording. Go to “File” and “Save” to save the recording to your desired location.
 How to record a facetime call on Mac
3.2 Recording FaceTime Calls Using Continuity Camera
If you have both an iPhone and a Mac, you can use Continuity Camera to record FaceTime calls. This feature allows you to use your iPhone as your webcam on your Mac.
- Connect iPhone to Mac: Connect your iPhone to your Mac using a lightning cable. Alternatively, you can use Continuity Camera wirelessly if both devices are on the same Wi-Fi network and signed in with the same Apple ID.
- Open QuickTime Player: Open QuickTime Player on your Mac.
- New Movie Recording: Select “File” from the menu bar and choose “New Movie Recording”.
- Select iPhone as Camera: Click the arrow to the right of the Record button to see a list of available cameras. Select your iPhone from the list.
- Unlock iPhone: Unlock your iPhone, and its display should appear on your Mac screen in QuickTime.
- Open FaceTime: On your iPhone, open FaceTime.
- Start Recording: In QuickTime, click the Record button.
- Make the Call: Make a call using FaceTime on your iPhone.
- Stop Recording: Click “Stop Recording” when your call is finished.
- Save Recording: Click “File” and then “Save”. Name your recording and select where you want to save it before clicking “Save”.
 Recording a FaceTime call on Mac
3.3 Advantages of Recording on Mac
Recording FaceTime calls on a Mac offers several advantages:
- Integration: Seamless integration with other Apple devices and software.
- Higher Quality: Often results in higher quality audio and video compared to recording on a mobile device.
- Storage: More storage space available on a Mac compared to an iPhone or iPad.
- Editing Capabilities: Easier to edit recordings on a Mac using professional video editing software.
4. Recording FaceTime Calls on Android
FaceTime was initially limited to Apple devices, but now Android and PC users can join FaceTime sessions through a link. While you can’t start a FaceTime call from an Android device, an iOS user can send a link that allows Android users to join and record the call.
4.1 Joining FaceTime Calls on Android
To join a FaceTime call on an Android device, you need a link sent by an iOS user. Here’s how it works:
- Receive the Link: An iOS user creates a FaceTime link and shares it via email, message, or social media apps like Facebook Messenger or WhatsApp.
- Open the Link: On your Android device, open the link in Google Chrome (currently the only supported browser).
- Join the Call: Follow the prompts to join the FaceTime call.
4.2 Recording the Call on Android
Once you’ve joined the FaceTime call on your Android device, you can use a screen recording app to record the call. Here’s how:
- Download a Screen Recording App: Download a screen recording app from the Google Play Store. Some popular options include AZ Screen Recorder, XRecorder, and Mobizen Screen Recorder.
- Configure the App: Open the screen recording app and configure the settings to record audio and video. Ensure that the app has permission to access your microphone and storage.
- Start Recording: Start the screen recording app before joining the FaceTime call.
- Join the FaceTime Call: Join the FaceTime call using the link provided by the iOS user.
- Record the Call: The screen recording app will record both the video and audio of the FaceTime call.
- Stop Recording: When the call is finished, stop the screen recording. The recording will be saved to your device’s storage.
4.3 Best Screen Recording Apps for Android
Here are some of the best screen recording apps for Android:
| App | Key Features |
|---|---|
| AZ Screen Recorder | No root required, no recording time limit, high-quality video, screen capture, video editor. |
| XRecorder | No watermark, no root needed, unlimited recording time, easy to use, screen capture, video editor. |
| Mobizen Screen Recorder | Clean recording mode, facecam, editing tools, high-quality recording, no root required. |
| Google Play Games | Built-in screen recording feature for games, but can also record other apps, easy to use, no additional app installation required. |
| ADV Screen Recorder | Two engines (default and advanced), allows pausing, drawing on the screen during recording, customizable settings, no root required. |
According to a survey by TechRadar, AZ Screen Recorder and XRecorder are consistently ranked as the top screen recording apps for Android due to their ease of use and comprehensive features.
5. Legal Considerations for Recording FaceTime Calls
Before recording any FaceTime call, it’s important to understand the legal implications. Laws regarding audio and video recording vary by state and country, so it’s essential to be informed.
5.1 Consent Requirements
Many jurisdictions require consent from all parties before recording a conversation. This is known as “two-party consent” or “all-party consent.” Other jurisdictions only require one-party consent, meaning that only one person involved in the conversation needs to consent to the recording.
5.2 State Laws in the USA
In the United States, laws vary by state:
- Two-Party Consent States: States like California, Montana, Pennsylvania, and Washington require consent from all parties.
- One-Party Consent States: Most states, including New York, Texas, and Florida, only require one-party consent.
5.3 Best Practices for Legal Compliance
To ensure you are compliant with the law, follow these best practices:
- Obtain Consent: Always ask for and obtain consent from all participants before recording a FaceTime call.
- Inform Participants: Clearly inform participants that the call is being recorded and why.
- Document Consent: Keep a record of the consent obtained, whether it’s a written agreement or a verbal confirmation recorded at the beginning of the call.
- Know the Laws: Familiarize yourself with the recording laws in your state and the states of the other participants.
According to the Digital Media Law Project, obtaining explicit consent is always the safest approach to avoid legal issues related to recording conversations.
6. Exploring Streetsounds.net: Your Ultimate Resource for Audio Inspiration
Now that you know how to record FaceTime calls with sound, let’s explore how you can use those recordings and find inspiration at Streetsounds.net.
6.1 Discovering Unique Soundscapes
Streetsounds.net is your go-to destination for high-quality urban soundscapes and unique sonic textures. Whether you’re a musician, filmmaker, game designer, or simply an audio enthusiast, our library offers a diverse range of sounds to enhance your projects.
6.2 How Streetsounds.net Can Help You
- Extensive Sound Library: Access a vast collection of street sounds, from bustling city ambiences to specific sound events like traffic, construction, and human interactions.
- High-Quality Recordings: All sounds are professionally recorded and curated to ensure top-notch quality.
- Inspiration for Creative Projects: Use our sounds to add authenticity and depth to your music, films, games, and other creative endeavors.
- Community Engagement: Connect with other audio enthusiasts, share your projects, and get feedback from the community.
Address: 726 Broadway, New York, NY 10003, United States. Phone: +1 (212) 998-8550. Website: streetsounds.net.
6.3 Integrating Street Sounds Into Your Projects
Here are some ways to integrate street sounds into your projects:
- Music Production: Use street sounds as samples, loops, or textures to create unique and innovative tracks.
- Filmmaking: Add ambient street sounds to your films to create a sense of realism and immersion.
- Game Design: Enhance your game environments with authentic urban soundscapes.
- Podcasting: Use street sounds as background ambience or transitions to create a more engaging listening experience.
6.4 Success Stories and Examples
Many artists and creators have successfully used street sounds to enhance their projects. For example, a film student at New York University used recordings from Streetsounds.net to create an immersive soundscape for their short film, which won an award at a film festival. Similarly, a music producer used samples from our library to create a hit track that captured the essence of urban life.
7. Optimizing Your Recordings for Streetsounds.net
To make the most of your recordings on Streetsounds.net, consider these optimization tips:
7.1 Enhancing Audio Quality
- Use High-Quality Equipment: Invest in good microphones and recording devices.
- Record in Quiet Environments: Minimize background noise and distractions.
- Use Audio Editing Software: Clean up your recordings using software like Audacity, Adobe Audition, or Logic Pro.
- Master Your Audio: Properly master your audio to ensure it sounds its best on different devices and platforms.
7.2 Creating Engaging Visuals
- Use High-Resolution Video: Record video in 4K or at least 1080p.
- Stabilize Your Footage: Use a tripod or image stabilization software to reduce camera shake.
- Edit Your Video: Use video editing software like Adobe Premiere Pro or Final Cut Pro to create visually appealing content.
- Add Graphics and Text: Enhance your video with graphics, text overlays, and animations.
7.3 Tagging and Metadata
- Use Relevant Keywords: Tag your recordings with relevant keywords to make them easier to find.
- Write Detailed Descriptions: Provide detailed descriptions of your recordings, including the location, time, and specific sounds captured.
- Categorize Your Recordings: Properly categorize your recordings to ensure they are listed in the correct section of Streetsounds.net.
8. Real-World Applications of FaceTime Recordings and Street Sounds
The combination of FaceTime recordings and street sounds can be used in various creative and professional contexts.
8.1 Educational Purposes
- Online Learning: Record FaceTime lectures and discussions for students who can’t attend in person.
- Language Learning: Use street sounds to create immersive language learning experiences.
- Research: Capture interviews and field recordings for academic research.
8.2 Business and Professional Use
- Remote Meetings: Record important business meetings and presentations.
- Customer Support: Capture customer service interactions for training purposes.
- Marketing: Create engaging marketing videos using street sounds and FaceTime recordings.
8.3 Artistic and Creative Projects
- Documentary Filmmaking: Use FaceTime interviews and street sounds to create compelling documentaries.
- Interactive Art Installations: Combine FaceTime recordings with street sounds to create immersive art experiences.
- Virtual Reality Experiences: Use street sounds to enhance the realism of virtual reality environments.
9. The Future of Audio and Video Recording
As technology continues to evolve, the future of audio and video recording looks promising.
9.1 Emerging Technologies
- AI-Powered Recording Tools: AI-powered tools can automatically enhance audio and video quality, transcribe recordings, and generate summaries.
- Spatial Audio: Spatial audio technologies create immersive sound experiences that simulate real-world environments.
- Cloud-Based Recording Platforms: Cloud-based platforms allow for remote recording and collaboration, making it easier to create content with participants from around the world.
9.2 Trends in Urban Soundscapes
- Urban Sound Ecology: The study of urban soundscapes and their impact on human health and well-being.
- Sound Art: The use of sound as a medium for artistic expression.
- Acoustic Design: The design of urban environments to optimize sound quality and minimize noise pollution.
9.3 How Streetsounds.net Stays Ahead
Streetsounds.net is committed to staying at the forefront of audio and video recording technology. We continuously update our library with the latest sounds, collaborate with leading experts in the field, and invest in cutting-edge technology to ensure our users have access to the best resources available.
10. FAQ: Recording FaceTime Calls
10.1 Can You Legally Record a FaceTime Call?
The legality of recording audio and video varies by state, but it’s always best to get permission before recording. Check if your state requires two-party consent.
10.2 Can You Use FaceTime with an Android?
Yes, anyone with an Android device can join and record FaceTime calls by clicking on a link sent to them by an iOS user.
10.3 Can You Record FaceTime on an Android?
Yes, many screen recording apps in the Google Play store will let you record FaceTime calls. You need a link from an iOS user to join and record a FaceTime call.
10.4 Can I Record a FaceTime Call on iPhone?
You can use your built-in screen recorder to record a FaceTime call on an iPhone. Although, this doesn’t record audio. Try long-pressing on the screen recording button to turn on a microphone recorder or use external recording software.
10.5 Can You Video Record a FaceTime Session?
Yes, you can easily video record a FaceTime session either directly from your iPhone using the built-in screen recorder or on your Mac.
10.6 Can You Record a FaceTime Call on an iPad?
Yes, you can use the built-in screen recorder on your iPad to record a FaceTime call. Ensure your microphone is turned on in the settings.
10.7 Is Riverside a Free App?
Riverside offers both free and paid plans. The free plan provides basic recording capabilities, while the paid plans offer advanced features like high-resolution recording, separate audio tracks, and AI transcriptions.
10.8 What is the Best App for Recording FaceTime Calls?
Riverside is often considered one of the best apps for recording FaceTime calls due to its high-quality audio and video, separate audio tracks, and user-friendly interface.
10.9 How Do I Ensure High-Quality Audio When Recording?
To ensure high-quality audio, use a good microphone, record in a quiet environment, and use audio editing software to clean up your recordings.
10.10 Can I Use FaceTime Recordings for Commercial Purposes?
You can use FaceTime recordings for commercial purposes as long as you have obtained consent from all participants and comply with all applicable laws.
Conclusion
Recording FaceTime calls with sound is achievable through various methods, from third-party apps like Riverside to using QuickTime on a Mac. Understanding the legal aspects and optimizing your recordings will ensure you capture high-quality audio and video for any purpose. And when you’re looking for the perfect urban soundscape to complement your recordings, remember to explore the extensive library at Streetsounds.net.
Ready to take your audio and video projects to the next level? Visit streetsounds.net today to discover a world of high-quality urban soundscapes and connect with a community of passionate audio enthusiasts. Start exploring now and unleash your creative potential!