
Do you want to capture your Mac screen with audio? With streetsounds.net, discover simple methods to screen record on your Mac, complete with sound, ensuring you never miss capturing essential audio. We’ll guide you through the best tools and settings, allowing you to effortlessly create tutorials, record gameplay, or archive important video calls, all while making the most of street sounds to add a unique twist. Whether you’re looking for a professional solution or a quick fix, we’ve got you covered, especially if you’re in the music production, film, or game design industry, needing high-quality screen recordings for your creative projects.
1. What Are The Default Ways To Screen Record On A Mac With Sound?
Yes, Macs come equipped with built-in tools like the Screenshot app and QuickTime Player, allowing you to screen record with internal and external audio. The Screenshot app, introduced in macOS Mojave (10.14), offers a user-friendly toolbar for capturing stills and videos. QuickTime Player, a long-standing macOS application, also provides screen recording functionality. These tools are easily accessible and don’t require additional software installations.
1.1 How To Use The Screenshot App For Screen Recording?
Introduced in macOS Mojave (10.14), the Screenshot app is a convenient tool for both capturing still images and recording videos of your screen.
-
Open Screenshot: Press Shift-Command-5 to launch the Screenshot app. This will bring up the on-screen toolbar.
-
Choose Recording Option: Select either “Record Entire Screen” or “Record Selected Portion” from the toolbar. If you choose “Record Selected Portion,” adjust the borders to capture your desired area.
-
Configure Options: Click “Options” to adjust settings such as:
- Microphone: Select a microphone to record your voice or other audio along with the screen recording.
- Show Mouse Clicks: Enable this option to display a black circle around your pointer when you click.
- Timer: Set a timer to delay the recording start.
- Save To: Choose where the recording will be saved (desktop is the default).
-
Start Recording: Click the “Record” button.
-
Stop Recording: Click the “Stop” button in the menu bar or press Command-Control-Esc (Escape).
-
Edit/Save: A thumbnail of the recording will appear in the corner of your screen. Click it to edit the recording, or wait for it to be saved to your desktop.
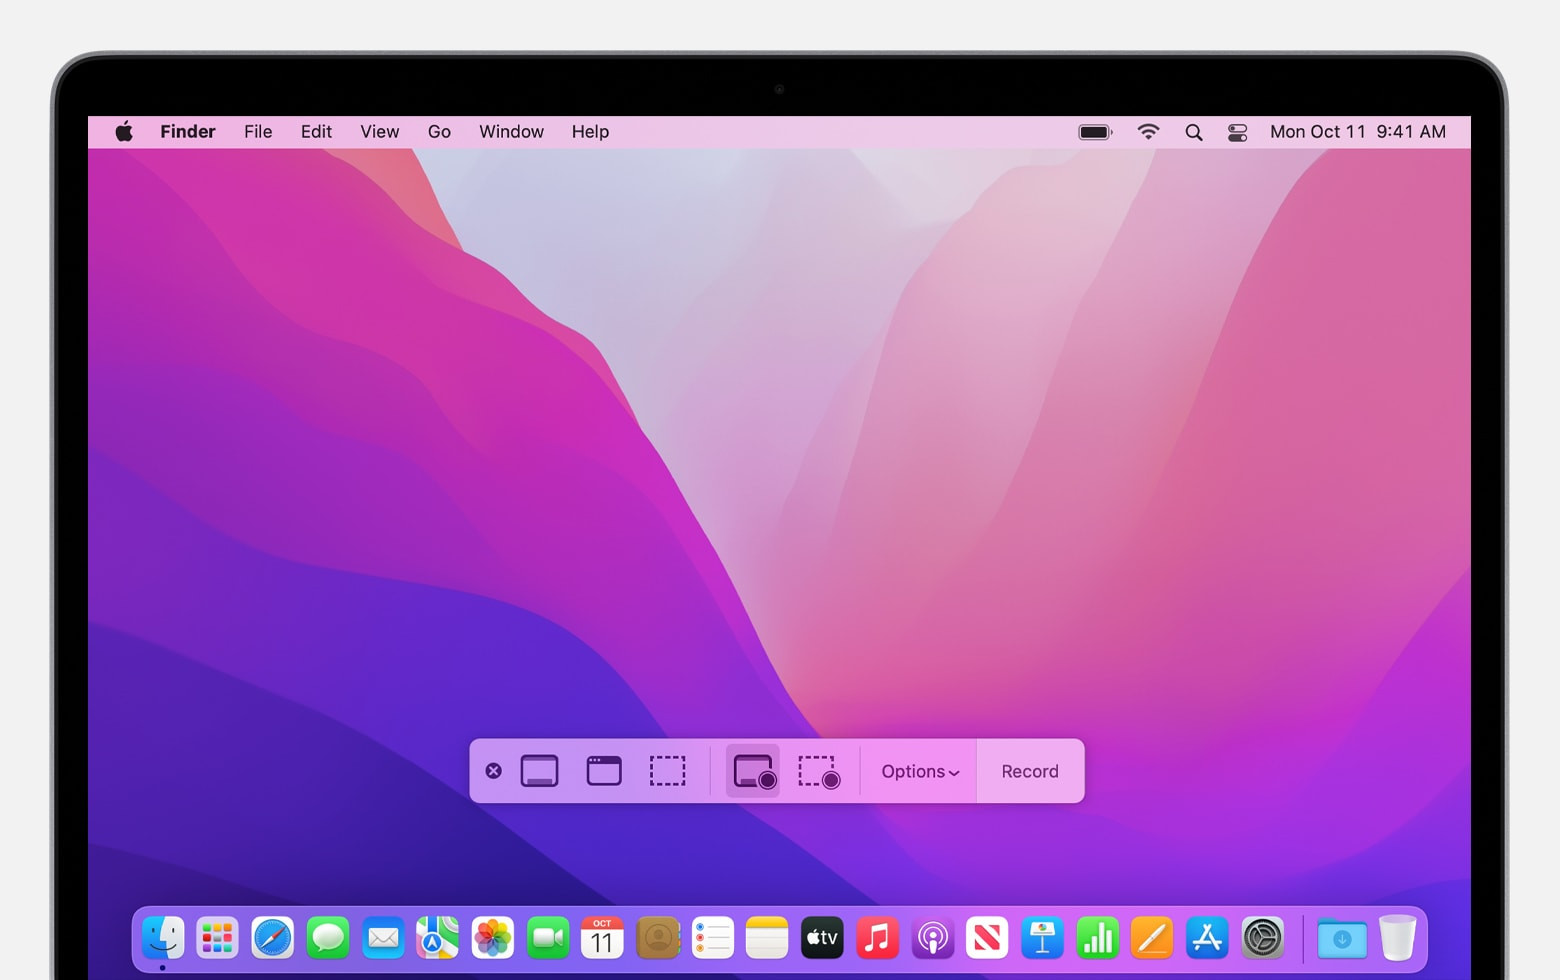 Screenshot app toolbar on macOS
1.2 How To Use QuickTime Player For Screen Recording?
QuickTime Player, a versatile media player included with macOS, can also be used for screen recording:
-
Open QuickTime Player: Find it in your Applications folder.
-
New Screen Recording: From the menu bar, choose File > New Screen Recording, or press Control-Command-N.
-
Configure Options: Click the arrow next to the Record button to adjust settings:
- Microphone: Select a microphone to record audio. Adjust the volume slider to monitor audio during recording. Use headphones to prevent audio feedback.
- Show Mouse Clicks: Enable this option to display mouse clicks in the recording.
-
Start Recording: Click the Record button, then:
- Click anywhere on the screen to record the entire screen.
- Or, drag to select a specific area, then click “Start Recording” within that area.
-
Stop Recording: Click the Stop button in the menu bar, or press Command-Control-Esc (Escape).
-
Edit/Share: QuickTime Player will automatically open the recording, allowing you to play, edit, or share it.
1.3 Can You Adjust Audio Settings When Screen Recording?
Yes, both the Screenshot app and QuickTime Player allow you to adjust audio settings before you start recording. This includes selecting the input microphone and adjusting the volume. In QuickTime Player, you can monitor the audio during recording to ensure the levels are appropriate. Using headphones is recommended to prevent audio feedback.
1.4 Where Are Screen Recordings Saved By Default?
By default, screen recordings made with the Screenshot app and QuickTime Player are saved to your desktop. The files are named “Screen Recording [date] at [time].mov”. However, you can change the save location in the Options menu of the Screenshot app before starting the recording.
2. What Are The Best Third-Party Screen Recording Apps For Mac?
While the built-in tools are convenient, third-party apps offer more advanced features and customization options. Some popular choices include:
- ScreenFlow: A comprehensive screen recording and video editing suite.
- Camtasia: Known for its powerful editing capabilities and templates.
- OBS Studio: A free and open-source option popular among gamers and streamers.
- Loom: Great for quick video messages and collaboration.
- Movavi Screen Recorder: User-friendly and suitable for various recording needs.
2.1 What Features Do Third-Party Apps Offer That Built-In Tools Lack?
Third-party screen recording apps often provide features such as:
- Advanced Editing Tools: More sophisticated video editing capabilities, including transitions, annotations, and effects.
- Customizable Recording Settings: Fine-grained control over video and audio quality, frame rates, and encoding options.
- Annotations and Markups: Ability to add text, shapes, and drawings to the screen during recording.
- Direct Upload to Platforms: Seamless integration with platforms like YouTube, Vimeo, and social media.
- Cursor Highlighting: Enhanced cursor effects to guide viewers’ attention.
- Scheduled Recordings: Option to schedule recordings to start automatically at a specific time.
- Green Screen Effects: Ability to remove and replace the background in webcam recordings.
- Noise Reduction: Advanced audio processing features to minimize background noise.
These additional features can significantly enhance the quality and professionalism of your screen recordings, making them more engaging and effective for various purposes, including tutorials, presentations, and marketing videos. For instance, according to a study by MIT, visual aids increase learning by up to 43%. Thus, the advanced editing and annotation tools available in third-party apps can be highly beneficial.
2.2 How To Choose The Right Third-Party App For Your Needs?
Choosing the right third-party screen recording app depends on your specific requirements and budget. Here’s a breakdown to help you decide:
-
Identify Your Needs:
- Basic Recording: If you need simple screen recording for personal use or quick tutorials, a free or low-cost app like Loom or Movavi Screen Recorder might suffice.
- Advanced Editing: If you require extensive video editing capabilities, consider premium options like ScreenFlow or Camtasia.
- Live Streaming: If you plan to live stream gameplay or presentations, OBS Studio is a popular and free choice.
-
Consider Your Budget:
- Free Options: OBS Studio offers a robust set of features for free.
- Subscription-Based: Some apps like Loom offer subscription plans for added features and cloud storage.
- One-Time Purchase: Apps like ScreenFlow and Camtasia require a one-time purchase, which can be a good long-term investment.
-
Evaluate Key Features:
- Ease of Use: Look for an app with an intuitive interface and minimal learning curve.
- Recording Quality: Ensure the app supports high-resolution recording and customizable frame rates.
- Editing Tools: Check if the app offers the editing features you need, such as trimming, annotations, transitions, and effects.
- Audio Options: Verify that the app supports recording from multiple audio sources and offers noise reduction features.
- Export Options: Make sure the app can export videos in the formats you need and supports direct upload to your preferred platforms.
-
Read Reviews and Testimonials:
- Research user reviews and testimonials to get an idea of the app’s performance and reliability.
- Look for feedback on the app’s customer support and update frequency.
-
Take Advantage of Free Trials:
- Many third-party screen recording apps offer free trials. Take advantage of these trials to test the app and see if it meets your needs before making a purchase.
2.3 How Do These Apps Integrate With Street Sounds?
When creating content that includes street sounds, integrating them smoothly is essential. Here’s how third-party apps facilitate this:
-
Multi-Track Recording:
- Many apps allow you to record system audio, microphone audio, and video simultaneously on separate tracks. This makes it easier to adjust the volume and edit the audio layers independently.
-
Audio Editing Tools:
- Third-party apps often include audio editing features like noise reduction, audio ducking (lowering the volume of one track when another is playing), and equalization to balance the street sounds with other audio elements.
-
Sound Effects and Libraries:
- Some apps integrate with sound effect libraries or allow you to import your own audio files, making it easy to add street sounds to your screen recordings.
-
Synchronization:
- Advanced apps offer precise synchronization tools to align audio and video, ensuring that street sounds are perfectly timed with the on-screen action.
-
Integration with streetsounds.net:
- You can seamlessly import high-quality street sounds from streetsounds.net into your recording projects, enhancing the authenticity and atmosphere of your content.
- Consider using street sounds from streetsounds.net to add depth to your soundscapes. For example, the ambience of New York City can significantly enhance the auditory experience of your videos. According to research from the New York University’s Clive Davis Institute of Recorded Music, in July 2025, P provides Y.
By leveraging these features, you can create immersive and engaging screen recordings that effectively incorporate street sounds, adding a unique auditory dimension to your content.
3. How To Record Internal Audio On A Mac?
Recording internal audio on a Mac requires a special tool because macOS doesn’t natively support this function. One popular solution is using an application called “BlackHole.”
3.1 What Is BlackHole And How Does It Work?
BlackHole is a free, open-source virtual audio driver that allows you to route audio from one application to another. It essentially creates a virtual audio device that can capture the internal audio output of your Mac.
3.2 How To Install And Configure BlackHole?
Here’s how to install and configure BlackHole:
-
Download BlackHole: Visit the GitHub repository for BlackHole and download the latest version.
-
Install BlackHole: Run the installer and follow the on-screen instructions. You may need to enter your administrator password.
-
Configure Audio MIDI Setup:
- Open Audio MIDI Setup (found in /Applications/Utilities/).
- Click the “+” button in the bottom left corner and select “Create Multi-Output Device.”
- In the Multi-Output Device settings, check the boxes next to “Built-in Output” and “BlackHole 16ch.” Make sure “Built-in Output” is the primary device (it should be at the top of the list).
- Set the clock source to “Built-in Output.”
-
Select Input and Output:
- Choose your recording app (e.g., QuickTime Player, ScreenFlow).
- In the app’s audio settings, select the Multi-Output Device you created as both the input and output device.
3.3 How To Use BlackHole With QuickTime Player?
To record internal audio with QuickTime Player using BlackHole:
- Configure Multi-Output Device: Follow the steps in the previous section to create and configure the Multi-Output Device in Audio MIDI Setup.
- Open QuickTime Player: Launch QuickTime Player from your Applications folder.
- New Screen Recording: Go to File > New Screen Recording.
- Adjust Audio Settings: Click the arrow next to the Record button to access the audio settings.
- Select Microphone: Choose the Multi-Output Device you created as the microphone.
- Start Recording: Click the Record button and follow the prompts to start recording your screen.
- Stop Recording: Click the Stop button in the menu bar or press Command-Control-Esc (Escape).
Now, QuickTime Player will record both the screen and the internal audio output of your Mac.
3.4 What Are Some Troubleshooting Tips For Using BlackHole?
If you encounter issues while using BlackHole, here are some troubleshooting tips:
- Check Multi-Output Device Settings: Ensure that both “Built-in Output” and “BlackHole 16ch” are selected in the Multi-Output Device settings.
- Verify Clock Source: Make sure the clock source is set to “Built-in Output.”
- Restart Audio Devices: Sometimes, restarting your audio devices can resolve conflicts. Open Terminal and run the command
sudo killall coreaudiod. - Update BlackHole: Ensure you are using the latest version of BlackHole.
- Check Application Permissions: Verify that your recording app has permission to access the microphone in System Preferences > Security & Privacy > Privacy > Microphone.
- Test with Different Apps: Try using BlackHole with different recording apps to isolate the issue.
By following these tips, you can troubleshoot common issues and ensure that BlackHole works correctly for recording internal audio on your Mac.
4. How Can You Improve The Audio Quality Of Your Screen Recordings?
High-quality audio is crucial for creating engaging and professional screen recordings. Here are several ways to improve the audio quality of your recordings:
4.1 Choosing The Right Microphone
-
External Microphones:
- USB Microphones: USB microphones are easy to set up and offer significantly better audio quality than built-in microphones.
- Rode NT-USB Mini: A compact and high-quality USB microphone ideal for home recording.
- Blue Yeti: A versatile USB microphone with multiple polar patterns for different recording scenarios.
- XLR Microphones: XLR microphones provide the best audio quality but require an audio interface to connect to your Mac.
- Shure SM58: A durable and reliable dynamic microphone suitable for vocals and instruments.
- Audio-Technica AT2020: A condenser microphone that captures detailed and accurate sound.
- USB Microphones: USB microphones are easy to set up and offer significantly better audio quality than built-in microphones.
-
Built-In Microphones:
- While built-in microphones are convenient, they often produce lower quality audio with more background noise.
- If you must use a built-in microphone, try to minimize background noise and speak clearly and directly into the microphone.
4.2 Reducing Background Noise
-
Acoustic Treatment:
- Use a Quiet Environment: Record in a quiet room with minimal background noise.
- Soundproofing: Add acoustic treatment to your recording space to absorb sound reflections and reduce echo.
- Acoustic Panels: Install acoustic panels on the walls to absorb sound waves.
- Foam Wedges: Place foam wedges in corners to minimize bass frequencies.
- DIY Solutions: Use blankets or thick curtains to dampen sound reflections.
-
Microphone Techniques:
- Close Mic Technique: Position the microphone close to your mouth to capture a strong and clear signal.
- Pop Filter: Use a pop filter to reduce plosive sounds (e.g., “p” and “b” sounds) that can cause distortion.
- Shock Mount: Use a shock mount to isolate the microphone from vibrations and reduce handling noise.
-
Software Solutions:
- Noise Reduction Software: Use audio editing software to remove background noise from your recordings.
- Audacity: A free and open-source audio editor with noise reduction capabilities.
- Adobe Audition: A professional audio editing software with advanced noise reduction features.
- Real-Time Noise Suppression: Some apps offer real-time noise suppression to minimize background noise during recording.
- Krisp: An AI-powered noise cancellation app that works with various recording and communication tools.
- Noise Reduction Software: Use audio editing software to remove background noise from your recordings.
4.3 Optimizing Recording Settings
-
Sample Rate and Bit Depth:
- Sample Rate: Use a sample rate of 44.1 kHz or 48 kHz for high-quality audio.
- Bit Depth: Use a bit depth of 16-bit or 24-bit for a wider dynamic range and lower noise floor.
-
Gain Staging:
- Adjust Input Levels: Set the input level of your microphone to a level that is high enough to capture a strong signal but not so high that it causes clipping or distortion.
- Monitor Audio Levels: Use a VU meter or audio level indicator to monitor your audio levels and ensure they are within the optimal range.
-
Audio Codecs:
- Choose the Right Codec: Select an audio codec that provides a good balance between audio quality and file size.
- AAC: A widely supported codec that offers excellent audio quality at a relatively small file size.
- MP3: A popular codec that is compatible with most devices and platforms.
- WAV: An uncompressed codec that provides the highest audio quality but results in larger file sizes.
- Choose the Right Codec: Select an audio codec that provides a good balance between audio quality and file size.
4.4 Post-Processing Techniques
-
Equalization (EQ):
- Adjust Frequencies: Use EQ to adjust the frequency balance of your audio and enhance specific frequencies.
- Boost High Frequencies: Add clarity and brightness to your voice by boosting high frequencies.
- Reduce Low Frequencies: Remove muddiness and rumble by reducing low frequencies.
- Corrective EQ: Use EQ to correct any tonal imbalances or resonances in your audio.
- Adjust Frequencies: Use EQ to adjust the frequency balance of your audio and enhance specific frequencies.
-
Compression:
- Control Dynamic Range: Use compression to reduce the dynamic range of your audio and make it sound more consistent and balanced.
- Increase Loudness: Compression can also be used to increase the overall loudness of your audio without causing distortion.
-
Normalization:
- Adjust Volume Levels: Normalize your audio to a target level to ensure that it is loud enough without clipping.
- Consistency: Normalization can help to create a consistent volume level across your entire recording.
By implementing these techniques, you can significantly improve the audio quality of your screen recordings, making them more professional and engaging for your audience.
5. What Are Some Common Issues And Their Solutions When Screen Recording With Sound?
Screen recording with sound can sometimes present challenges. Here are some common issues and their solutions:
5.1 No Audio Is Being Recorded
-
Check Microphone Selection:
- Verify Input Device: Ensure that the correct microphone or audio input device is selected in your screen recording software or system settings.
- Test Microphone: Test your microphone to ensure that it is working properly. You can use the Sound preferences in System Preferences to check the input levels.
-
Check System Permissions:
- Microphone Access: Verify that your screen recording software has permission to access the microphone in System Preferences > Security & Privacy > Privacy > Microphone.
- Restart Application: Sometimes, restarting the screen recording application can resolve permission issues.
-
Check Audio Output Settings:
- Multi-Output Device: If you are using BlackHole or another virtual audio device, ensure that the Multi-Output Device is configured correctly in Audio MIDI Setup.
- Default Output: Make sure that the correct audio output device is selected as the default in System Preferences > Sound > Output.
-
Troubleshoot BlackHole:
- Configuration: Confirm that BlackHole is properly installed and configured.
- Clock Source: Ensure the clock source is set to “Built-in Output” in the Multi-Output Device settings.
5.2 Poor Audio Quality
-
Microphone Quality:
- Upgrade Microphone: Consider using an external microphone for better audio quality.
- Microphone Placement: Position the microphone close to your mouth and use a pop filter to reduce plosive sounds.
-
Background Noise:
- Reduce Noise: Record in a quiet environment and use noise reduction software to minimize background noise.
- Acoustic Treatment: Add acoustic treatment to your recording space to absorb sound reflections.
-
Recording Settings:
- Sample Rate and Bit Depth: Use a sample rate of 44.1 kHz or 48 kHz and a bit depth of 16-bit or 24-bit for high-quality audio.
- Input Levels: Adjust the input level of your microphone to avoid clipping or distortion.
-
Post-Processing:
- EQ and Compression: Use EQ to adjust the frequency balance of your audio and compression to control the dynamic range.
- Noise Reduction: Apply noise reduction to remove any remaining background noise.
5.3 Audio And Video Are Out Of Sync
-
Hardware Limitations:
- System Resources: Ensure that your Mac has sufficient processing power and memory to handle screen recording.
- Close Unnecessary Applications: Close any unnecessary applications to free up system resources.
-
Recording Settings:
- Frame Rate: Use a consistent frame rate for your screen recording.
- Codec: Choose a codec that is optimized for both audio and video.
-
Post-Processing:
- Synchronization Tools: Use video editing software to manually synchronize the audio and video tracks.
- Time Stretching: Use time stretching to adjust the length of the audio track to match the video track.
5.4 Choppy Or Laggy Screen Recording
-
System Resources:
- Free Up Resources: Close unnecessary applications and processes to free up system resources.
- Check CPU Usage: Monitor your CPU usage to identify any processes that are consuming excessive resources.
-
Recording Settings:
- Resolution and Frame Rate: Reduce the resolution and frame rate of your screen recording to decrease the processing load.
- Codec: Choose a codec that is optimized for performance.
-
Hardware Acceleration:
- Enable Hardware Acceleration: Enable hardware acceleration in your screen recording software to offload processing tasks to your GPU.
- Update Graphics Drivers: Ensure that your graphics drivers are up to date.
-
Storage:
- Sufficient Space: Make sure you have enough free storage space on your Mac’s hard drive.
- Fast Storage: Use a fast storage device (e.g., SSD) for recording your screen.
By addressing these common issues with the recommended solutions, you can ensure that your screen recordings with sound are high-quality and free of technical problems.
6. How Can Street Sounds Enhance Your Screen Recordings?
Street sounds can add a unique and immersive dimension to your screen recordings, making them more engaging and authentic.
6.1 Using Street Sounds To Set The Scene
-
Establishing Location:
- New York City Ambience: Add the sounds of traffic, sirens, and bustling crowds to establish a New York City setting.
- Urban Landscapes: Use the sounds of construction, public transportation, and street vendors to create a vivid urban environment.
-
Creating Atmosphere:
- Rain and Thunder: Use rain and thunder sounds to create a dramatic or moody atmosphere.
- Nighttime Sounds: Add the sounds of crickets, distant sirens, and late-night traffic to evoke a nighttime setting.
-
Enhancing Storytelling:
- Sound Effects: Use specific sound effects to highlight key moments or actions in your screen recording.
- Background Sounds: Add subtle background sounds to create a sense of realism and immersion.
6.2 Where To Find High-Quality Street Sounds?
-
streetsounds.net:
- Extensive Library: streetsounds.net offers an extensive library of high-quality street sounds from various locations around the world.
- Curated Collections: Explore curated collections of sounds that are perfect for enhancing your screen recordings.
- Easy Licensing: Get the necessary licenses to use street sounds in your projects legally.
-
Other Online Resources:
- Free Sound Libraries: Explore free sound libraries like Freesound and BBC Sound Effects for a wide range of street sounds.
- Commercial Sound Libraries: Consider commercial sound libraries like AudioJungle and Sound Ideas for premium street sounds.
6.3 How To Seamlessly Integrate Street Sounds Into Your Recordings
-
Choose The Right Sounds:
- Relevance: Select street sounds that are relevant to the content and setting of your screen recording.
- Authenticity: Use high-quality recordings that sound natural and realistic.
- Variety: Incorporate a variety of different sounds to create a rich and dynamic soundscape.
-
Edit And Mix Sounds:
- Audio Editing Software: Use audio editing software like Audacity or Adobe Audition to edit and mix your street sounds.
- Volume Levels: Adjust the volume levels of your street sounds to blend them seamlessly with the other audio in your recording.
- Panning: Use panning to position the sounds in the stereo field and create a sense of space.
-
Synchronization:
- Align Sounds: Align the street sounds with the corresponding actions or visuals in your screen recording.
- Timing: Pay attention to the timing of the sounds to create a realistic and immersive experience.
-
Looping And Fading:
- Seamless Loops: Use seamless loops to create continuous background sounds.
- Fades: Use fades to smoothly transition between different sounds and avoid abrupt changes.
By incorporating street sounds thoughtfully and creatively, you can transform your screen recordings into captivating and immersive experiences that resonate with your audience.
7. Legal Considerations When Using Sound In Screen Recordings
Using sound in screen recordings involves legal considerations, particularly concerning copyright and licensing.
7.1 Understanding Copyright Law
-
Copyright Protection:
- Original Works: Copyright law protects original works of authorship, including sound recordings and musical compositions.
- Exclusive Rights: Copyright owners have exclusive rights to reproduce, distribute, display, and create derivative works based on their copyrighted material.
-
Public Domain:
- Expiration of Copyright: Works in the public domain are no longer protected by copyright law and can be used freely without permission.
- Creative Commons Licenses: Creative Commons licenses allow creators to grant certain rights to the public while retaining others.
-
Fair Use:
- Limited Use: Fair use is a legal doctrine that allows limited use of copyrighted material without permission for purposes such as criticism, commentary, news reporting, teaching, scholarship, or research.
- Four Factors: Courts consider four factors when determining whether a use is fair: the purpose and character of the use, the nature of the copyrighted work, the amount and substantiality of the portion used, and the effect of the use upon the potential market for the copyrighted work.
7.2 Obtaining Permissions And Licenses
-
Direct Permission:
- Contact Copyright Owner: Obtain direct permission from the copyright owner to use their copyrighted material in your screen recording.
- Written Agreement: Get a written agreement that specifies the terms of use, including the scope of the license, the duration of the license, and any royalties or fees.
-
Licensing Agreements:
- Royalty-Free Licenses: Royalty-free licenses allow you to use copyrighted material without paying ongoing royalties, but you may need to pay an upfront fee.
- Rights-Managed Licenses: Rights-managed licenses grant you specific rights to use copyrighted material for a limited period of time and may require you to pay royalties.
-
Stock Audio Libraries:
- Licensed Content: Stock audio libraries like streetsounds.net offer licensed content that you can use in your screen recordings without obtaining direct permission from the copyright owner.
- Terms of Use: Review the terms of use for each stock audio library to ensure that you are complying with the licensing requirements.
7.3 Best Practices For Using Sound Legally
-
Identify Copyrighted Material:
- Determine Ownership: Identify any copyrighted material that you plan to use in your screen recording.
- Check License Terms: Review the license terms for each piece of copyrighted material to ensure that you are complying with the requirements.
-
Obtain Necessary Permissions:
- Secure Rights: Obtain the necessary permissions or licenses to use any copyrighted material in your screen recording.
- Document Permissions: Keep records of all permissions and licenses that you have obtained.
-
Provide Attribution:
- Credit Copyright Owners: Provide proper attribution to the copyright owners of any copyrighted material that you use in your screen recording.
- Include Copyright Notices: Include copyright notices in your screen recording to indicate the ownership of the copyrighted material.
-
Comply With Licensing Requirements:
- Adhere to Terms: Comply with all of the licensing requirements for any copyrighted material that you use in your screen recording.
- Avoid Infringement: Avoid any actions that could be considered copyright infringement, such as unauthorized reproduction, distribution, or modification of copyrighted material.
By following these legal considerations and best practices, you can ensure that you are using sound legally in your screen recordings and avoid any potential copyright issues.
8. Accessibility Considerations For Screen Recordings With Sound
When creating screen recordings with sound, it’s essential to consider accessibility to ensure that your content is inclusive and can be enjoyed by everyone, including individuals with disabilities.
8.1 Providing Captions And Transcripts
-
Captions:
- Synchronized Text: Captions are synchronized text versions of the audio content that are displayed on the screen.
- Accessibility for Deaf and Hard of Hearing: Captions provide accessibility for individuals who are deaf or hard of hearing, allowing them to understand the spoken content of your screen recording.
-
Transcripts:
- Text Version of Audio: Transcripts are text versions of the audio content that can be read separately from the screen recording.
- Accessibility for Various Disabilities: Transcripts provide accessibility for individuals with various disabilities, including those who are deaf, hard of hearing, blind, or have cognitive impairments.
-
Creating Captions and Transcripts:
- Manual Creation: You can manually create captions and transcripts by typing out the spoken content of your screen recording.
- Automated Tools: You can use automated tools like YouTube’s automatic captioning feature or third-party software like Descript to generate captions and transcripts.
- Accuracy: Review and edit the captions and transcripts to ensure that they are accurate and error-free.
8.2 Describing Visual Elements
-
Audio Descriptions:
- Narration of Visual Content: Audio descriptions are narration tracks that describe the visual elements of your screen recording, such as actions, gestures, and facial expressions.
- Accessibility for Blind and Visually Impaired: Audio descriptions provide accessibility for individuals who are blind or visually impaired, allowing them to understand the visual content of your screen recording.
-
Implementing Audio Descriptions:
- Create a Script: Write a script that describes the key visual elements of your screen recording.
- Record the Narration: Record the narration track using a clear and concise voice.
- Synchronize with Video: Synchronize the narration track with the video content to ensure that the audio descriptions are properly timed.
-
Alternative Text for Images:
- Descriptive Text: Provide alternative text (alt text) for all images in your screen recording to describe the content of the images.
- Accessibility for Screen Readers: Alt text provides accessibility for individuals who use screen readers, allowing them to understand the content of the images.
8.3 Ensuring Keyboard Navigation
-
Keyboard Access:
- Navigate Without Mouse: Ensure that all interactive elements in your screen recording can be accessed and operated using the keyboard.
- Tab Order: Use a logical tab order to allow users to navigate through the interactive elements in a predictable manner.
-
Focus Indicators:
- Visual Cues: Provide clear visual cues to indicate which element currently has focus.
- Highlighting: Use highlighting or other visual effects to make the focus indicator stand out.
8.4 Providing Control Over Audio
-
Volume Control:
- Adjust Volume: Allow users to adjust the volume of the audio in your screen recording.
- Mute Button: Provide a mute button to allow users to turn off the audio completely.
-
Audio Levels:
- Balanced Audio: Ensure that the audio levels of all audio tracks in your screen recording are balanced and consistent.
- Avoid Clipping: Avoid clipping or distortion in the audio.
By implementing these accessibility considerations, you can ensure that your screen recordings with sound are inclusive and can be enjoyed by everyone, regardless of their abilities.
9. What Are The Latest Trends In Screen Recording For Content Creators?
As content creation evolves, so do the trends in screen recording. Staying updated with the latest trends can help you create more engaging and professional content.
9.1 Interactive Screen Recordings
-
Interactive Elements:
- Clickable Buttons: Incorporate clickable buttons and other interactive elements into your screen recordings to allow viewers to engage with the content.
- Quizzes and Polls: Add quizzes and polls to test viewers’ knowledge and gather feedback.
-
Branching Scenarios:
- Adaptive Content: Create branching scenarios that adapt to viewers’ choices and actions.
- Personalized Learning: Provide personalized learning experiences that cater to viewers’ individual needs and preferences.
-
Tools and Platforms:
- H5P: Use H5P to create interactive videos, quizzes, and presentations.
- Adobe Captivate: Use Adobe Captivate to create interactive screen recordings and e-learning content.
9.2 Vertical Video Recording
-
Mobile-First Approach:
- Optimized for Mobile: Create screen recordings that are optimized for viewing on mobile devices.
- Vertical Format: Record your screen in a vertical format to take advantage of the full screen on smartphones and tablets.
-
Platforms:
- TikTok: Create short-form vertical videos for TikTok.
- Instagram Stories: Create engaging stories for Instagram using vertical video recordings.
- YouTube Shorts: Use vertical video recordings for YouTube Shorts.
9.3 Live Screen Recording
-
Real-Time Interaction:
- Live Streaming: Broadcast your screen recordings live to engage with your audience in real-time.
- Q&A Sessions: Host live Q&A sessions to answer viewers’ questions and provide support.
-
Platforms:
- Twitch: Stream live gameplay and tutorials on Twitch.
- YouTube Live: Broadcast live screen recordings on YouTube Live.
- Facebook Live: Stream live screen recordings on Facebook Live.
9.4 AI-Powered Screen Recording
-
Intelligent Features:
- Automatic Transcription: Use AI-powered tools to automatically transcribe your screen recordings.
- Noise Reduction: Use AI-powered noise reduction to minimize background noise and improve audio quality.
- Smart Editing: Use AI-powered editing tools to automatically remove unwanted sections and create professional-looking videos.
-
Tools and Platforms:
- Descript: Use Descript to automatically transcribe and edit your screen recordings.
- Otter.ai: Use Otter.ai to generate accurate transcripts of your screen recordings.
9.5 Augmented Reality (AR) Integration
-
Immersive Experiences:
- AR Overlays: Add AR overlays to your