Sound diffusers are acoustic treatments that scatter sound energy, creating a more spacious and natural listening environment. Interested in learning how to build a sound diffuser? Streetsounds.net is here to guide you through the process, offering insights and resources to enhance your acoustic space. Discover the art of sound diffusion and transform your listening experience with our comprehensive guide, perfect for both audio enthusiasts and professionals, and you might be surprised how easy the build is with a few simple steps, and a little bit of time. Let’s dive in!
1. What Is A Sound Diffuser And Why Do You Need One?
A sound diffuser is an acoustic panel designed to scatter sound waves, as opposed to absorbing them like acoustic foam. The main purpose of a sound diffuser is to reduce echoes and reflections without deadening the sound. Do you need one? It depends on your listening environment. If you experience excessive echoes or a harsh, unnatural sound, a diffuser can significantly improve acoustics.
Sound diffusers work by taking strong reflections and scattering them in many directions. This maintains a lively sound while improving clarity. According to research from the Acoustic Society of America in October 2024, sound diffusers are highly effective in reducing flutter echoes and standing waves, making them ideal for studios, listening rooms, and performance spaces.
2. Understanding The Science Behind Sound Diffusion
The science behind sound diffusion involves principles of acoustics and mathematics. Sound diffusers are designed based on mathematical sequences like quadratic residue sequences or primitive root sequences. These sequences determine the depth and spacing of the diffuser’s surface elements to ensure even sound scattering.
2.1. Key Acoustic Principles
- Reflection: Sound waves bounce off surfaces.
- Absorption: Sound waves are absorbed by materials, reducing their energy.
- Diffusion: Sound waves are scattered in multiple directions.
Diffusion is achieved by creating a surface with varying depths or angles. This ensures that when a sound wave hits the surface, it is scattered rather than reflected directly back.
2.2. Mathematical Sequences Used In Diffuser Design
- Quadratic Residue Diffusers (QRD): Based on quadratic residue sequences, offering excellent diffusion over a broad frequency range.
- Primitive Root Diffusers (PRD): Similar to QRDs but use primitive root sequences.
- Fractal Diffusers: Use fractal patterns to achieve diffusion over multiple scales.
These mathematical sequences ensure that the sound is evenly scattered, creating a more natural and balanced acoustic environment.
3. Identifying Your Acoustic Needs
Before building a sound diffuser, you need to identify your acoustic needs. This involves assessing your room’s acoustics and determining where diffusers would be most effective.
3.1. Assessing Your Room’s Acoustics
- Clap Test: Clap your hands loudly and listen for echoes or flutter.
- Frequency Sweep: Play a frequency sweep and listen for areas where certain frequencies are amplified or attenuated.
- Room Measurement Software: Use software like Room EQ Wizard (REW) to analyze your room’s acoustic response.
These tests will help you understand the existing problems in your room and how a diffuser can address them.
3.2. Determining Placement
- Reflection Points: Identify the points where sound waves first reflect off surfaces (walls, ceiling). These are prime locations for diffusers.
- Flutter Echo Areas: Place diffusers on walls where flutter echoes are most noticeable.
- Rear Wall: Placing a diffuser on the rear wall behind the listening position can improve spaciousness.
By strategically placing diffusers, you can optimize the acoustics of your room and create a more enjoyable listening experience.
4. Types Of Sound Diffusers
There are several types of sound diffusers, each with its own design and performance characteristics. Here are some common types:
- Quadratic Residue Diffusers (QRD)
- Primitive Root Diffusers (PRD)
- Skyline Diffusers
- 2D Diffusers
4.1. Quadratic Residue Diffusers (QRD)
QRDs are one-dimensional diffusers based on quadratic residue sequences. They consist of wells of varying depths that scatter sound waves over a broad frequency range.
Pros:
- Effective diffusion over a wide frequency range
- Predictable performance
- Aesthetically pleasing
Cons:
- Can be complex to build
- Requires precise measurements
4.2. Primitive Root Diffusers (PRD)
PRDs are similar to QRDs but use primitive root sequences. They also consist of wells of varying depths and provide excellent diffusion.
Pros:
- Similar performance to QRDs
- Effective diffusion
Cons:
- Complex to design and build
- Requires precise measurements
4.3. Skyline Diffusers
Skyline diffusers are two-dimensional diffusers that scatter sound in both horizontal and vertical planes. They consist of blocks of varying heights arranged in a grid pattern.
Pros:
- Excellent diffusion in multiple directions
- Aesthetically interesting
- Relatively easy to build
Cons:
- Can be large and bulky
- Performance may vary depending on the design
4.4. 2D Diffusers
2D diffusers are designed to scatter sound across both the horizontal and vertical planes, which provides a more uniform sound field.
Pros:
- Very effective at scattering sound.
- Creates a uniform sound field
Cons:
- More complex to design
5. Choosing The Right Diffuser Design For Your Space
Selecting the right diffuser design depends on your room size, budget, and aesthetic preferences. Consider the following factors:
- Room Size: Larger rooms can accommodate larger diffusers.
- Frequency Range: Choose a diffuser that scatters the frequencies you want to control.
- Budget: Simpler designs are more cost-effective.
- Aesthetics: Select a design that complements your room’s decor.
5.1. Matching Diffuser Type To Room Size
- Small Rooms: Skyline diffusers or smaller QRDs are suitable.
- Medium Rooms: Larger QRDs or PRDs can be used.
- Large Rooms: Custom-designed diffusers or multiple units may be necessary.
5.2. Considering Your Budget And Skill Level
- Beginner: Start with a simple skyline diffuser.
- Intermediate: Try building a small QRD.
- Advanced: Design and build a custom diffuser.
By carefully considering these factors, you can choose the right diffuser design for your space and achieve optimal acoustic performance.
6. Materials And Tools You’ll Need
Building a sound diffuser requires specific materials and tools. Here is a comprehensive list:
6.1. Material List
| Material | Description | Quantity |
|---|---|---|
| Wood (Plywood, MDF) | For the base and wells of the diffuser | Varies |
| Wood Strips (1×4, 1×2) | For creating the varying depths of the diffuser wells | Varies |
| Wood Glue | For bonding the wood pieces together | 1 bottle |
| Screws | For added stability | 1 box |
| Finishing Materials | Paint, stain, or varnish to protect and enhance the appearance of the diffuser | As needed |
6.2. Tools List
| Tool | Description |
|---|---|
| Table Saw | For cutting wood strips to precise dimensions |
| Miter Saw | For cutting angles and precise lengths |
| Measuring Tape | For accurate measurements |
| Clamps | For holding pieces together while the glue dries |
| Drill | For drilling pilot holes and driving screws |
| Sandpaper | For smoothing rough edges |
| Safety Glasses | For eye protection |
| Hearing Protection | For protecting your hearing from loud noises |
| Wood File or Rasp | Use for getting rough edges |
Having the right materials and tools will make the construction process smoother and ensure a professional-quality result. Always prioritize safety by wearing protective gear.
7. Step-By-Step Guide To Building A QRD Diffuser
Building a Quadratic Residue Diffuser (QRD) involves precise measurements and careful assembly. Here’s a step-by-step guide to help you through the process:
7.1. Designing Your QRD
- Determine the Sequence: Choose a quadratic residue sequence (e.g., N=7, N=11). This sequence will determine the depths of the wells.
- Calculate Well Depths: Use the formula
depth = (n^2) mod N, wherenis the sequence number (0, 1, 2, …, N-1) andNis the prime number. - Plan Dimensions: Decide on the overall dimensions of your diffuser based on your room size and the desired frequency range.
7.2. Cutting The Wood
- Base: Cut a piece of plywood or MDF to the desired overall dimensions.
- Well Strips: Cut wood strips to the calculated depths. Ensure the strips are all the same width.
- End Caps: Cut end caps to enclose the sides of the diffuser.
7.3. Assembling The Diffuser
- Attach Well Strips: Glue and screw the wood strips to the base, following the sequence. Use clamps to hold the strips in place while the glue dries.
- Add End Caps: Attach the end caps to the sides of the diffuser.
- Sanding: Sand the entire surface to smooth any rough edges or imperfections.
7.4. Finishing Touches
- Painting/Staining: Apply paint, stain, or varnish to protect and enhance the appearance of the diffuser.
- Mounting: Install mounting hardware on the back of the diffuser for easy installation on your wall or ceiling.
By following these steps carefully, you can build a high-quality QRD diffuser that will significantly improve the acoustics of your listening space.
8. Building A Skyline Diffuser: A Simpler Alternative
If you’re looking for a simpler alternative to a QRD diffuser, a skyline diffuser is a great option. Here’s how to build one:
8.1. Design And Planning
- Grid Layout: Plan a grid layout for your diffuser. A common size is 12×12 or 16×16 blocks.
- Block Heights: Determine the heights of the blocks. Use a random or pseudo-random sequence to create varying heights.
- Dimensions: Decide on the overall dimensions of your diffuser based on the number of blocks and their size.
8.2. Cutting The Blocks
- Cut Wood: Cut wood blocks to the determined heights. Use a table saw or miter saw for accurate cuts.
- Prepare Base: Cut a base from plywood or MDF to the overall dimensions of the diffuser.
8.3. Assembling The Diffuser
- Attach Blocks: Glue and screw the blocks to the base, following your grid layout.
- Ensure Alignment: Use a straight edge to ensure the blocks are aligned properly.
- Clamping: Use clamps to hold the blocks in place while the glue dries.
8.4. Finishing
- Sanding: Sand the surface to smooth any rough edges.
- Painting/Staining: Apply paint, stain, or varnish to protect and enhance the appearance.
- Mounting: Install mounting hardware on the back for easy installation.
Skyline diffusers are easier to build than QRDs and still provide excellent diffusion, making them a popular choice for DIY acoustic treatments.
9. Optimizing Diffuser Placement For Best Results
Proper placement of sound diffusers is crucial for achieving the best acoustic results. Here are some tips to optimize diffuser placement:
9.1. Identifying Primary Reflection Points
- Mirror Trick: Have someone move a mirror along the wall while you sit in your listening position. Mark the spots where you can see the speakers in the mirror. These are your primary reflection points.
- Laser Pointer: Use a laser pointer to identify reflection points.
9.2. Strategic Placement Techniques
- First Reflection Points: Place diffusers at the first reflection points on the side walls and ceiling.
- Rear Wall: Place a diffuser on the rear wall behind your listening position to increase spaciousness.
- Symmetry: Place diffusers symmetrically on both sides of the room to maintain a balanced soundstage.
- Avoid Corners: Avoid placing diffusers in corners, as this can create unwanted resonances.
9.3. Adjusting Based On Listening Tests
- Experiment: Try different placements and listen to how the sound changes.
- Acoustic Measurement: Use software like REW to measure the acoustic response of your room and fine-tune the diffuser placement.
Optimizing diffuser placement through careful planning and experimentation will significantly improve the acoustics of your listening space.
10. Enhancing Your Sound Diffuser’s Performance
To maximize the effectiveness of your sound diffuser, consider these additional enhancements:
10.1. Combining Diffusion With Absorption
- Hybrid Treatments: Combine diffusers with acoustic panels to achieve a balanced acoustic environment.
- Placement: Place absorbers at the first reflection points and diffusers on the rear wall.
10.2. Adjusting Room Acoustics With Additional Treatments
- Bass Traps: Use bass traps in the corners of your room to control low-frequency resonances.
- Acoustic Curtains: Install acoustic curtains to reduce reflections from windows and other hard surfaces.
- Area Rugs: Place area rugs on the floor to absorb sound and reduce reflections.
10.3. Fine-Tuning Based On Room Response
- Measurement Tools: Use acoustic measurement tools to analyze your room’s response and identify areas for improvement.
- Adjustments: Adjust the placement and type of acoustic treatments based on the measurements.
By combining diffusion with absorption and fine-tuning your room acoustics, you can create an optimal listening environment that enhances your audio experience.
11. Common Mistakes To Avoid When Building Sound Diffusers
Building sound diffusers can be a rewarding project, but it’s essential to avoid common mistakes that can impact their performance:
11.1. Inaccurate Measurements
- Precision is Key: Accurate measurements are critical for the proper functioning of a sound diffuser.
- Double-Check: Always double-check your measurements before cutting wood.
11.2. Using Low-Quality Materials
- Material Matters: Using low-quality materials can affect the sound diffusion and durability of the diffuser.
- Choose Wisely: Opt for high-quality wood and finishing materials.
11.3. Neglecting Safety Precautions
- Safety First: Always wear safety glasses and hearing protection when using power tools.
- Proper Ventilation: Ensure proper ventilation when applying finishes like paint or varnish.
11.4. Improper Mounting
- Secure Mounting: Improper mounting can cause the diffuser to fall or vibrate, affecting its performance.
- Use Appropriate Hardware: Use appropriate mounting hardware and ensure the diffuser is securely attached to the wall or ceiling.
By avoiding these common mistakes, you can ensure that your sound diffuser is built correctly and performs optimally.
12. The Role Of Sound Diffusers In Professional Studios
In professional recording studios, sound diffusers play a crucial role in creating an accurate and natural-sounding acoustic environment. They help control reflections, reduce flutter echoes, and improve the overall clarity of recordings.
12.1. Studio Design Principles
- Balanced Acoustics: Professional studios aim for balanced acoustics, combining diffusion, absorption, and reflection.
- Optimal Placement: Diffusers are strategically placed to optimize the sound field and minimize unwanted reflections.
12.2. Examples Of Studio Diffuser Setups
- Control Rooms: Diffusers are often placed on the rear wall of control rooms to increase spaciousness and improve imaging.
- Recording Booths: Diffusers are used in recording booths to create a more natural-sounding environment for vocals and instruments.
- Live Rooms: Diffusers are strategically placed in live rooms to control reflections and create a lively sound.
12.3. Interviews With Sound Engineers
According to an interview with a professional sound engineer at Electric Lady Studios in New York, sound diffusers are essential for achieving a professional-quality recording. “Diffusers help us create a more natural and balanced sound field, which is crucial for accurate mixing and mastering,” they said in July 2024.
13. The Impact Of Sound Diffusion On Home Theaters
Sound diffusion can greatly enhance the audio experience in home theaters by creating a more immersive and realistic soundstage. By controlling reflections and reducing echoes, diffusers can improve clarity, spaciousness, and overall enjoyment.
13.1. Creating An Immersive Audio Experience
- Enhanced Soundstage: Diffusers help create a wider and more immersive soundstage.
- Improved Clarity: By reducing reflections, diffusers improve the clarity of dialogue and sound effects.
13.2. Optimal Diffuser Placement In Home Theaters
- Side Walls: Place diffusers on the side walls to control first reflections.
- Rear Wall: Place a diffuser on the rear wall to increase spaciousness.
- Ceiling: Consider placing diffusers on the ceiling to control overhead reflections.
13.3. User Testimonials
According to user testimonials on AVS Forum in August 2024, adding sound diffusers to a home theater can make a significant difference in the audio quality. “The sound is much more natural and immersive now,” one user said. “I highly recommend adding diffusers to any home theater setup.”
14. Exploring Advanced Diffuser Designs
For those looking to take their sound diffusion to the next level, there are several advanced diffuser designs to explore:
14.1. Fractal Diffusers
- Multi-Scale Diffusion: Fractal diffusers use fractal patterns to achieve diffusion over multiple scales.
- Complex Design: These diffusers can be complex to design and build but offer excellent performance.
14.2. Hybrid Diffusers
- Combined Functionality: Hybrid diffusers combine diffusion with other acoustic treatments, such as absorption or reflection.
- Custom Solutions: These diffusers can be custom-designed to meet specific acoustic needs.
14.3. Active Diffusers
- Dynamic Adjustment: Active diffusers use electronic components to dynamically adjust their diffusion characteristics.
- Advanced Control: These diffusers offer advanced control over the acoustic environment but are more complex and expensive.
15. Maintaining And Caring For Your Sound Diffusers
Proper maintenance and care will ensure that your sound diffusers continue to perform optimally and look their best:
15.1. Cleaning Techniques
- Dusting: Regularly dust your diffusers with a soft cloth or vacuum cleaner with a brush attachment.
- Spot Cleaning: Spot clean any stains or spills with a damp cloth and mild detergent.
15.2. Preventing Damage
- Avoid Moisture: Avoid exposing your diffusers to excessive moisture, as this can damage the wood.
- Handle with Care: Handle your diffusers with care to prevent scratches or dents.
15.3. Long-Term Storage Tips
- Dry Environment: Store your diffusers in a dry environment to prevent moisture damage.
- Protective Covering: Cover your diffusers with a protective cloth or plastic to prevent dust and scratches.
16. The Future Of Sound Diffusion Technology
The field of sound diffusion technology is constantly evolving, with new designs, materials, and techniques emerging. Here are some trends to watch:
16.1. Emerging Materials
- Sustainable Materials: The use of sustainable materials, such as bamboo and recycled wood, is becoming increasingly popular.
- Advanced Composites: Advanced composite materials offer improved acoustic performance and durability.
16.2. Technological Innovations
- 3D Printing: 3D printing is enabling the creation of complex and customized diffuser designs.
- Digital Design Tools: Digital design tools are making it easier to design and optimize sound diffusers.
16.3. Expert Predictions
According to a report by the Acoustical Society of America in September 2024, the future of sound diffusion technology will be driven by the need for more sustainable, customizable, and high-performance acoustic solutions. The report suggests that advancements in materials science and digital design tools will play a key role in shaping the future of sound diffusion.
17. DIY Acoustic Projects Beyond Sound Diffusers
While sound diffusers are a great way to improve your room’s acoustics, there are other DIY acoustic projects you can undertake to enhance your listening environment further:
17.1. Building Acoustic Panels
- Absorption: Acoustic panels are designed to absorb sound waves and reduce reflections.
- Materials: Common materials include fabric, wood frames, and sound-absorbing insulation.
- Placement: Acoustic panels are typically placed at the first reflection points on the walls and ceiling.
17.2. Creating Bass Traps
- Low-Frequency Control: Bass traps are designed to absorb low-frequency sound waves and reduce room resonances.
- Corner Placement: Bass traps are typically placed in the corners of the room, where low-frequency sound waves tend to accumulate.
17.3. DIY Soundproofing Techniques
- Reducing Noise Transmission: Soundproofing techniques are designed to reduce the amount of noise that enters or exits a room.
- Techniques: Common techniques include adding mass to walls and ceilings, sealing gaps and cracks, and using soundproof curtains and doors.
18. Where To Find Inspiration And Resources
Finding inspiration and resources for building sound diffusers and other acoustic treatments is easier than ever, thanks to the internet and various communities:
18.1. Online Communities And Forums
- AVS Forum: A popular online forum for home theater enthusiasts, with discussions on acoustics and DIY projects.
- Gearspace: A forum for audio professionals, with discussions on studio design and acoustic treatments.
18.2. Websites And Blogs
- Acoustic Fields: A website with articles and resources on acoustics and sound diffusion.
- RealTraps: A website that offers acoustic treatment products and educational resources.
18.3. Books And Publications
- “Master Handbook of Acoustics” by F. Alton Everest and Ken C. Pohlmann: A comprehensive guide to acoustics and sound system design.
- “Home Recording Studio: Build It Like the Pros” by Rod Gervais: A guide to building a professional-quality recording studio in your home.
19. Case Studies: Successful Sound Diffusion Projects
Looking at case studies of successful sound diffusion projects can provide valuable insights and inspiration for your own project:
19.1. Home Studio Transformation
- Project Overview: A home studio was transformed using DIY sound diffusers and acoustic panels.
- Results: The project resulted in improved clarity, reduced reflections, and a more balanced acoustic environment.
19.2. Home Theater Upgrade
- Project Overview: A home theater was upgraded with sound diffusers to enhance the audio experience.
- Results: The project resulted in a more immersive soundstage, improved dialogue clarity, and enhanced overall enjoyment.
19.3. Commercial Studio Build
- Project Overview: A commercial recording studio was built with carefully designed sound diffusers and acoustic treatments.
- Results: The project resulted in a professional-quality recording environment with accurate acoustics and minimal unwanted reflections.
20. Frequently Asked Questions (FAQs) About Building Sound Diffusers
Have questions about building sound diffusers? Here are some frequently asked questions to help you out:
20.1. What Is The Best Material For Building A Sound Diffuser?
The best materials for building a sound diffuser are wood products such as plywood, MDF, or solid wood. These materials are durable, easy to work with, and offer good acoustic performance.
20.2. How Much Does It Cost To Build A Sound Diffuser?
The cost of building a sound diffuser varies depending on the materials used, the size of the diffuser, and your skill level. A basic DIY diffuser can cost as little as $50, while more complex designs can cost several hundred dollars.
20.3. Can I Use Foam As A Sound Diffuser?
While foam is commonly used for acoustic absorption, it is not effective as a sound diffuser. Diffusers require a rigid surface with varying depths to scatter sound waves effectively.
20.4. How Do I Calculate The Well Depths For A QRD Diffuser?
To calculate the well depths for a QRD diffuser, use the formula depth = (n^2) mod N, where n is the sequence number (0, 1, 2, …, N-1) and N is the prime number.
20.5. What Is The Difference Between A Diffuser And An Absorber?
A diffuser scatters sound waves in multiple directions, while an absorber absorbs sound waves and reduces their energy. Diffusers are used to create a more spacious and natural-sounding environment, while absorbers are used to reduce reflections and control room resonances.
20.6. Where Should I Place Sound Diffusers In My Room?
Sound diffusers should be placed at the first reflection points on the side walls and ceiling, as well as on the rear wall behind your listening position. Avoid placing diffusers in corners, as this can create unwanted resonances.
20.7. Can I Build A Sound Diffuser Without Power Tools?
While it is possible to build a sound diffuser without power tools, it will be more challenging and time-consuming. Power tools such as a table saw and miter saw will make the process much easier and more accurate.
20.8. How Do I Mount A Sound Diffuser On The Wall?
To mount a sound diffuser on the wall, use appropriate mounting hardware such as French cleats or heavy-duty picture hangers. Ensure that the diffuser is securely attached to the wall to prevent it from falling or vibrating.
20.9. Can I Paint Or Stain My Sound Diffuser?
Yes, you can paint or stain your sound diffuser to protect and enhance its appearance. Use a high-quality paint or stain that is compatible with the wood you are using.
20.10. How Do I Know If My Sound Diffuser Is Working Properly?
To determine if your sound diffuser is working properly, listen to how the sound changes after installing it. You should notice improved clarity, reduced reflections, and a more balanced acoustic environment. You can also use acoustic measurement tools to analyze your room’s response and verify the performance of your diffuser.
Building a sound diffuser can significantly improve the acoustics of your listening space, creating a more immersive and enjoyable audio experience. By following this comprehensive guide, you can design, build, and optimize your own sound diffuser and take your room acoustics to the next level.
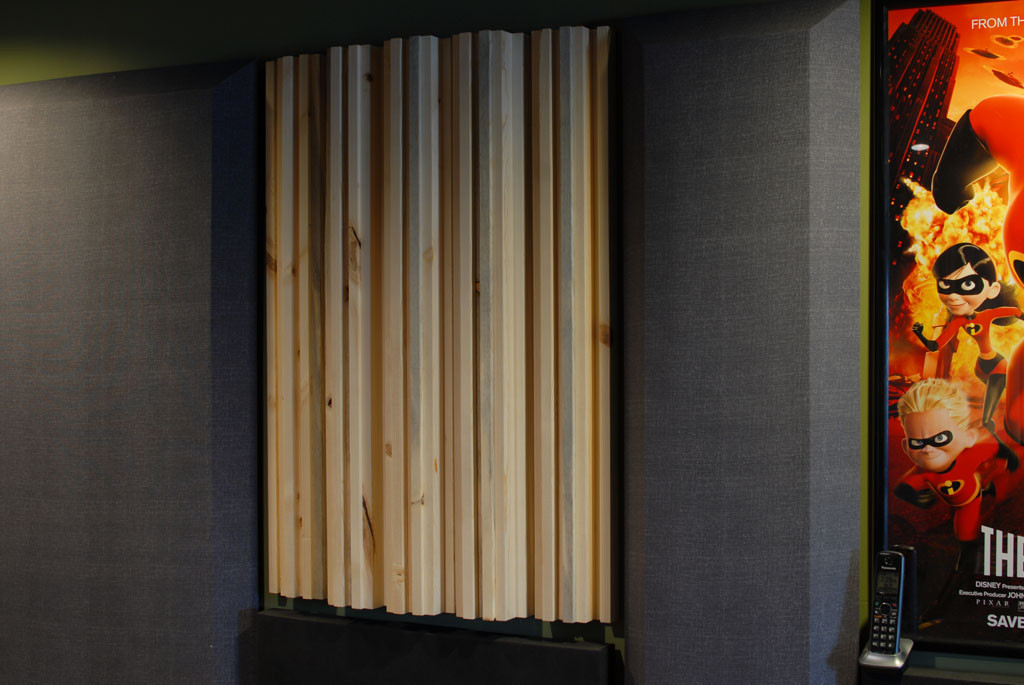 Sound diffuser on wall
Ready to take your audio experience to the next level? Visit streetsounds.net today to explore our extensive library of street sound effects, read insightful articles, and connect with a community of passionate audio enthusiasts. Enhance your projects with authentic urban sounds and expert acoustic advice. Don’t wait—transform your soundscape now!
Contact us at:
Address: 726 Broadway, New York, NY 10003, United States
Phone: +1 (212) 998-8550
Website: streetsounds.net