Changing the output sound on Windows 11 is a straightforward process that allows you to direct audio to your preferred device, whether it’s internal speakers, external speakers, or headphones. With streetsounds.net, discover the perfect audio setup for your unique needs, optimizing your experience with street sound samples and urban audio landscapes. This guide will walk you through the steps and explore advanced options for a customized audio experience using sound settings, audio enhancements, and sound output.
1. What Are the Basic Steps to Change the Output Sound on Windows 11?
Yes, you can easily change the output sound on Windows 11 through the Sound Settings.
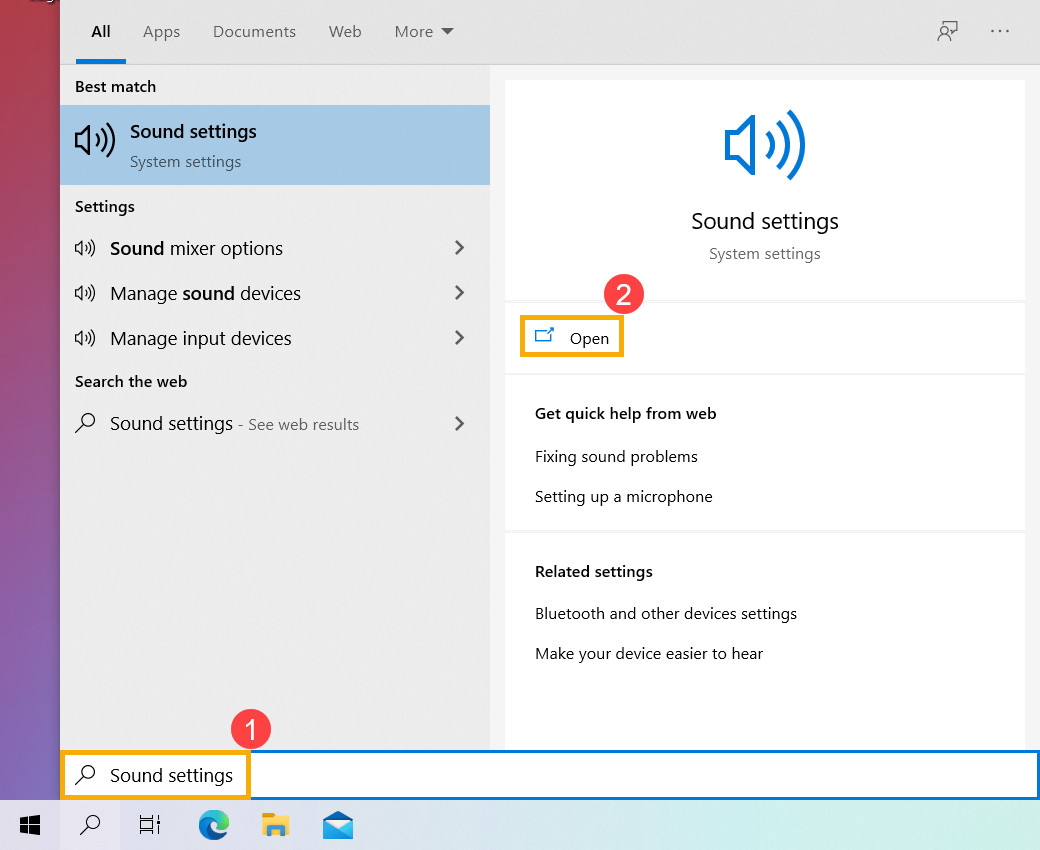
- Open Sound Settings: Type “Sound settings” in the Windows search bar and click “Open”.
- Choose Output Device: In the Sound settings, select your preferred output device from the dropdown menu under “Output,” such as internal speakers, external speakers, or headphones.
- Adjust Volume: Use the master volume slider to set the desired sound level.
This simple adjustment can significantly enhance your audio experience, especially when working with the diverse soundscapes available on streetsounds.net.
2. Where Can I Find the Sound Settings on Windows 11?
The Sound Settings can be found in the System Settings of Windows 11.
- Open Settings: Click on the Windows Start button and select the “Settings” icon (gear icon).
- Navigate to Sound Settings: In the Settings window, click on “System,” then select “Sound” from the left sidebar.
- Access Sound Options: Here, you can adjust various sound settings, including output and input devices, volume levels, and advanced audio options.
Navigating these settings allows you to fine-tune your audio experience, especially useful when exploring and integrating high-quality street sounds from streetsounds.net into your projects.
3. How Do I Select a Specific Output Device in Sound Settings?
Selecting a specific output device in Sound Settings involves a simple selection process from the available options.
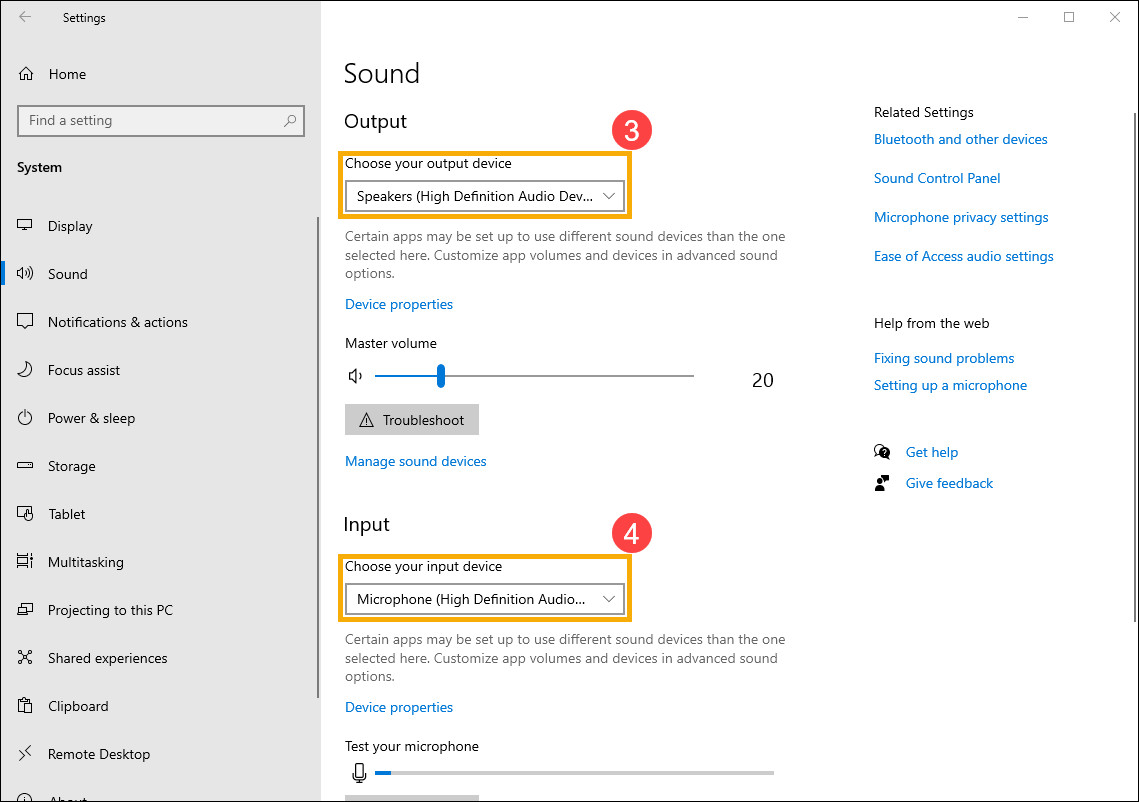
- Go to Output Section: In Sound Settings, find the “Output” section, which lists all available audio output devices.
- Choose Your Device: Click the dropdown menu to see a list of connected devices such as internal speakers, external speakers, or headphones.
- Test Your Selection: Select your desired device. Windows will automatically switch the audio output to the selected device. You can play a test sound to confirm the correct device is active.
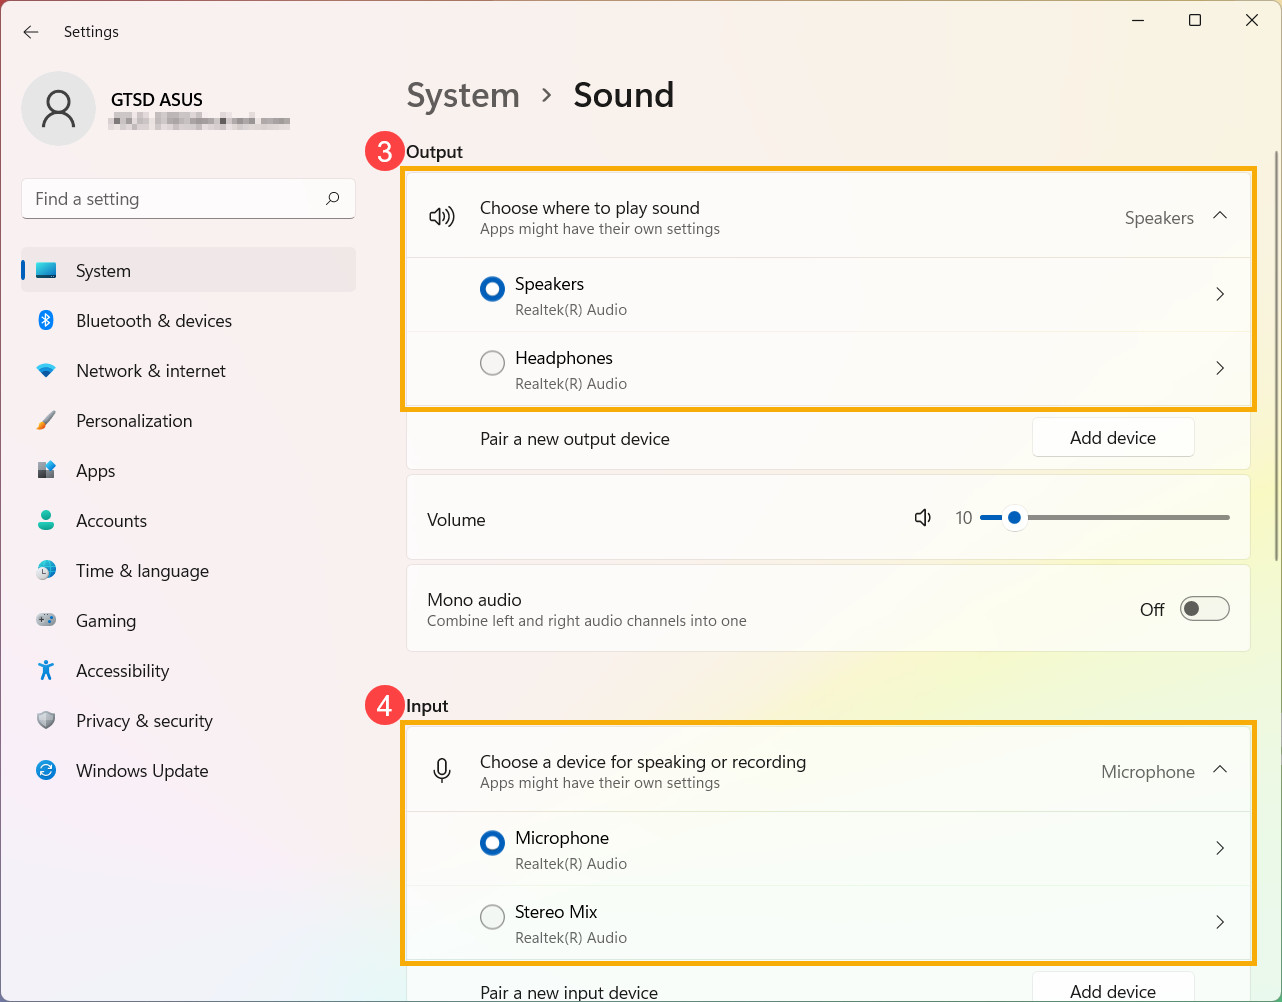 Choosing an output device in Windows 11 Sound Settings
Selecting the right output device ensures that you hear the rich and diverse sounds from streetsounds.net through your preferred audio source, enhancing your listening experience.
4. What Do I Do If My Preferred Output Device Is Not Listed?
If your preferred output device is not listed, there are several troubleshooting steps you can take to resolve the issue.
- Check Physical Connections: Ensure the device is properly connected to your computer. For wired devices, check the cable and port. For wireless devices, ensure Bluetooth is enabled and the device is paired.
- Update Drivers: Outdated or corrupted drivers can prevent devices from being recognized. Go to Device Manager, find your audio device, right-click, and select “Update driver.”
- Restart Audio Service: Sometimes, restarting the Windows Audio service can resolve the issue. Press
Win + R, typeservices.msc, find “Windows Audio,” right-click, and select “Restart.” - Set as Default Device: In Sound Settings, click “More sound settings” to open the Sound Control Panel. In the “Playback” tab, find your device, right-click, and select “Set as Default Device.”
Ensuring your device is correctly recognized is essential for enjoying high-quality audio from sources like streetsounds.net, where diverse soundscapes require accurate and reliable playback.
5. How Can I Quickly Switch Between Output Devices?
Quickly switching between output devices can be done through the Taskbar or Sound Settings.
- Using the Taskbar: Click the speaker icon in the Taskbar notification area. A volume slider will appear, along with a list of available output devices. Click the arrow next to the current device to select a different one.
- Through Sound Settings: Open Sound Settings and select your desired output device from the dropdown menu.
This flexibility is particularly useful for those who frequently switch between headphones and speakers, allowing you to tailor your audio experience when working with sound libraries from streetsounds.net.
6. What Is the Volume Mixer and How Do I Use It on Windows 11?
The Volume Mixer allows you to adjust the volume levels for individual applications, providing granular control over your audio experience.
- Open Volume Mixer: Right-click the speaker icon in the Taskbar and select “Open Volume mixer”.
- Adjust Individual App Volumes: The Volume Mixer displays a list of currently running applications that are producing sound. Each app has its own volume slider, allowing you to increase or decrease its volume independently.
- Mute/Unmute Apps: Each app also has a speaker icon that you can click to mute or unmute the application.
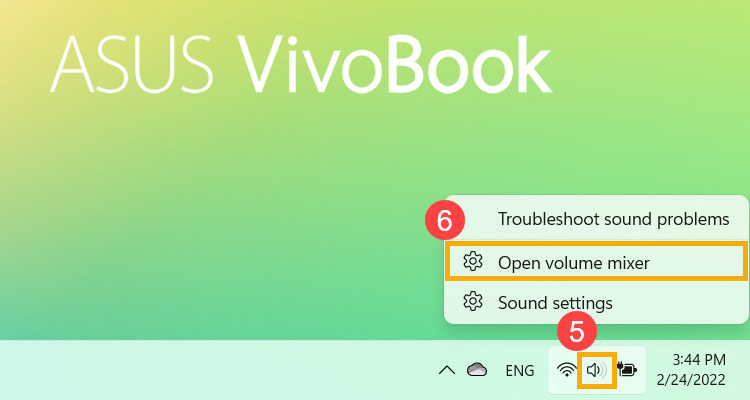 Opening Volume Mixer in Windows 11
Using the Volume Mixer, you can prioritize certain sounds, such as the detailed street sounds from streetsounds.net, ensuring they are heard clearly above other applications.
7. Can I Adjust the Volume for Individual Apps?
Yes, you can adjust the volume for individual apps using the Volume Mixer.
- Access Volume Mixer: Right-click the speaker icon in the Taskbar and select “Open Volume mixer”.
- Modify App Volumes: In the Volume Mixer, you will see a list of applications currently playing audio. Use the slider for each app to adjust its volume level.
This feature is incredibly useful for balancing different audio sources, such as adjusting the volume of a music player relative to the sound of a video game, or fine-tuning the levels when sampling sounds from streetsounds.net within a music production environment.
8. How Do I Mute or Unmute Specific Applications?
Muting or unmuting specific applications is easily done through the Volume Mixer.
- Open Volume Mixer: Right-click the speaker icon on the Taskbar and select “Open Volume mixer”.
- Mute/Unmute Icon: In the Volume Mixer, each application has a speaker icon next to its volume slider. Click this icon to toggle between mute and unmute. When muted, the speaker icon will typically display a crossed-out symbol.
This control is essential for managing audio distractions, allowing you to focus on critical sounds or samples from streetsounds.net without interruption.
9. What If an Application Doesn’t Appear in the Volume Mixer?
If an application doesn’t appear in the Volume Mixer, it might not be actively producing sound or the system might not be recognizing it.
- Ensure the App Is Playing Sound: Make sure the application is actually playing audio. Some apps only appear in the Volume Mixer when they are actively outputting sound.
- Restart the Application: Sometimes, simply restarting the application can make it appear in the Volume Mixer.
- Check App Permissions: Ensure the application has the necessary permissions to access the audio output. Check the app’s settings or Windows privacy settings.
- Update Audio Drivers: Outdated audio drivers can sometimes cause applications not to be recognized. Update your audio drivers through Device Manager.
Correcting these issues ensures that all your audio sources are properly managed, allowing you to seamlessly integrate sounds from streetsounds.net into your projects.
10. How Can I Set a Default Audio Output Device?
Setting a default audio output device ensures that Windows automatically uses your preferred device unless you specify otherwise.
- Open Sound Settings: Go to Sound Settings via the Windows search bar.
- Select Default Device: In the Output section, choose your preferred device from the dropdown menu. Windows will automatically set this as the default.
- Confirm in Sound Control Panel: For more control, click “More sound settings” to open the classic Sound Control Panel. In the “Playback” tab, select your device, and click “Set as Default Device.”
 Sound Control Panel in Windows 11
Setting a default ensures consistent audio output, which is vital when you are relying on accurate sound reproduction for projects involving high-quality audio from streetsounds.net.
11. What Are Sound Enhancements and How Do They Affect Audio Output?
Sound Enhancements are audio processing effects built into Windows that can alter the sound output, often to improve clarity, bass, or overall sound quality.
- Access Sound Enhancements: Open Sound Settings, click “More sound settings” to open the Sound Control Panel. In the “Playback” tab, select your device, click “Properties,” and go to the “Enhancements” tab.
- Explore Available Enhancements: You will see a list of available enhancements, such as Loudness Equalization, Bass Boost, and Virtual Surround.
- Enable or Disable Enhancements: Check or uncheck the boxes next to each enhancement to enable or disable it. You can listen to the audio to hear the effect of each enhancement.
Be aware that while enhancements can sometimes improve the listening experience, they can also introduce unwanted artifacts or distort the original sound. When working with professional-grade audio from streetsounds.net, it’s often best to disable enhancements to maintain the integrity of the original recording.
12. Should I Disable Sound Enhancements for Professional Audio Work?
Yes, it is generally recommended to disable sound enhancements for professional audio work to maintain the integrity and accuracy of the audio.
- Access Enhancements Tab: Open Sound Settings, click “More sound settings” to open the Sound Control Panel. In the “Playback” tab, select your device, click “Properties,” and go to the “Enhancements” tab.
- Disable All Enhancements: Check the box that says “Disable all enhancements” or manually uncheck each enhancement.
Disabling enhancements ensures that you are hearing the audio exactly as it was recorded, which is crucial for mixing, mastering, and critical listening tasks. With resources like streetsounds.net, where the authenticity of the captured sound is paramount, disabling enhancements is essential for accurate sound design and production.
13. How Do I Troubleshoot Audio Output Problems?
Troubleshooting audio output problems involves checking several potential issues and systematically addressing them.
- Check Volume Levels: Ensure the master volume is not muted or set too low. Also, check the Volume Mixer to ensure individual applications are not muted or set to very low volumes.
- Verify Device Connection: Make sure your audio device is properly connected. Check cables, Bluetooth connections, and power sources.
- Update Audio Drivers: Outdated or corrupted drivers can cause audio problems. Update your audio drivers through Device Manager.
- Restart Audio Service: Restarting the Windows Audio service can often resolve audio issues. Press
Win + R, typeservices.msc, find “Windows Audio,” right-click, and select “Restart.” - Run the Audio Troubleshooter: Windows has a built-in audio troubleshooter that can automatically detect and fix common audio problems. Go to Settings > System > Sound > Troubleshoot.
By systematically checking these common issues, you can often resolve audio output problems and ensure a smooth experience when working with sound resources like those found on streetsounds.net.
14. What Is the Difference Between Default Device and Default Communication Device?
The Default Device and Default Communication Device serve different roles in managing audio output.
- Default Device: This is the device that Windows uses for all general audio output, such as music, videos, and system sounds.
- Default Communication Device: This is the device that Windows uses specifically for communication-related audio, such as voice calls, video conferences, and VoIP applications.
You can set both devices independently in the Sound Control Panel. This allows you to, for example, use headphones for voice calls while using speakers for general audio. Setting these correctly ensures that your audio is routed to the appropriate devices for different tasks, enhancing your overall audio experience when using resources like streetsounds.net alongside communication applications.
15. How Do I Set a Separate Communication Device?
Setting a separate communication device allows you to route communication audio to a specific output, separate from your default audio.
- Open Sound Control Panel: Open Sound Settings, click “More sound settings” to open the classic Sound Control Panel.
- Go to Playback Tab: In the “Playback” tab, select the device you want to use for communication (e.g., headphones) and click “Set as Default Communication Device.”
- Configure Recording Device: Repeat the process in the “Recording” tab to set the microphone you want to use for communication.
By setting a separate communication device, you can ensure clear and focused audio for calls and conferences, while still enjoying high-quality sound from sources like streetsounds.net through your default speakers.
16. Can I Use Multiple Output Devices Simultaneously?
Yes, you can use multiple output devices simultaneously on Windows 11, although it requires some configuration.
- Enable Stereo Mix: First, enable Stereo Mix (if it’s not already enabled). Open Sound Control Panel, go to the “Recording” tab, right-click in the list of devices, and select “Show Disabled Devices.” If Stereo Mix appears, right-click it and select “Enable.”
- Set Stereo Mix as Listen Device: In the Properties of Stereo Mix, go to the “Listen” tab, check “Listen to this device,” and select your second output device from the dropdown menu.
- Configure Default Output: Set your primary output device as the default playback device in the “Playback” tab.
Using multiple output devices can be useful for creating a more immersive audio experience or for routing audio to different zones in a studio or home. However, be aware that it may introduce latency or synchronization issues. For critical audio work with resources like streetsounds.net, it’s generally best to use a single, high-quality output device.
17. What Is Spatial Sound and How Does It Enhance Audio?
Spatial Sound is a technology that creates a more immersive and three-dimensional audio experience by simulating sound coming from different directions in space.
- Access Spatial Sound Settings: Open Sound Settings, select your output device, and click “Spatial sound.”
- Choose a Format: Select a spatial sound format from the dropdown menu, such as “Windows Sonic for Headphones” (free) or “Dolby Atmos for Headphones” (paid).
- Configure Settings: Depending on the format, you may have additional settings to configure, such as headphone optimization or virtual speaker placement.
Spatial Sound can significantly enhance the listening experience, especially for content that is specifically mixed for spatial audio. However, it may not be suitable for all types of audio, and some users may prefer the more accurate reproduction of traditional stereo or surround sound. Experimenting with spatial sound can be a fun way to explore new dimensions in audio, especially when combined with the detailed soundscapes available on streetsounds.net.
18. How Do I Enable or Disable Spatial Sound?
Enabling or disabling Spatial Sound is a straightforward process that can be done through the Sound Settings.
- Open Sound Settings: Go to Sound Settings via the Windows search bar.
- Select Output Device: Choose your desired output device.
- Access Spatial Sound Settings: Click on “Spatial sound” to access the spatial sound settings.
- Enable/Disable Spatial Sound: Use the dropdown menu to select a spatial sound format (e.g., Windows Sonic for Headphones) to enable it, or select “Off” to disable it.
Enabling spatial sound can create a more immersive listening experience, particularly with headphones, while disabling it ensures the audio is reproduced in its original format. This can be especially useful when working with high-quality sound samples from streetsounds.net, where you might want to hear the sounds as they were originally recorded.
19. What Is the Best Spatial Sound Format for Headphones?
The best spatial sound format for headphones depends on personal preference and the type of content you are listening to.
- Windows Sonic for Headphones: This is a free spatial sound format built into Windows 11. It provides a basic spatial audio experience and is a good starting point for most users.
- Dolby Atmos for Headphones: This is a paid spatial sound format that offers a more advanced and customizable spatial audio experience. It is particularly well-suited for movies, games, and music that are specifically mixed for Dolby Atmos.
- DTS Headphone:X: Another paid option, DTS Headphone:X, provides a different take on spatial audio, focusing on creating a more accurate and realistic soundstage.
Experimenting with different formats can help you find the one that sounds best to you. For detailed audio work with sound libraries like streetsounds.net, it’s often best to start with Windows Sonic or disable spatial sound to ensure accurate reproduction of the original sounds.
20. How Do I Calibrate My Headphones for Optimal Audio Output?
Calibrating your headphones ensures they are delivering the most accurate and balanced sound possible.
- Use Calibration Software: Several software options are available for headphone calibration, such as Sonarworks SoundID Reference, Dirac Live, and IK Multimedia ARC System. These programs measure the frequency response of your headphones and create a correction profile to flatten the response.
- Follow Software Instructions: Each program has its own set of instructions for measuring and calibrating your headphones. Generally, you will need to play test tones through your headphones and use a microphone to measure the output.
- Apply Correction Profile: Once the calibration is complete, the software will create a correction profile that you can apply to your audio output. This profile will compensate for the frequency response of your headphones, resulting in a more accurate and balanced sound.
Calibrating your headphones can significantly improve your listening experience, especially when working with high-quality audio from sources like streetsounds.net, where accurate sound reproduction is essential for critical listening and audio production.
21. Can I Restore the Default Sound Settings on Windows 11?
Yes, you can restore the default sound settings on Windows 11, which can be useful if you’ve made changes that are causing problems or if you just want to start fresh.
- Open Sound Settings: Go to Sound Settings via the Windows search bar.
- Select Sound Device: Choose the sound device you want to reset.
- Navigate to Advanced Settings: Click “More sound settings” to open the Sound Control Panel.
- Restore Defaults: In the “Playback” tab, select your device, click “Properties,” go to the “Advanced” tab, and click “Restore Defaults.”
 Restoring Default Sound Settings
Restoring the default sound settings can help resolve many audio issues and provide a clean slate for configuring your audio preferences. It’s a good starting point when troubleshooting problems or when you want to ensure you are hearing the audio as intended, which is particularly useful when working with sound samples from streetsounds.net.
22. How Do Audio Drivers Affect Sound Output?
Audio drivers are software programs that allow your operating system to communicate with your audio hardware. They play a critical role in sound output by translating digital audio signals into analog signals that your speakers or headphones can reproduce.
- Compatibility: Drivers ensure that your audio hardware is compatible with your operating system.
- Performance: Properly installed and updated drivers can improve the performance of your audio hardware, resulting in better sound quality and lower latency.
- Features: Drivers can enable advanced features, such as spatial sound, audio enhancements, and multi-channel audio output.
- Troubleshooting: Corrupted or outdated drivers can cause audio problems, such as distorted sound, crackling noises, or no sound at all.
Keeping your audio drivers up to date is essential for optimal sound output. When working with high-quality audio from resources like streetsounds.net, ensuring your drivers are in good shape can make a significant difference in the accuracy and fidelity of the reproduced sound.
23. How Do I Update My Audio Drivers?
Updating your audio drivers is a straightforward process that can improve your sound output and resolve audio-related issues.
- Open Device Manager: Right-click the Windows Start button and select “Device Manager.”
- Expand Sound, Video, and Game Controllers: Find your audio device in the list.
- Update Driver: Right-click your audio device and select “Update driver.”
- Search Automatically or Browse: You can choose to have Windows automatically search for updated drivers, or you can browse your computer for driver files that you have downloaded from the manufacturer’s website.
Keeping your audio drivers current ensures compatibility and optimal performance, allowing you to fully appreciate the rich and detailed sounds from sources like streetsounds.net.
24. Where Can I Download the Latest Audio Drivers?
Downloading the latest audio drivers from the manufacturer’s website is the best way to ensure you have the most up-to-date and compatible drivers for your audio hardware.
- Identify Your Audio Hardware: Determine the exact model of your audio device. This information is usually available on the device itself or in the documentation that came with it.
- Visit the Manufacturer’s Website: Go to the website of the manufacturer of your audio device (e.g., Realtek, Creative, Focusrite).
- Find the Support or Downloads Section: Look for a support or downloads section on the website.
- Search for Your Device: Enter the model number of your audio device and search for drivers.
- Download the Latest Drivers: Download the latest drivers for your operating system.
Using the latest drivers ensures optimal performance and compatibility, which is crucial when working with high-quality audio from resources like streetsounds.net, where accurate and reliable sound reproduction is essential.
25. What Are the Common Issues Caused by Outdated Audio Drivers?
Outdated audio drivers can lead to a variety of issues that can negatively impact your audio experience.
- Sound Distortion: Audio may sound distorted, crackly, or fuzzy.
- No Sound: You may experience a complete lack of sound output.
- Compatibility Issues: Your audio device may not be properly recognized by your operating system.
- Performance Problems: Audio playback may be choppy or laggy.
- Feature Limitations: Advanced audio features, such as spatial sound or audio enhancements, may not work correctly.
Keeping your audio drivers up to date helps prevent these issues, ensuring a smooth and high-quality audio experience when working with resources like streetsounds.net.
26. How Can External Sound Cards Improve Audio Output?
External sound cards can significantly improve audio output by providing higher-quality audio processing and output capabilities compared to the built-in audio hardware in most computers.
- Better Audio Quality: External sound cards often use higher-quality components, such as digital-to-analog converters (DACs) and amplifiers, which can result in cleaner, more detailed, and more accurate sound.
- Lower Noise and Distortion: External sound cards are typically better shielded against electrical noise and interference, resulting in lower noise and distortion levels.
- More Features and Connectivity: External sound cards often offer more features and connectivity options, such as multiple inputs and outputs, headphone amplifiers, and support for professional audio formats.
- Bypass Internal Hardware: By using an external sound card, you can bypass the limitations of your computer’s internal audio hardware, which may be of lower quality or subject to interference.
For professionals working with high-quality audio, an external sound card is often a worthwhile investment. When using resources like streetsounds.net, an external sound card can help you hear the full potential of the recordings, ensuring accurate and detailed sound reproduction.
27. What Are the Benefits of Using High-Quality Headphones?
Using high-quality headphones offers several benefits that can significantly enhance your listening experience.
- Improved Sound Quality: High-quality headphones typically offer a more accurate and detailed sound reproduction, allowing you to hear subtle nuances in the audio that you might miss with lower-quality headphones.
- Better Comfort: High-quality headphones are often designed with comfort in mind, using premium materials and ergonomic designs to ensure a comfortable fit even during long listening sessions.
- Noise Isolation: Many high-quality headphones offer excellent noise isolation, which can help block out distractions and allow you to focus on the audio.
- Durability: High-quality headphones are typically built to last, using durable materials and robust construction to withstand daily use.
For professionals working with audio or anyone who appreciates high-fidelity sound, investing in high-quality headphones is a worthwhile decision. When using resources like streetsounds.net, high-quality headphones can help you appreciate the full depth and detail of the recordings, ensuring an immersive and accurate listening experience.
28. How Does the Quality of Audio Files Affect the Output Sound?
The quality of audio files has a direct and significant impact on the output sound.
- Resolution and Bitrate: Higher resolution and bitrate audio files contain more information, resulting in a more detailed and accurate sound reproduction.
- Compression: Lossy compression formats (e.g., MP3, AAC) reduce the file size by discarding some of the audio information, which can result in a loss of detail and clarity. Lossless compression formats (e.g., FLAC, ALAC) preserve all of the audio information, resulting in no loss of quality.
- Source Recording: The quality of the original recording also plays a crucial role. Even with high-resolution audio files, a poorly recorded or mixed source will still sound bad.
When working with audio, it’s important to start with the highest quality files possible to ensure the best possible output sound. Resources like streetsounds.net often provide high-quality audio files, allowing you to take full advantage of your audio hardware and software.
29. What Audio File Formats Provide the Best Sound Quality?
Several audio file formats provide excellent sound quality, each with its own strengths and weaknesses.
- FLAC (Free Lossless Audio Codec): A lossless compression format that preserves all of the audio information while reducing the file size. It is widely supported and is a good choice for archiving and listening to high-quality audio.
- ALAC (Apple Lossless Audio Codec): Apple’s lossless compression format, similar to FLAC. It is well-supported on Apple devices and software.
- WAV (Waveform Audio File Format): An uncompressed audio format that stores audio data in its raw form. It provides the highest possible sound quality but also results in the largest file sizes.
- AIFF (Audio Interchange File Format): Apple’s equivalent to WAV. It is also an uncompressed audio format that provides excellent sound quality.
For critical listening and audio production, lossless formats like FLAC and ALAC are generally preferred. When file size is a concern, high-bitrate lossy formats like MP3 (320kbps) and AAC (256kbps) can provide a good balance between sound quality and file size. With resources like streetsounds.net, using these high-quality formats ensures you capture all the nuances of the original recordings.
30. How Can I Test My Audio Output to Ensure It’s Working Correctly?
Testing your audio output is essential to ensure that it is working correctly and that you are hearing the audio as intended.
- Play Test Tones: Use a test tone generator or download test tone files to play through your audio output. Listen for any distortion, crackling noises, or other artifacts.
- Use a Frequency Response Analyzer: Use a frequency response analyzer to measure the frequency response of your audio output. This can help you identify any peaks or dips in the frequency response that may be affecting the sound.
- Listen to Familiar Music: Listen to music that you are familiar with and that you know sounds good on other systems. Pay attention to the details in the music and compare it to what you are used to hearing.
- Check Different Output Devices: Test your audio output with different output devices (e.g., headphones, speakers) to ensure that the problem is not specific to a particular device.
By systematically testing your audio output, you can identify and troubleshoot any issues that may be affecting your listening experience. This is particularly important when working with high-quality audio from resources like streetsounds.net, where accurate and detailed sound reproduction is essential.
31. How Does Sample Rate Affect Audio Quality?
The sample rate is the number of samples of audio taken per second, measured in Hertz (Hz). It directly affects the highest frequency that can be accurately reproduced in the audio.
- Nyquist Theorem: According to the Nyquist-Shannon sampling theorem, the sample rate must be at least twice the highest frequency you want to capture. For example, to capture frequencies up to 20 kHz (the upper limit of human hearing), you need a sample rate of at least 40 kHz.
- Common Sample Rates: Common sample rates include 44.1 kHz (CD quality), 48 kHz (common for video and professional audio), 96 kHz, and 192 kHz.
- Higher Sample Rates: Higher sample rates can capture more information and potentially result in a more accurate and detailed sound reproduction, but they also result in larger file sizes and require more processing power.
For most music and audio production, a sample rate of 44.1 kHz or 48 kHz is sufficient. Higher sample rates may be beneficial for certain applications, such as recording and mastering high-resolution audio. When working with resources like streetsounds.net, understanding sample rates can help you choose the appropriate settings for your projects.
32. What Role Does Bit Depth Play in Audio Output Quality?
Bit depth refers to the number of bits used to represent each sample of audio. It directly affects the dynamic range and signal-to-noise ratio of the audio.
- Dynamic Range: Higher bit depths provide a greater dynamic range, which is the difference between the quietest and loudest sounds that can be accurately represented.
- Quantization Noise: Lower bit depths can introduce quantization noise, which is a form of distortion that results from rounding off the audio samples to the nearest available value.
- Common Bit Depths: Common bit depths include 16-bit (CD quality), 24-bit, and 32-bit.
- Higher Bit Depths: Higher bit depths can reduce quantization noise and provide a greater dynamic range, resulting in a cleaner and more detailed sound reproduction.
For most music and audio production, a bit depth of 24-bit is recommended. Higher bit depths may be beneficial for certain applications, such as recording and mastering high-resolution audio. When working with resources like streetsounds.net, understanding bit depth can help you optimize your audio settings for the best possible sound quality.
33. How Can I Optimize My Listening Environment for Better Sound?
Optimizing your listening environment can significantly improve your audio experience by reducing unwanted reflections and resonances that can distort the sound.
- Acoustic Treatment: Use acoustic panels, bass traps, and diffusers to absorb and diffuse sound waves in your listening room. This can help reduce reflections and resonances, resulting in a more accurate and balanced sound.
- Speaker Placement: Position your speakers correctly in your listening room. Follow the manufacturer’s recommendations for speaker placement, and experiment with different positions to find the one that sounds best in your room.
- Room Symmetry: Try to create a symmetrical listening environment. This means that the left and right sides of the room should be as similar as possible in terms of size, shape, and acoustic treatment.
- Reduce Noise: Minimize external noise sources in your listening environment. Close windows, turn off noisy appliances, and use noise-canceling headphones if necessary.
Optimizing your listening environment can help you hear the full potential of your audio equipment and resources like streetsounds.net, ensuring a more immersive and accurate listening experience.
34. What Is the Importance of Grounding in Audio Setups?
Grounding is an essential aspect of audio setups that helps prevent electrical noise and interference, resulting in cleaner and more accurate sound.
- Preventing Ground Loops: Ground loops occur when there are multiple paths to ground in an audio system, which can create a circulating current that introduces hum and noise into the audio signal.
- Reducing Electrical Noise: Proper grounding can help reduce electrical noise and interference from power sources, electronic devices, and other sources.
- Ensuring Safety: Grounding also plays a crucial role in ensuring the safety of your audio equipment and preventing electrical shocks.
- Best Practices: Use grounded power outlets, connect all audio equipment to a common ground point, and avoid using multiple ground paths.
Ensuring proper grounding in your audio setup can help eliminate unwanted noise and interference, allowing you to hear the audio as it was intended. This is particularly important when working with high-quality audio from resources like streetsounds.net, where even small amounts of noise can detract from the listening experience.
35. How Do Different Speaker Types Affect Audio Output?
Different speaker types are designed for specific purposes and have different characteristics that affect the audio output.
- Bookshelf Speakers: Compact speakers designed to be placed on a shelf or stand. They typically offer good sound quality and are suitable for small to medium-sized rooms.
- Floor-Standing Speakers: Larger speakers designed to be placed on the floor. They typically offer better bass response and can fill larger rooms with sound.
- Studio Monitors: Speakers designed for professional audio production. They offer a flat frequency response and accurate sound reproduction.
- Headphones: Personal listening devices that provide a more intimate and isolated listening experience.
Choosing the right speaker type depends on your listening environment, budget, and preferences. When working with high-quality audio from resources like streetsounds.net, selecting speakers that accurately reproduce the sound can significantly enhance your listening experience.
36. How Can I Use EQ (Equalization) to Improve Sound Output?
EQ, or Equalization, is the process of adjusting the frequency balance of an audio signal. It can be used to improve sound output by correcting frequency imbalances, enhancing certain frequencies, and reducing unwanted frequencies.
- Identify Frequency Imbalances: Use your ears or a frequency analyzer to identify any frequency imbalances in your audio output. For example, you may notice that the bass is too boomy or the treble is too harsh.
- Use an EQ Plugin or Hardware EQ: Use an EQ plugin in your audio software or a hardware EQ unit to adjust the frequency balance of the audio signal.
- Make Small Adjustments: Make small, subtle adjustments to the EQ, and listen carefully to the results. Avoid making drastic changes, as this can often make the audio sound unnatural.
- Correct Problems, Don’t Create Them: Use EQ to correct problems in the audio, not to create new ones. For example, if the bass is too boomy, reduce the bass frequencies with the EQ.
Using EQ can help you fine-tune your audio output and achieve a more balanced and pleasing sound. When working with resources