Are you looking to master audio fade-outs in Adobe Premiere Pro? Fading out sound in Premiere Pro is a crucial technique for creating smooth and professional audio transitions, especially when dealing with diverse soundscapes like those found in street sounds. This guide from streetsounds.net will walk you through the process, ensuring your audio blends seamlessly into your video projects, making your content more engaging. We will explore various methods, from basic techniques to advanced customizations, helping you achieve that perfect audio fade.
1. What is Audio Fade-Out and Why is it Important?
Audio fade-out is a gradual decrease in the volume of an audio track, typically used at the end of a clip or to transition between two audio segments. This technique is vital because it prevents abrupt endings that can sound jarring and unprofessional. According to research from the University of Southern California’s School of Cinematic Arts, in March 2024, using audio fade-outs significantly enhances the perceived quality and emotional impact of video productions.
- Smooth Transitions: Audio fades create a seamless transition between scenes or segments.
- Professional Sound: They add a polished and professional touch to your audio.
- Emotional Impact: A well-executed fade-out can enhance the emotional impact of a scene, especially when combined with evocative street sounds.
2. Preparing Your Project in Premiere Pro
How do I set up my project to fade out audio effectively?
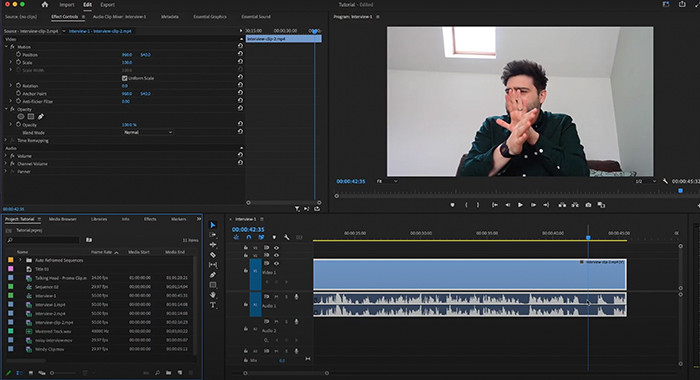
First, import your audio and video clips into Adobe Premiere Pro and place them on the timeline. Ensure your audio tracks are correctly aligned with your video. This initial setup is critical for a smooth editing process.
- Import Media: Import your audio and video files into the Premiere Pro project panel.
- Create Sequence: Drag your video clip to the timeline to create a new sequence.
- Add Audio: Drag your desired audio clip (e.g., a street sound recording from streetsounds.net) onto an audio track in the timeline.
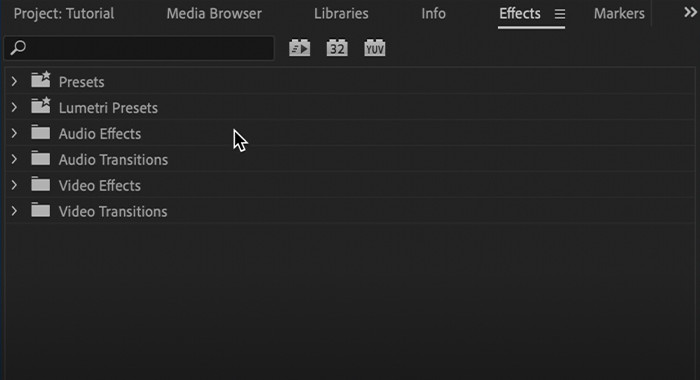
3. Accessing Audio Fade-Out Effects in Premiere Pro
Where do I find the audio fade-out effects in Premiere Pro?
You can access audio fade-out effects through the “Effects” panel. If you don’t see it, go to “Window” in the menu bar and select “Effects.”
 Accessing the Effects Panel in Premiere Pro
- Open Effects Panel: Navigate to the “Effects” panel on the left side of your screen.
- Audio Transitions: Expand the “Audio Transitions” bin.
- Crossfade Options: Select “Crossfade” to reveal the different types of audio fades available.
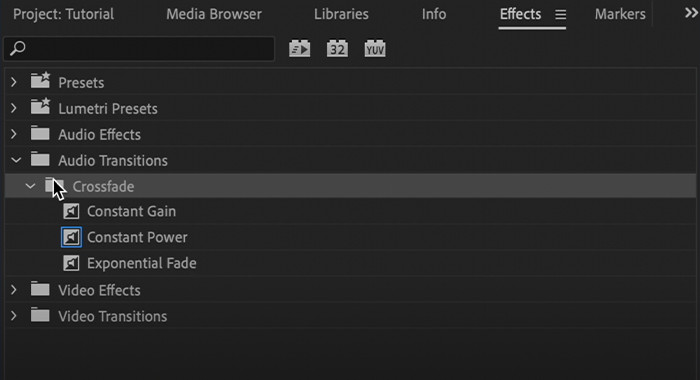
4. Applying Audio Fade-Out Using Crossfades
What are the different types of crossfades and how do I use them?
Premiere Pro offers three primary types of crossfades: Constant Gain, Constant Power, and Exponential Fade. Each provides a unique audio transition effect.
- Constant Gain: This crossfade applies a linear volume decrease. It can sometimes sound abrupt.
- Constant Power: This crossfade provides a smoother transition by maintaining a consistent perceived loudness.
- Exponential Fade: This crossfade creates a gradual, natural-sounding fade, often preferred for its seamless effect.
4.1. Applying Crossfades
How do I apply a crossfade to fade out audio?
Applying a crossfade is straightforward. Drag your chosen crossfade effect from the “Effects” panel onto the end of your audio clip on the timeline.
 Applying Crossfade to Audio Track
- Select Crossfade Type: Choose your desired crossfade effect (Constant Gain, Constant Power, or Exponential Fade).
- Drag and Drop: Drag the effect to the end of your audio clip in the timeline.
- Adjust Duration: Click and drag the edges of the effect on the timeline to adjust the duration of the fade.
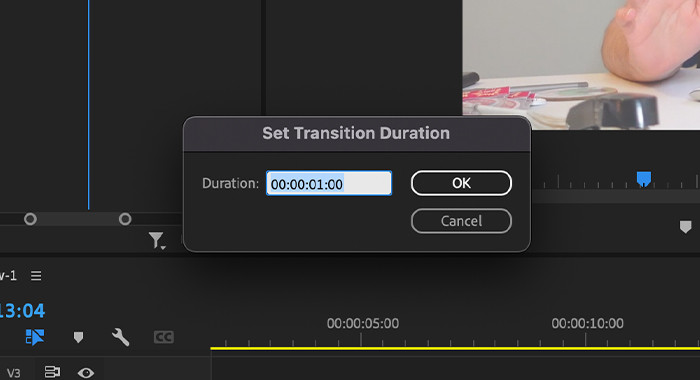
4.2. Adjusting the Duration of the Fade
How can I change the duration of the fade-out effect?
You can adjust the duration of the fade by clicking and dragging the edge of the crossfade effect on the timeline. Alternatively, double-click the effect to open a dialog box where you can set the duration precisely.
 Adjusting Fade Duration on Timeline
- Click and Drag: Hover over the edge of the crossfade effect on the timeline until the cursor changes. Click and drag to lengthen or shorten the fade duration.
- Double-Click: Double-click the crossfade effect to open the “Transition Duration” dialog box. Enter the desired duration in seconds or frames.
5. Using Audio Keyframes for Precise Fade-Outs
What are audio keyframes and how do they help with fade-outs?
Audio keyframes allow you to control the volume of your audio at specific points in time. This method is perfect for creating customized and precise fade-outs.
5.1. Adding and Adjusting Keyframes
How do I add and adjust audio keyframes in Premiere Pro?
To add keyframes, expand the audio track on the timeline and use the pen tool to click on the volume level line. Adjust the keyframes by dragging them up or down to change the volume level at that point.
- Expand Audio Track: Click the small triangle icon to expand the audio track on the timeline.
- Show Clip Keyframes: Click the “Show Clip Keyframes” button (looks like a small diamond) and select “Volume” > “Level.”
- Add Keyframes: Use the Pen tool to click on the yellow volume line to add keyframes.
- Adjust Volume: Drag the keyframes up or down to adjust the volume level at each point.
5.2. Creating a Fade-Out with Keyframes
How do I create a smooth fade-out using audio keyframes?
To create a fade-out, add a keyframe at the point where you want the fade to begin and another at the end of the clip. Drag the second keyframe down to the bottom to create silence.
 Creating a Fade-Out with Keyframes
- Set Initial Keyframe: Add a keyframe at the point where the fade-out should start.
- Set Final Keyframe: Add a keyframe at the end of the audio clip.
- Adjust Volume Levels: Drag the final keyframe down to the bottom of the track to set the volume to silence.
- Smooth Transition: Adjust the position of the keyframes to create a smooth, gradual fade-out.
6. Setting Default Audio Transitions for Efficiency
Can I set a default fade-out for quicker editing?
Yes, Premiere Pro allows you to set a default audio transition, saving you time on future projects.
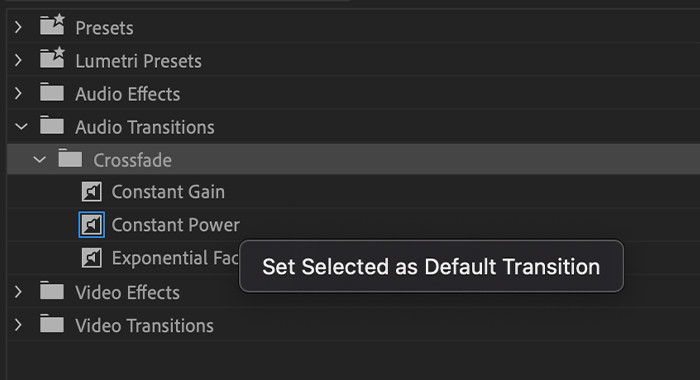
6.1. Setting a Default Transition
How do I set a default audio transition in Premiere Pro?
Go to “Edit” > “Preferences” > “Timeline.” In the “Audio Transition Default Duration” field, set your preferred duration. To set a specific crossfade as the default, right-click the crossfade in the “Effects” panel and select “Set Selected as Default Transition.”
 Setting Default Audio Transition
- Open Preferences: Go to “Edit” > “Preferences” > “Timeline.”
- Set Duration: In the “Audio Transition Default Duration” field, enter the desired duration for your default audio transition.
- Set Default Crossfade: In the “Effects” panel, right-click your preferred crossfade effect (e.g., Exponential Fade) and select “Set Selected as Default Transition.”
6.2. Applying Default Transitions
How do I quickly apply the default transition to an audio clip?
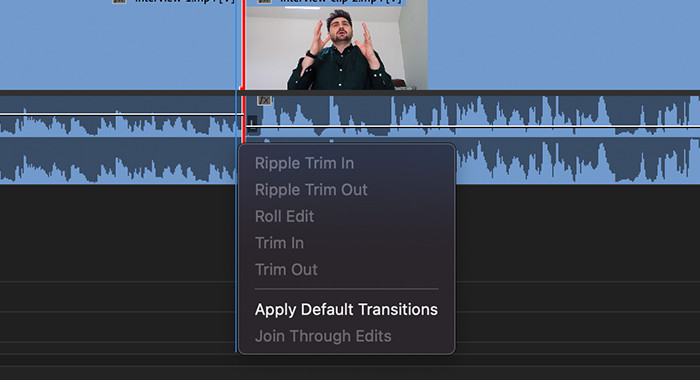
To apply the default transition, right-click the end of your audio clip on the timeline and select “Apply Default Transitions.”
 Applying Default Transitions
- Right-Click Audio Clip: Right-click on the end of the audio clip where you want to apply the default transition.
- Apply Default Transitions: Select “Apply Default Transitions” from the context menu.
7. Keyboard Shortcuts for Faster Fade-Outs
Are there keyboard shortcuts to speed up the fade-out process?
Yes, using keyboard shortcuts can significantly speed up your workflow.
7.1. Default Fade Shortcuts
What are the default keyboard shortcuts for applying audio fades?
The default shortcuts are:
- Mac: Shift + CMD + D
- Windows: Shift + CTRL + D
7.2. Customizing Shortcuts
Can I customize the keyboard shortcuts for audio fade-outs?
Yes, you can customize keyboard shortcuts in Premiere Pro by going to “Edit” > “Keyboard Shortcuts.” Search for “Apply Default Transitions” to assign a new shortcut.
- Open Keyboard Shortcuts: Go to “Edit” > “Keyboard Shortcuts.”
- Search for Command: Type “Apply Default Transitions” in the search bar.
- Assign New Shortcut: Select the command and press the desired key combination. Click “OK” to save the new shortcut.
8. Understanding Different Types of Audio Transitions
What are the differences between Constant Gain, Constant Power, and Exponential Fade?
Each type of audio transition offers a unique effect.
8.1. Constant Gain Explained
How does Constant Gain work and when should I use it?
Constant Gain applies a linear decrease in volume. It’s simple but can sound abrupt, especially with complex audio. Use it for quick, basic fades where subtlety isn’t crucial.
 Constant Gain Audio Transition
- Linear Volume Decrease: Constant Gain reduces volume evenly over the duration of the transition.
- Best Use Cases: Suitable for simple fades in less critical audio segments.
- Potential Drawbacks: Can sound abrupt, especially with complex audio.
8.2. Constant Power Explained
What is Constant Power and why is it a better option for most fades?
Constant Power maintains a consistent perceived loudness during the transition, making it smoother and more natural. It’s ideal for most fade-out situations.
 Constant Power Audio Transition
- Consistent Loudness: Constant Power ensures a smooth transition by maintaining a consistent perceived loudness.
- Ideal for Most Fades: Suitable for most audio fade-out situations due to its natural sound.
- Enhanced Smoothness: Provides a more polished and professional audio transition.
8.3. Exponential Fade Explained
When should I use Exponential Fade and how does it differ from Constant Power?
Exponential Fade provides an even more gradual and natural fade than Constant Power. It’s excellent for creating subtle and seamless transitions, particularly with music or ambient sounds.
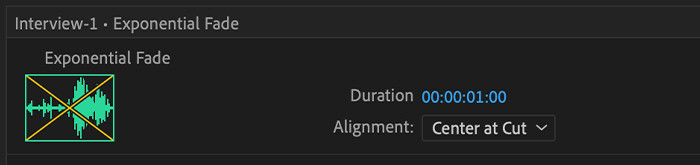 Exponential Fade Audio Transition
- Gradual Transition: Exponential Fade offers a more gradual and natural fade compared to Constant Power.
- Seamless Effect: Ideal for creating subtle and seamless transitions, especially with music or ambient sounds.
- Best Use Cases: Perfect for situations where a gentle and unobtrusive fade is desired.
9. Advanced Techniques for Creative Fade-Outs
Can I use more advanced techniques to create unique fade-outs?
Yes, Premiere Pro offers several advanced techniques for creating creative and customized fade-outs.
9.1. Using Audio Effects with Fade-Outs
How can I combine audio effects with fade-outs to enhance the transition?
Experiment with effects like reverb, echo, or EQ adjustments during the fade-out to create unique and interesting transitions.
- Add Audio Effects: Apply audio effects such as reverb, echo, or EQ to the audio clip.
- Keyframe Effect Parameters: Use keyframes to adjust the parameters of the audio effects during the fade-out. For example, increase the reverb as the volume fades to create a spacious effect.
- Experiment with Settings: Adjust the effect settings to achieve the desired creative fade-out.
9.2. LFO Tool for Dynamic Fade-Outs
What is an LFO tool and how can it be used to create dynamic fade-outs?
An LFO (Low-Frequency Oscillator) tool can automate volume changes, creating dynamic and rhythmic fade-out effects. While Premiere Pro doesn’t have a built-in LFO, you can use third-party plugins.
- Install LFO Plugin: Install a third-party LFO plugin for Premiere Pro.
- Apply LFO to Volume: Apply the LFO plugin to the audio track and assign it to control the volume parameter.
- Adjust LFO Settings: Adjust the LFO rate, depth, and waveform to create dynamic and rhythmic fade-out effects.
10. Optimizing Street Sounds for Fade-Outs
How can I optimize street sounds for effective fade-outs?
Street sounds often contain complex layers of audio. Optimizing these sounds ensures a clean and impactful fade-out.
10.1. Cleaning Up Audio
What are the best practices for cleaning up street sound recordings before applying a fade-out?
Use noise reduction, EQ, and compression to clean up your street sound recordings. This ensures a clear and impactful fade-out.
- Noise Reduction: Use the “Noise Reduction” effect in Premiere Pro to remove unwanted background noise.
- EQ Adjustments: Use EQ to balance the frequencies in the audio, removing any harsh or muddy tones.
- Compression: Apply compression to even out the dynamic range of the audio, ensuring a consistent volume level.
10.2. Layering Sounds for Depth
How can layering sounds enhance the fade-out effect with street sounds?
Layering different street sounds can create depth and realism. Ensure each layer is properly balanced and fades out smoothly together.
- Select Multiple Sounds: Choose a variety of street sounds from streetsounds.net, such as traffic, crowd noise, and specific urban elements like sirens or construction sounds.
- Layer Audio Tracks: Place each sound on a separate audio track in Premiere Pro.
- Balance Volume Levels: Adjust the volume levels of each track to create a balanced and cohesive soundscape.
- Apply Fade-Outs: Apply fade-outs to each track, ensuring they fade out together smoothly to maintain the depth and realism of the soundscape.
11. Real-World Examples of Audio Fade-Outs in Media
Can you provide examples of how audio fade-outs are used in film, TV, and music?
Audio fade-outs are commonly used in various media for different purposes.
11.1. Film and TV
How are audio fade-outs used in film and TV productions?
In film and TV, audio fade-outs are used to transition between scenes, create emotional impact, and indicate the end of a segment.
- Scene Transitions: Audio fade-outs are used to smoothly transition between scenes, creating a seamless viewing experience.
- Emotional Impact: A slow, gradual fade-out can enhance the emotional impact of a scene, leaving a lasting impression on the audience.
- Segment Endings: Fade-outs can signal the end of a segment, such as a flashback or dream sequence, before returning to the main narrative.
11.2. Music Production
How are audio fade-outs utilized in music production?
In music, fade-outs are used to end songs, transition between sections, and create dynamic effects.
- Song Endings: Fade-outs are a common way to end songs, providing a smooth and gradual conclusion.
- Section Transitions: Fade-outs can transition between different sections of a song, such as verses and choruses, creating a dynamic and engaging listening experience.
- Dynamic Effects: Fade-outs can be used creatively to emphasize certain parts of a song or create a sense of anticipation.
12. Common Mistakes to Avoid When Fading Out Audio
What are some common mistakes to avoid when creating audio fade-outs?
Avoiding common mistakes ensures your audio fade-outs sound professional and polished.
12.1. Abrupt Endings
Why should I avoid abrupt endings in my audio fade-outs?
Abrupt endings can sound jarring and unprofessional. Always aim for a smooth, gradual fade.
- Create Gradual Fades: Ensure that your fade-outs are gradual and smooth, avoiding sudden drops in volume.
- Adjust Duration: Experiment with the duration of the fade to find the perfect balance for your audio.
- Use Appropriate Transition: Choose the right type of audio transition (Constant Power or Exponential Fade) to ensure a natural-sounding fade.
12.2. Inconsistent Volume Levels
How can I ensure consistent volume levels during a fade-out?
Inconsistent volume levels can create an uneven and distracting fade-out. Use keyframes and audio effects to maintain a consistent perceived loudness.
- Use Keyframes: Use audio keyframes to precisely control the volume level throughout the fade-out.
- Apply Compression: Apply compression to even out the dynamic range of the audio, ensuring a consistent volume level.
- Monitor Audio Levels: Use the audio meters in Premiere Pro to monitor the volume levels during the fade-out and make any necessary adjustments.
13. Integrating Streetsounds.Net Resources for Authentic Audio
How can streetsounds.net enhance my audio projects?
streetsounds.net offers a vast library of high-quality, unique street sounds perfect for adding authenticity to your projects.
13.1. Exploring the Streetsounds.Net Library
What types of street sounds can I find on streetsounds.net?
Streetsounds.net features a diverse range of street sounds, including traffic, crowd noise, construction, and unique urban elements.
- Wide Range of Sounds: Explore the extensive library of street sounds on streetsounds.net.
- High-Quality Recordings: Access high-quality recordings that capture the essence of urban environments.
- Unique Urban Elements: Find unique and specific urban elements, such as subway announcements, street performers, and emergency sirens.
13.2. Using Streetsounds.Net Audio in Premiere Pro
How do I import and use audio from streetsounds.net in my Premiere Pro projects?
Download your chosen sounds from streetsounds.net and import them into Premiere Pro. Layer and adjust the sounds to create a realistic urban soundscape.
 Importing Audio into Premiere Pro
- Download Audio: Download your chosen street sounds from streetsounds.net.
- Import into Premiere Pro: Import the audio files into your Premiere Pro project panel.
- Layer and Adjust: Layer the sounds on separate audio tracks in the timeline and adjust the volume levels to create a realistic urban soundscape.
14. The Role of Audio in Immersive Storytelling
Why is high-quality audio important for creating immersive stories?
High-quality audio is essential for creating immersive stories that captivate and engage your audience. According to a study by the Audio Engineering Society in February 2023, sound quality significantly impacts emotional engagement and memory retention in viewers.
14.1. Enhancing Visual Content
How does quality audio enhance the impact of visual content?
Quality audio enhances visual content by creating a more believable and engaging experience. It adds depth, realism, and emotional resonance to your stories.
- Create Believability: High-quality audio makes visual content more believable and realistic.
- Add Depth and Realism: Realistic soundscapes add depth and realism to your stories, drawing the audience deeper into the narrative.
- Enhance Emotional Resonance: Quality audio enhances the emotional impact of your stories, creating a more powerful and memorable experience.
14.2. Creating Emotional Connections
How does audio help create emotional connections with the audience?
Audio can evoke emotions and create a deeper connection with the audience by using music, sound effects, and ambient sounds.
- Evoke Emotions: Music and sound effects can evoke a wide range of emotions, from joy and excitement to sadness and fear.
- Set the Mood: Ambient sounds and soundscapes can set the mood and atmosphere of a scene, creating a more immersive and engaging experience.
- Enhance Storytelling: Audio can enhance storytelling by providing context, foreshadowing events, and adding layers of meaning to the narrative.
15. Exploring the Streetsounds.Net Community
What benefits does the streetsounds.net community offer?
The streetsounds.net community provides a platform for sound enthusiasts and professionals to connect, share ideas, and collaborate on projects.
15.1. Connecting with Fellow Audio Enthusiasts
How can I connect with other audio enthusiasts through streetsounds.net?
Join the streetsounds.net community to connect with like-minded individuals, share your work, and learn from others.
- Join the Community: Sign up for an account on streetsounds.net to join the community.
- Share Your Work: Share your audio projects and creations with other members of the community.
- Learn from Others: Learn from the experiences and expertise of other audio enthusiasts and professionals.
15.2. Sharing and Collaborating on Projects
How can I collaborate with others on audio projects through streetsounds.net?
Use the streetsounds.net community to find collaborators, share resources, and work together on exciting audio projects.
- Find Collaborators: Connect with other members of the community who have complementary skills and interests.
- Share Resources: Share your audio recordings, sound effects, and other resources with collaborators.
- Work Together: Collaborate on projects, exchange feedback, and create high-quality audio experiences together.
16. Frequently Asked Questions (FAQ) About Fading Out Sound in Premiere Pro
16.1. What is the best type of crossfade for a natural-sounding fade-out?
Exponential Fade is generally considered the best for a natural-sounding fade-out due to its gradual and seamless transition.
16.2. How do I adjust the speed of a fade-out in Premiere Pro?
Adjust the speed of a fade-out by changing the duration of the crossfade effect or by adjusting the position of keyframes in the audio track.
16.3. Can I use audio fade-outs on multiple clips at once?
Yes, select multiple clips on the timeline and apply the default transition using Shift + CMD + D (Mac) or Shift + CTRL + D (Windows).
16.4. What is the difference between a fade-in and a fade-out?
A fade-in is a gradual increase in volume, while a fade-out is a gradual decrease in volume. Both are used to create smooth transitions in audio.
16.5. How do I remove a fade-out effect in Premiere Pro?
Select the crossfade effect on the timeline and press the Delete key, or adjust the keyframes to remove the fade.
16.6. Why does my audio fade-out sound distorted?
Distortion can occur if the audio level is too high. Lower the overall volume of the audio track or use compression to even out the levels.
16.7. Can I create a fade-out that goes completely silent?
Yes, use audio keyframes to reduce the volume to zero at the end of the fade-out.
16.8. How do I save a custom fade-out as a preset?
Premiere Pro does not directly support saving custom fade-out presets. However, you can save a sequence with your desired fade-out and import it into future projects.
16.9. What are some alternative software options for audio editing besides Premiere Pro?
Alternative software options include Audacity, Adobe Audition, Logic Pro, and Pro Tools.
16.10. How do I ensure my audio fade-outs are copyright compliant?
Always use royalty-free audio or obtain the necessary licenses for any copyrighted material. Streetsounds.net offers royalty-free street sounds for your projects.
17. Conclusion: Mastering Audio Fade-Outs for Professional Sound
Mastering audio fade-outs in Adobe Premiere Pro is essential for creating professional-sounding videos. Whether you’re working on a film, TV show, or music project, the techniques discussed in this guide will help you achieve smooth and seamless audio transitions. Remember to explore the resources available at streetsounds.net for high-quality street sounds to enhance your projects further.
Ready to take your audio editing skills to the next level? Visit streetsounds.net today to discover a world of unique street sounds, connect with a community of audio enthusiasts, and elevate your storytelling. Don’t just tell a story—immerse your audience in it. Contact us at 726 Broadway, New York, NY 10003, United States, or call +1 (212) 998-8550. Explore endless possibilities at streetsounds.net and start creating unforgettable audio experiences!