
Experiencing sound issues in Windows 10 can be frustrating, especially when you’re trying to immerse yourself in the vibrant world of street sounds. But don’t worry, streetsounds.net is here to help you troubleshoot and resolve these problems, so you can get back to enjoying your favorite audio experiences. Dive into troubleshooting your audio on Windows 10, ensure your system’s audio drivers are functioning correctly, and explore advanced settings for optimal sound performance.
1. Understanding Common Sound Problems in Windows 10
What are the common reasons for sound problems in Windows 10?
Sound problems in Windows 10 can stem from a variety of sources, ranging from simple configuration errors to more complex driver or hardware issues. Identifying the root cause is the first step to finding an effective solution. These problems include no sound output, distorted audio, intermittent sound, and issues with specific audio devices.
Configuration Problems
- Muted Volume: The most basic, yet often overlooked, issue is simply having the volume muted, either in the system settings or within a specific application.
- Incorrect Output Device: Windows 10 may be directing audio to the wrong output device, especially if you have multiple audio devices connected, such as headphones, speakers, or a Bluetooth device.
- Application-Specific Settings: Some applications have their own volume controls and output settings, which may override the system’s default settings.
Driver Issues
- Outdated Drivers: Audio drivers are software components that allow Windows 10 to communicate with your sound card or audio device. Outdated drivers can cause compatibility issues and lead to sound problems.
- Corrupted Drivers: Drivers can become corrupted due to software conflicts, malware infections, or system errors.
- Driver Conflicts: Conflicts between different audio drivers or other system drivers can also result in sound problems.
Hardware Issues
- Faulty Audio Device: The speakers, headphones, or sound card itself may be defective.
- Loose Connections: Loose or damaged cables connecting the audio device to the computer can interrupt the audio signal.
- External Interference: Electromagnetic interference from other devices can sometimes cause distortion or other audio problems.
Software Conflicts
- Conflicting Applications: Certain applications, especially those that interact with audio devices, may conflict with the system’s audio settings.
- Operating System Errors: Windows 10 itself may have errors or bugs that affect audio functionality.
- Recent Updates: Newly installed Windows updates can sometimes introduce audio problems due to compatibility issues or driver conflicts.
How to identify the cause
- Check Volume Levels: Start by checking the volume levels in the system tray and within the application you’re using.
- Verify Output Device: Ensure that the correct audio output device is selected in the system settings.
- Test with Different Devices: Try using different headphones or speakers to rule out a hardware problem.
- Update Drivers: Update your audio drivers to the latest version.
- Run the Troubleshooter: Use the Windows 10 audio troubleshooter to automatically diagnose and fix common problems.
2. Basic Troubleshooting Steps for No Sound in Windows 10
What are the first steps to take when there’s no sound in Windows 10?
When you encounter a complete absence of sound in Windows 10, it’s essential to start with the most basic troubleshooting steps to rule out simple causes before diving into more complex solutions. These steps will help you identify the problem quickly and efficiently.
-
Check the Volume Level
- Ensure that the volume is not muted or set too low. Look for the speaker icon in the system tray (usually in the lower-right corner of the screen).
- Click the speaker icon to open the volume control and make sure the volume slider is set to an audible level.
- Also, check the volume mixer by right-clicking the speaker icon and selecting “Open Volume Mixer”. This allows you to adjust the volume for individual applications.
-
Verify the Correct Playback Device is Selected
- Windows 10 may be sending audio to the wrong output device, especially if you have multiple devices connected (e.g., headphones, speakers, Bluetooth devices).
- Right-click the speaker icon in the system tray and select “Open Sound settings”.
- In the Sound settings, under the “Output” section, make sure the correct device is selected in the dropdown menu. If you’re using headphones, ensure they are selected; if you’re using speakers, ensure they are selected.
- If the correct device is not listed, make sure it is properly connected to your computer. For Bluetooth devices, ensure they are paired correctly.
-
Check the Audio Cables and Connections
- Ensure that all audio cables are securely connected to both your computer and the audio output device (speakers, headphones, etc.).
- Check for any visible damage to the cables, such as fraying or cuts.
- If possible, try using different cables to rule out a faulty cable.
- If you are using external speakers, make sure they are powered on.
-
Restart Your Computer
- Restarting your computer can often resolve temporary software glitches that may be causing the sound problem.
- Close all open applications and restart Windows.
- After the restart, check if the sound is working.
-
Run the Windows Audio Troubleshooter
- Windows 10 includes a built-in audio troubleshooter that can automatically diagnose and fix common sound problems.
- To run the troubleshooter, right-click the speaker icon in the system tray and select “Troubleshoot sound problems”.
- The troubleshooter will scan your system for audio issues and attempt to fix them automatically. Follow the on-screen instructions and see if it resolves the problem.
-
Check Device Manager for Errors
- Device Manager allows you to view the status of all hardware devices connected to your computer, including audio devices.
- To open Device Manager, right-click the Start button and select “Device Manager”.
- Expand the “Sound, video and game controllers” category.
- Look for any devices with a yellow exclamation mark or a red “X”, which indicates a problem.
- If you find any errors, right-click the device and select “Properties”. The Properties window may provide more information about the problem and suggest solutions.
-
Test with Different Applications
- The sound problem may be specific to a particular application. Try playing audio from different applications (e.g., a music player, a web browser, a game) to see if the sound works in some but not others.
- If the sound only fails in one application, the problem is likely with that application’s settings or configuration.
By following these basic troubleshooting steps, you can quickly identify and resolve many common sound problems in Windows 10. If the problem persists, you may need to move on to more advanced troubleshooting techniques.
3. Updating Audio Drivers in Windows 10
How do I update audio drivers in Windows 10 to fix sound issues?
Updating your audio drivers is a crucial step in resolving sound issues in Windows 10. Outdated or corrupted drivers can lead to various problems, including no sound, distorted audio, or compatibility issues. There are several ways to update your audio drivers, ensuring your system can properly communicate with your audio hardware.
-
Using Device Manager to Automatically Search for Driver Updates
-
Device Manager is a built-in Windows tool that allows you to manage and update hardware drivers.
- Open Device Manager: Right-click the Start button and select “Device Manager”.
- Expand Sound, video and game controllers: In Device Manager, find and expand the “Sound, video and game controllers” category.
- Update Driver: Right-click on your audio device (e.g., speakers, headphones, sound card) and select “Update driver”.
- Search Automatically: Choose “Search automatically for drivers”. Windows will search your computer and the internet for the latest available drivers.
- Follow Instructions: If Windows finds a new driver, it will download and install it automatically. Follow any on-screen instructions to complete the update.
-
-
Manually Installing Drivers from the Manufacturer’s Website
-
If Windows cannot find a new driver automatically, you can download the latest driver from the manufacturer’s website.
- Identify Your Audio Device: Determine the manufacturer and model of your audio device or sound card. This information is usually printed on the device itself or in the device’s documentation.
- Visit Manufacturer’s Website: Go to the manufacturer’s website (e.g., Realtek, Creative, or the website of your computer manufacturer like Dell or HP).
- Download Drivers: Navigate to the support or downloads section of the website and search for the latest drivers for your audio device and operating system (Windows 10).
- Install Drivers: Once the driver is downloaded, run the installer and follow the on-screen instructions to install the driver.
- Restart Your Computer: After the installation is complete, restart your computer to apply the changes.
-
-
Uninstalling and Reinstalling Audio Drivers
-
Sometimes, uninstalling the existing audio driver and then reinstalling it can resolve driver-related issues.
- Open Device Manager: Right-click the Start button and select “Device Manager”.
- Expand Sound, video and game controllers: In Device Manager, find and expand the “Sound, video and game controllers” category.
- Uninstall Device: Right-click on your audio device and select “Uninstall device”.
- Delete Driver Software: If prompted, check the box that says “Delete the driver software for this device” and then click “Uninstall”.
- Restart Your Computer: Restart your computer. Windows will automatically detect the missing audio device and attempt to reinstall the driver.
- Install Drivers Manually (if necessary): If Windows does not automatically reinstall the driver, you may need to manually install the driver from the manufacturer’s website, as described in the previous step.
-
-
Using Windows Update to Find Driver Updates
-
Windows Update can sometimes provide driver updates along with other system updates.
- Open Settings: Click the Start button and select the gear icon to open the Settings app.
- Go to Update & Security: Click on “Update & Security”.
- Check for Updates: Click the “Check for updates” button. Windows will scan for available updates, including driver updates.
- Install Updates: If Windows finds any driver updates, it will download and install them automatically. Restart your computer when prompted.
-
-
Rolling Back Audio Drivers
-
If you recently updated your audio drivers and started experiencing sound problems, rolling back to a previous driver version may resolve the issue.
- Open Device Manager: Right-click the Start button and select “Device Manager”.
- Expand Sound, video and game controllers: In Device Manager, find and expand the “Sound, video and game controllers” category.
- Properties: Right-click on your audio device and select “Properties”.
- Driver Tab: Click on the “Driver” tab.
- Roll Back Driver: If the “Roll Back Driver” button is available (not grayed out), click it. Follow the on-screen instructions to roll back to the previous driver version.
- Restart Your Computer: Restart your computer to apply the changes.
-
By following these methods, you can ensure that your audio drivers are up to date and functioning correctly, resolving many common sound problems in Windows 10.
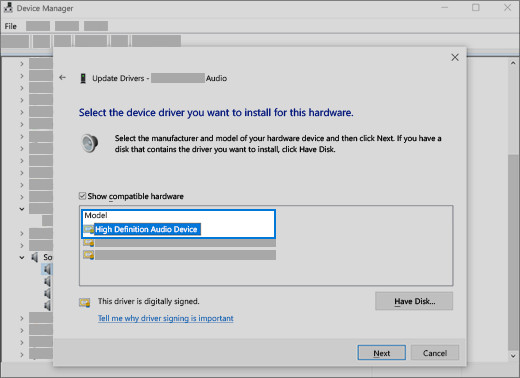 Select the driver and select next to use the generic audio driver
4. Setting the Default Audio Device in Windows 10
How do I set the default audio device in Windows 10?
Setting the correct default audio device in Windows 10 is crucial for ensuring that sound is played through the intended speakers or headphones. Windows 10 allows you to easily manage your audio devices and set the default for both playback and recording.
-
Accessing Sound Settings
-
The first step is to access the Sound Settings in Windows 10.
- Right-click the Sound Icon: Locate the speaker icon in the system tray, typically in the lower-right corner of your screen.
- Open Sound Settings: Right-click the speaker icon and select “Open Sound settings”. This will open the Sound Settings window.
- Alternatively, you can access Sound Settings through the Settings app:
- Open Settings: Click the Start button and select the gear icon to open the Settings app.
- Go to System: Click on “System”.
- Select Sound: In the left sidebar, click on “Sound”.
-
-
Setting the Default Playback Device
-
In the Sound Settings window, you can choose the default device for audio playback.
- Choose Your Output Device: In the “Output” section, you will see a dropdown menu labeled “Choose your output device”.
- Select the Desired Device: Click the dropdown menu and select the audio device you want to use as the default (e.g., headphones, speakers).
- Test the Device: After selecting the device, you can test it by clicking the “Test” button. This will play a short sound to confirm that the device is working correctly.
- Adjust Volume: You can also adjust the volume level for the selected device using the volume slider.
-
-
Setting the Default Recording Device
-
Similarly, you can set the default device for audio recording.
- Go to Input Settings: In the Sound Settings window, scroll down to the “Input” section.
- Choose Your Input Device: In the “Input” section, you will see a dropdown menu labeled “Choose your input device”.
- Select the Desired Device: Click the dropdown menu and select the audio device you want to use as the default for recording (e.g., microphone).
- Test the Device: You can test the microphone by speaking into it and observing the “Test your microphone” indicator. The blue bar should move as you speak, indicating that the microphone is picking up sound.
- Adjust Volume: You can also adjust the input volume level for the selected device using the volume slider.
-
-
Managing Sound Devices in the Sound Control Panel
-
For more advanced settings, you can use the Sound Control Panel.
- Open Sound Control Panel: In the Sound Settings window, click on “Sound Control Panel” on the right side of the window. This will open the classic Sound Control Panel.
- Playback Tab: In the Sound Control Panel, go to the “Playback” tab.
- Set Default Device: Right-click on the desired playback device and select “Set as Default Device”. If you want to use the device for communication as well (e.g., for voice chat), also select “Set as Default Communication Device”.
- Recording Tab: Go to the “Recording” tab.
- Set Default Device: Right-click on the desired recording device and select “Set as Default Device”. If you want to use the device for communication as well, also select “Set as Default Communication Device”.
- Apply Changes: Click “Apply” and then “OK” to save the changes.
-
-
Disabling Unused Audio Devices
-
To avoid confusion and potential conflicts, it’s a good idea to disable any unused audio devices.
- Open Sound Control Panel: Follow the steps above to open the Sound Control Panel.
- Playback or Recording Tab: Go to the “Playback” or “Recording” tab, depending on the device you want to disable.
- Disable Device: Right-click on the device you want to disable and select “Disable”. The device will no longer be available for use.
- Apply Changes: Click “Apply” and then “OK” to save the changes.
-
By following these steps, you can easily set the default audio devices in Windows 10 and ensure that sound is played through the correct speakers or headphones and recorded through the correct microphone.
5. Checking Audio Enhancements in Windows 10
How do I check and adjust audio enhancements in Windows 10?
Audio enhancements in Windows 10 are designed to improve the sound quality of your audio devices. However, sometimes these enhancements can cause unexpected issues, such as distortion, low volume, or other sound problems. Checking and adjusting these settings can help resolve such issues and optimize your audio experience.
-
Accessing Sound Control Panel
-
The first step is to access the Sound Control Panel, where you can manage audio enhancements.
- Right-click the Sound Icon: Locate the speaker icon in the system tray, typically in the lower-right corner of your screen.
- Open Sound Settings: Right-click the speaker icon and select “Open Sound settings”.
- Sound Control Panel: In the Sound Settings window, click on “Sound Control Panel” on the right side of the window. This will open the classic Sound Control Panel.
- Alternatively, you can access Sound Control Panel through the Run dialog:
- Press Windows Key + R: Press the Windows key and the R key simultaneously to open the Run dialog.
- Type “mmsys.cpl”: Type
mmsys.cpland press Enter. This will directly open the Sound Control Panel.
-
-
Navigating to Playback Devices
-
In the Sound Control Panel, you’ll need to navigate to the Playback tab to adjust enhancements for your output devices (speakers, headphones, etc.).
- Playback Tab: In the Sound Control Panel, click on the “Playback” tab.
- Select Your Device: Select the audio device you want to configure (e.g., headphones, speakers) and click “Properties”. This will open the Properties window for the selected device.
-
-
Adjusting Enhancements
-
The Enhancements tab in the device’s Properties window is where you can find and adjust audio enhancements.
- Enhancements Tab: In the Properties window, click on the “Enhancements” tab. If you do not see the “Enhancements” tab, it might be located under a different tab depending on your audio driver.
- List of Enhancements: You will see a list of available enhancements, such as:
- Loudness Equalization: This enhancement attempts to normalize the volume levels across different audio sources, making quiet sounds louder and loud sounds quieter.
- Bass Boost: This enhancement amplifies the low-frequency sounds to enhance the bass.
- Virtual Surround: This enhancement creates a virtual surround sound effect for headphones or stereo speakers.
- Room Correction: This enhancement adjusts the audio output to compensate for the acoustics of your room.
- Enable or Disable Enhancements: Check or uncheck the boxes next to each enhancement to enable or disable it.
- Apply Changes: Click “Apply” and then “OK” to save the changes.
-
-
Disabling All Enhancements
-
If you are experiencing audio issues, a quick way to troubleshoot is to disable all enhancements.
- Disable All Enhancements: In the Enhancements tab, check the box that says “Disable all enhancements”. This will turn off all audio enhancements for the selected device.
- Apply Changes: Click “Apply” and then “OK” to save the changes.
- Test Audio: Test your audio to see if disabling enhancements resolves the issue. If it does, you can then selectively re-enable enhancements one by one to identify which one is causing the problem.
-
-
Troubleshooting Specific Enhancements
-
If disabling all enhancements fixes the problem, you can try enabling them one at a time to identify the problematic enhancement.
- Enable Enhancements Individually: In the Enhancements tab, enable one enhancement at a time.
- Apply Changes and Test: Click “Apply” and then “OK”. Test your audio to see if the problem returns.
- Identify the Culprit: Repeat this process for each enhancement until you identify the one that is causing the issue.
- Disable Problematic Enhancement: Once you find the problematic enhancement, leave it disabled and enable the others as desired.
-
By checking and adjusting audio enhancements in Windows 10, you can optimize your audio experience and resolve issues caused by these settings.
6. Checking the Volume Mixer in Windows 10
How do I check and adjust the Volume Mixer in Windows 10?
The Volume Mixer in Windows 10 is a useful tool that allows you to control the volume levels of individual applications. This can be particularly helpful when some applications are too loud or too quiet compared to others. Checking and adjusting the Volume Mixer can help you balance the audio output of different programs and ensure a consistent listening experience.
-
Accessing the Volume Mixer
-
There are several ways to access the Volume Mixer in Windows 10.
- Right-click the Sound Icon: Locate the speaker icon in the system tray, typically in the lower-right corner of your screen.
- Open Volume Mixer: Right-click the speaker icon and select “Open Volume Mixer”. This will open the Volume Mixer window.
- Alternatively, you can access the Volume Mixer through Sound Settings:
- Right-click the Sound Icon: Right-click the speaker icon in the system tray.
- Open Sound Settings: Select “Open Sound settings”.
- App volume and device preferences: Scroll down to the bottom and click on “App volume and device preferences” under Advanced sound options.
-
-
Understanding the Volume Mixer Interface
-
The Volume Mixer displays a list of applications that are currently playing audio, along with a master volume control for the system.
- System Volume: At the top of the Volume Mixer, you will see the master volume control, which affects the overall volume of the system.
- Application Volumes: Below the system volume, you will see individual volume controls for each application that is currently playing audio.
- Output Devices: You can also select different output devices (e.g., speakers, headphones) for each application.
-
-
Adjusting Application Volumes
-
You can adjust the volume level of each application independently.
- Locate the Application: Find the application you want to adjust in the Volume Mixer.
- Adjust the Slider: Use the slider below the application’s icon to adjust the volume level. Moving the slider to the left decreases the volume, while moving it to the right increases the volume.
- Mute/Unmute Application: You can also mute or unmute an application by clicking the speaker icon below the volume slider.
-
-
Setting Output Devices for Applications
-
You can choose which audio output device each application uses.
- App volume and device preferences: Open “App volume and device preferences” from Sound Settings
- Choose the Output Device: Under the Output section, each app will have the option to select specific output device.
- Select the Desired Device: Click the dropdown menu and select the audio device you want to use for that application.
-
-
Troubleshooting with the Volume Mixer
-
The Volume Mixer can be a valuable tool for troubleshooting audio issues.
- Application Too Quiet: If an application is too quiet, make sure its volume slider is set to an appropriate level in the Volume Mixer.
- Application Too Loud: If an application is too loud, lower its volume slider in the Volume Mixer.
- No Sound in Application: If an application has no sound, make sure it is not muted in the Volume Mixer and that its volume slider is not set to zero.
- Conflicting Applications: If you are experiencing audio issues with multiple applications, try adjusting their volume levels in the Volume Mixer to see if it resolves the problem.
-
-
Saving Volume Mixer Settings
-
Windows 10 does not automatically save Volume Mixer settings, so you may need to readjust them each time you restart your computer. However, there are third-party tools that can help you save and restore Volume Mixer settings.
- Third-Party Tools: Search online for “Volume Mixer save settings” to find third-party tools that can help you save and restore your Volume Mixer settings.
-
By checking and adjusting the Volume Mixer in Windows 10, you can fine-tune the audio output of individual applications and ensure a balanced and consistent listening experience.
7. Checking Audio Services in Windows 10
How do I check and restart audio services in Windows 10?
Audio services are essential system components that manage audio playback and recording in Windows 10. If these services are not running correctly, you may experience various sound problems. Checking and restarting these services can often resolve audio issues.
-
Accessing the Services Manager
-
The first step is to access the Services Manager, where you can view and manage Windows services.
- Open Run Dialog: Press the Windows key and the R key simultaneously to open the Run dialog.
- Type “services.msc”: Type
services.mscand press Enter. This will open the Services Manager. - Alternatively, you can access the Services Manager through Task Manager:
- Open Task Manager: Press Ctrl + Shift + Esc to open Task Manager.
- Go to Services Tab: Click on the “Services” tab.
- Open Services: At the bottom of the Services tab, click on “Open Services”.
-
-
Identifying Key Audio Services
-
There are several audio-related services that are critical for sound functionality in Windows 10.
- Windows Audio: This service manages audio for Windows-based programs.
- Windows Audio Endpoint Builder: This service manages audio devices.
- Plug and Play: This service enables a computer to recognize and adapt to hardware changes with little or no user input.
- Multimedia Class Scheduler: This service enables prioritization of various tasks.
-
-
Checking the Status of Audio Services
-
In the Services Manager, you can check the status of each audio service to ensure that it is running.
- Locate the Service: Scroll through the list of services to find “Windows Audio” and “Windows Audio Endpoint Builder”.
- Check the Status: Look at the “Status” column for each service. The status should be “Running”. If the status is blank or shows “Stopped”, the service is not running.
- Check the Startup Type: Also, check the “Startup Type” column. The startup type should be set to “Automatic”. If it is set to “Manual” or “Disabled”, the service may not start automatically when Windows starts.
-
-
Starting or Restarting Audio Services
-
If an audio service is not running, you can start or restart it.
- Right-click the Service: Right-click on the service you want to start or restart (e.g., “Windows Audio”).
- Select “Start” or “Restart”: If the service is not running, select “Start”. If the service is already running, select “Restart”.
- Wait for the Service to Start: Windows will attempt to start or restart the service. Wait for a few seconds and then check the status again to make sure the service is running.
-
-
Changing the Startup Type of Audio Services
-
If an audio service is not starting automatically when Windows starts, you can change its startup type to “Automatic”.
- Right-click the Service: Right-click on the service you want to configure (e.g., “Windows Audio”).
- Select “Properties”: Select “Properties” from the context menu.
- Go to General Tab: In the Properties window, go to the “General” tab.
- Change Startup Type: In the “Startup type” dropdown menu, select “Automatic”.
- Apply Changes: Click “Apply” and then “OK” to save the changes.
-
-
Troubleshooting Audio Services
-
If you are experiencing issues with audio services, try the following troubleshooting steps.
- Restart All Audio Services: Restart both the “Windows Audio” and “Windows Audio Endpoint Builder” services.
- Check Dependencies: Some services depend on other services. Make sure that all dependent services are also running. You can check the dependencies of a service in its Properties window, under the “Dependencies” tab.
- Run System File Checker: Corrupted system files can sometimes cause issues with services. Run the System File Checker tool to scan for and repair corrupted system files.
- Open Command Prompt as Administrator: Click the Start button, type
cmd, right-click on “Command Prompt”, and select “Run as administrator”. - Run System File Checker: Type
sfc /scannowand press Enter. Windows will scan your system for corrupted files and attempt to repair them.
- Open Command Prompt as Administrator: Click the Start button, type
- Check Event Viewer: The Event Viewer can provide information about errors or warnings related to audio services.
- Open Event Viewer: Press the Windows key, type
eventvwr, and press Enter to open the Event Viewer. - Check System and Application Logs: Look for errors or warnings in the “System” and “Application” logs that are related to audio services.
- Open Event Viewer: Press the Windows key, type
-
By checking and restarting audio services in Windows 10, you can resolve many common sound problems and ensure that your audio system is functioning correctly.
8. Disabling Audio Enhancements Temporarily in Windows 10
How can I temporarily disable audio enhancements in Windows 10 to troubleshoot sound issues?
Temporarily disabling audio enhancements in Windows 10 is a useful troubleshooting step when you’re experiencing sound issues such as distortion, low volume, or inconsistent audio quality. This allows you to quickly determine whether the enhancements are the cause of the problem.
-
Accessing Sound Settings
-
To begin, you’ll need to access the Sound Settings in Windows 10.
- Right-click the Sound Icon: Locate the speaker icon in the system tray, typically in the lower-right corner of your screen.
- Open Sound Settings: Right-click the speaker icon and select “Open Sound settings”. This will open the Sound Settings window.
- Alternatively, you can access Sound Settings through the Settings app:
- Open Settings: Click the Start button and select the gear icon to open the Settings app.
- Go to System: Click on “System”.
- Select Sound: In the left sidebar, click on “Sound”.
-
-
Opening the Sound Control Panel
-
From the Sound Settings, you can access the classic Sound Control Panel, which provides more advanced audio settings.
- Sound Control Panel: In the Sound Settings window, click on “Sound Control Panel” on the right side of the window. This will open the classic Sound Control Panel.
-
-
Selecting the Playback Device
-
In the Sound Control Panel, you’ll need to select the audio playback device you want to adjust.
- Playback Tab: In the Sound Control Panel, click on the “Playback” tab.
- Select Your Device: Select the audio device you are using (e.g., headphones, speakers) and click “Properties”. This will open the Properties window for the selected device.
-
-
Disabling Audio Enhancements
-
In the Properties window, you can find the Enhancements tab, where you can disable audio enhancements.
- Enhancements Tab: In the Properties window, click on the “Enhancements” tab. If you do not see the “Enhancements” tab, it may be located under a different tab depending on your audio driver.
- Disable All Enhancements: Check the box labeled “Disable all enhancements”. This will turn off all audio enhancements for the selected device.
- Apply Changes: Click “Apply” and then “OK” to save the changes.
-
-
Testing Audio After Disabling Enhancements
-
After disabling audio enhancements, test your audio to see if the issue is resolved.
- Play Audio: Play some audio through the selected device (e.g., play a song, watch a video).
- Check for Improvements: Listen carefully to see if the sound quality has improved or if the issue has been resolved. If the problem is gone, it indicates that one or more of the audio enhancements were causing the issue.
-
-
Re-enabling Enhancements (Optional)
-
If disabling all enhancements resolves the issue, you can try re-enabling them one by one to identify the specific enhancement that is causing the problem.
- Re-enable Enhancements Individually: In the Enhancements tab, uncheck the “Disable all enhancements” box and then enable one enhancement at a time.
- Apply Changes and Test: Click “Apply” and then “OK”. Test your audio to see if the problem returns.
- Identify the Culprit: Repeat this process for each enhancement until you identify the one that is causing the issue.
- Disable Problematic Enhancement: Once you find the problematic enhancement, leave it disabled and enable the others as desired.
-
By temporarily disabling audio enhancements, you can quickly troubleshoot sound issues in Windows 10 and determine whether the enhancements are the cause of the problem.
9. Running the Hardware and Devices Troubleshooter
How do I run the Hardware and Devices Troubleshooter in Windows 10?
The Hardware and Devices Troubleshooter in Windows 10 is a built-in tool that can automatically diagnose and fix common problems with hardware devices, including audio devices. Running this troubleshooter can help identify and resolve issues such as driver problems, device conflicts, and other hardware-related errors.
-
Accessing the Troubleshooter
-
There are a few ways to access the Hardware and Devices Troubleshooter in Windows 10.
-
Using Settings App (If Available):
- Open Settings: Click the Start button and select the gear icon to open the Settings app.
- Go to Update & Security: Click on “Update & Security”.
- Select Troubleshoot: In the left sidebar, click on “Troubleshoot”.
- Run the Troubleshooter: If the “Hardware and Devices” troubleshooter is listed, select it and click “Run the troubleshooter”.
-
Using Command Prompt:
- Open Command Prompt as Administrator: Click the Start button, type
cmd, right-click on “Command Prompt”, and select “Run as administrator”. - Run the Troubleshooter: Type the following command and press Enter:
msdt.exe -id DeviceDiagnostic
- Open Command Prompt as Administrator: Click the Start button, type
-
-
-
Running the Troubleshooter
-
Once you have accessed the troubleshooter, follow the on-screen instructions to run it.
- Wait for the Scan: The troubleshooter will scan your system for hardware problems. This process may take a few minutes.
- Follow Instructions: If the troubleshooter finds any problems, it will provide instructions on how to fix them. Follow the instructions carefully.
- Apply Fixes: The troubleshooter may automatically apply some fixes. If prompted, allow the troubleshooter to apply the fixes.
- Restart Your Computer (If Required): After the troubleshooter has finished, it may prompt you to restart your computer. Restart your computer if prompted.
-
-
Interpreting the Results
-
After the troubleshooter has finished, it will display a report of the problems it found and the actions it took.
- Review the Report: Read the report carefully to understand what problems were found and how they were resolved.
- Check for Unresolved Issues: If the troubleshooter was unable to fix a particular problem, it may provide additional information or suggestions on how to resolve the issue manually.
-
-
Troubleshooting with the Hardware and Devices Troubleshooter
-
The Hardware and Devices Troubleshooter can help resolve a variety of hardware-related issues.
- Driver Problems: The troubleshooter can detect and fix problems with outdated, corrupted, or incompatible drivers.
- Device Conflicts: The troubleshooter can identify and resolve conflicts between different hardware devices.
- Hardware Errors: The troubleshooter
-