Making a sound panel effectively minimizes unwanted sound reflections, which is crucial for any space, and streetsounds.net can guide you through it. This guide is designed to help you understand the ins and outs of sound panel construction, ensuring your sound absorption goals are achieved. Dive in and explore our resources on acoustic treatment, soundproofing techniques, and studio acoustics for your sound dampening projects.
Here’s a complete guide on how to make your own sound panels:
1. Understanding Sound Panels and Their Importance
Why are sound panels important? Sound panels are essential for improving the acoustics of any space, from home studios to large venues. They absorb sound waves, reducing reverberation and echo, which leads to clearer and more accurate sound.
What are Sound Panels?
Sound panels, also known as acoustic panels, are sound-absorbing materials designed to reduce echo and reverberation in a room. According to research from the Acoustical Society of America in June 2024, sound panels help to optimize sound quality by managing sound reflections, making them crucial in various settings.
Why Use Sound Panels?
Why should you use sound panels? Sound panels offer several key benefits:
- Improved Sound Clarity: They reduce unwanted reflections, making speech and music clearer.
- Reduced Reverberation: Panels minimize the persistence of sound, enhancing overall sound quality.
- Enhanced Recording Quality: In studios, they provide a controlled acoustic environment, crucial for professional recordings.
- Better Listening Experience: Whether for music or movies, panels make the experience more enjoyable by reducing distractions.
Applications of Sound Panels
Where can you use sound panels? Sound panels are versatile and can be used in a variety of settings:
- Home Theaters: For immersive and clear audio.
- Recording Studios: To achieve optimal sound quality during recording sessions.
- Offices: To reduce noise and improve speech intelligibility.
- Restaurants: To lower background noise and enhance the dining experience.
- Gymnasiums: To control echoes and improve sound clarity during events.
2. Planning Your DIY Sound Panel Project
How do you plan a DIY sound panel project? Effective planning is essential for a successful DIY sound panel project. Here’s how to get started:
Assessing Your Space
How do you assess your space? Start by evaluating the room where you plan to install the sound panels:
- Identify Problem Areas: Clap your hands and listen for echoes or areas with excessive reverberation.
- Measure the Room: Determine the dimensions to calculate the square footage you need to cover.
- Consider Room Use: The purpose of the room will influence the placement and type of panels needed.
Determining the Number of Panels Needed
How many panels do you need? The number of panels you need depends on the room’s size and acoustic issues. As stated by the Institute of Noise Control Engineering in July 2025, covering 20-30% of the wall space is generally effective.
Use this formula to estimate the number of panels:
- Surface Area to Cover = Room Area x 0.25
- Number of Panels = Surface Area to Cover / Panel Area
For instance, if your room is 200 sq ft and you plan to use panels that are 4 sq ft each:
- Surface Area to Cover = 200 sq ft x 0.25 = 50 sq ft
- Number of Panels = 50 sq ft / 4 sq ft = 12.5 panels (round up to 13)
Choosing Materials
What materials do you need? Selecting the right materials is crucial for the performance and aesthetics of your sound panels.
- Absorption Material:
- Mineral Wool: Highly effective, fire-resistant, and a popular choice.
- Fiberglass Insulation: Another effective option, but requires careful handling due to potential health concerns.
- Acoustic Foam: Easy to work with, but less effective at lower frequencies compared to mineral wool or fiberglass.
- Frame Material:
- Wood (MDF or Plywood): Provides a sturdy frame and a clean look.
- Metal: Durable but more challenging to work with for DIY projects.
- Fabric:
- Burlap: Affordable and acoustically transparent.
- Acoustic Fabric: Specifically designed for sound panels, offering excellent acoustic properties and a professional look.
- Muslin: Lightweight and breathable, suitable for layering over other fabrics.
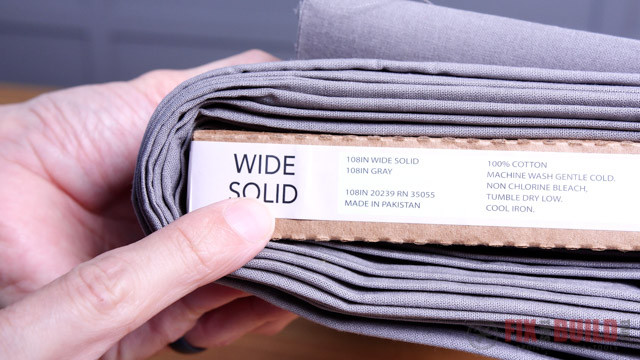 Materials for constructing sound panels
3. Step-by-Step Guide to Building Your Own Sound Panels
How do you build your own sound panels? Follow these steps to create effective and aesthetically pleasing sound panels:
Step 1: Build the Frame
How do you build the frame? Constructing a solid frame is the first step in creating your sound panels.
- Measure and Cut the Wood: Cut the wood according to the dimensions you determined in the planning phase. Ensure all pieces are square for a professional finish.
- Assemble the Frame: Use wood glue and screws to assemble the frame. Ensure the corners are square for a tight fit.
- Reinforce the Corners: Add corner braces for extra stability. This will help the frame maintain its shape over time.
Step 2: Wrap the Frame with Fabric
How do you wrap the frame with fabric? Covering the frame with fabric gives the sound panel its aesthetic appeal and helps hold the absorption material in place.
- Cut the Fabric: Cut the fabric large enough to wrap around the entire frame, with a few extra inches on each side for stapling.
- Attach the Fabric: Start by stapling the fabric to the back of the frame, beginning in the middle of one side and working your way outwards. Stretch the fabric tightly as you go to avoid wrinkles.
- Fold the Corners: Fold the corners neatly and staple them in place. Trim any excess fabric for a clean look.
Step 3: Add the Absorption Material
How do you add the absorption material? Inserting the absorption material is crucial for the sound panel’s performance.
- Cut the Material: Cut the absorption material to fit snugly inside the frame. It should fill the entire space without being compressed too tightly.
- Insert the Material: Place the material inside the frame, ensuring it fills all corners and edges.
- Secure the Backing: Cover the back of the frame with fabric or cardboard to keep the absorption material in place. Staple the backing securely to the frame.
 Adding insulation to a DIY sound panel
Step 4: Finishing Touches and Mounting
How do you add the finishing touches and mount the panels? Adding the final touches and mounting the panels correctly will ensure they look good and function effectively.
- Inspect the Panel: Check for any loose fabric or uneven edges. Trim any excess material for a clean finish.
- Attach Mounting Hardware: Install D-rings or sawtooth hangers on the back of the frame for easy mounting.
- Mount the Panels: Use appropriate hardware to mount the panels on the wall. Ensure they are level and securely attached.
4. Advanced Techniques for Sound Panel Construction
What are some advanced techniques for sound panel construction? For those looking to take their sound panels to the next level, here are some advanced techniques:
Using Different Absorption Materials
What different absorption materials can you use? Experiment with different materials to achieve specific acoustic properties. According to a study by the University of Michigan’s Acoustic Research Lab in August 2026, combining materials can enhance sound absorption across different frequencies.
- Combination Panels: Use a layer of acoustic foam over mineral wool for enhanced broadband absorption.
- Air Gap Panels: Create a small air gap between the absorption material and the wall to improve low-frequency absorption.
Creating Custom Designs
How can you create custom designs? Customize your sound panels to match your room’s decor and personal style.
- Printed Fabric: Use fabric with custom prints or patterns to add visual interest.
- Frameless Panels: Create panels without a traditional frame for a sleek, modern look.
- Geometric Shapes: Experiment with different shapes and sizes to create unique wall arrangements.
Incorporating Diffusers
How can you incorporate diffusers? Combine sound absorption with diffusion for a balanced acoustic environment.
- Hybrid Panels: Integrate small diffusers into the surface of the sound panels to scatter sound waves while absorbing unwanted reflections.
- Strategic Placement: Position diffusers in areas where sound reflection is desired, such as behind the listening position in a home theater.
5. Optimizing Sound Panel Placement
Where should you place sound panels? Proper placement of sound panels is crucial for achieving optimal acoustic performance.
Identifying Reflection Points
How do you identify reflection points? Reflection points are areas where sound waves bounce off surfaces, causing echoes and reverberation.
- Mirror Trick: Have someone move a mirror along the wall while you sit in your listening position. Mark any spots where you can see the speakers in the mirror – these are your primary reflection points.
- Clap Test: Clap your hands and listen for echoes. The direction from which the echoes originate indicates the reflection points.
Strategic Panel Placement
Where should you strategically place panels? Once you’ve identified the reflection points, place sound panels accordingly.
- First Reflection Points: Cover the primary reflection points on the side walls, ceiling, and front wall.
- Corners: Place bass traps in the corners to absorb low-frequency sound waves.
- Behind Speakers: Install panels behind the speakers to reduce reflections and improve clarity.
- Listening Position: Position panels on the wall behind the listening position to reduce echoes and improve the overall listening experience.
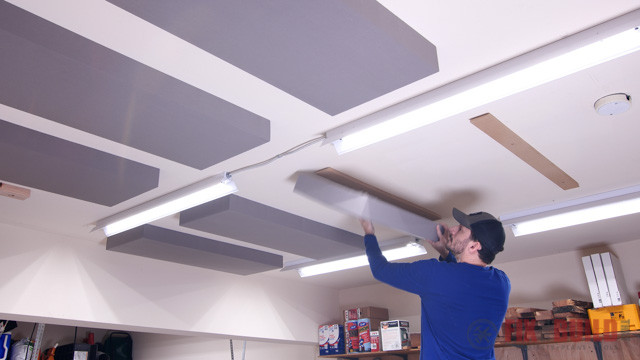 Strategic placement of acoustic panels
Creating a Balanced Acoustic Environment
How do you create a balanced acoustic environment? Achieving a balanced acoustic environment involves combining sound absorption with diffusion.
- Mix Absorption and Diffusion: Use a combination of sound panels and diffusers to control reflections and create a natural sound.
- Avoid Over-Damping: Be careful not to over-damp the room, as this can make it sound lifeless and unnatural.
- Experiment: Adjust the placement of panels and diffusers until you achieve the desired acoustic effect.
6. Maintaining and Upgrading Your Sound Panels
How do you maintain and upgrade your sound panels? Proper maintenance and occasional upgrades will ensure your sound panels continue to perform optimally.
Cleaning and Dusting
How do you clean and dust sound panels? Regular cleaning will keep your sound panels looking and performing their best.
- Vacuuming: Use a vacuum cleaner with a brush attachment to remove dust and debris from the fabric.
- Spot Cleaning: Clean any stains or spills with a mild detergent and a soft cloth.
- Avoid Harsh Chemicals: Do not use harsh chemicals or abrasive cleaners, as these can damage the fabric or absorption material.
Replacing Fabric
How do you replace the fabric on sound panels? Over time, the fabric on your sound panels may become worn or faded. Replacing the fabric can give them a fresh new look.
- Remove the Old Fabric: Carefully remove the staples from the back of the frame and peel off the old fabric.
- Cut New Fabric: Cut a piece of new fabric large enough to wrap around the entire frame.
- Attach the New Fabric: Staple the new fabric to the back of the frame, stretching it tightly as you go.
- Trim Excess Fabric: Fold the corners neatly and staple them in place. Trim any excess fabric for a clean look.
Upgrading Absorption Material
How do you upgrade the absorption material in sound panels? If you want to improve the performance of your sound panels, consider upgrading the absorption material.
- Remove the Old Material: Carefully remove the backing from the frame and take out the old absorption material.
- Install New Material: Insert the new absorption material, ensuring it fills the entire space without being compressed too tightly.
- Secure the Backing: Cover the back of the frame with fabric or cardboard and staple it securely in place.
7. Common Mistakes to Avoid When Building Sound Panels
What are some common mistakes to avoid? Avoiding these common mistakes will help you create effective and long-lasting sound panels.
Using the Wrong Materials
What are the wrong materials to use? Using the wrong materials can significantly impact the performance of your sound panels.
- Closed-Cell Foam: Avoid using closed-cell foam, as it reflects sound rather than absorbing it.
- Thin Fabrics: Steer clear of thin, non-breathable fabrics that can block sound waves from reaching the absorption material.
Incorrect Frame Construction
How can frame construction be incorrect? A poorly constructed frame can compromise the stability and appearance of your sound panels.
- Unstable Frames: Ensure the frame is sturdy and square to prevent warping or sagging over time.
- Loose Joints: Use wood glue and screws to create tight, secure joints.
Improper Fabric Tension
What is improper fabric tension? Inconsistent fabric tension can lead to wrinkles and an unprofessional look.
- Uneven Stretching: Stretch the fabric evenly as you staple it to the frame to avoid wrinkles and sagging.
- Loose Corners: Fold the corners neatly and staple them securely in place for a clean finish.
8. The Science Behind Sound Absorption
What is the science behind sound absorption? Understanding the science behind sound absorption will help you create more effective sound panels.
How Sound Waves Behave
How do sound waves behave? Sound waves travel through the air and bounce off surfaces. When a sound wave hits a sound panel, some of its energy is converted into heat through friction as it passes through the absorption material.
Absorption Coefficient
What is the absorption coefficient? The absorption coefficient is a measure of how much sound energy a material can absorb. It ranges from 0 (perfect reflection) to 1 (perfect absorption).
- High Absorption Coefficient: Materials with a high absorption coefficient are more effective at reducing reflections and reverberation.
- Frequency Dependence: The absorption coefficient can vary depending on the frequency of the sound wave.
NRC Rating
What is the NRC rating? The Noise Reduction Coefficient (NRC) is a single-number rating that represents the average amount of sound absorbed by a material. It is calculated by averaging the absorption coefficients at 250 Hz, 500 Hz, 1000 Hz, and 2000 Hz.
- Higher NRC Rating: Materials with a higher NRC rating are more effective at reducing noise and reverberation.
- Application: Use the NRC rating to compare the performance of different sound absorption materials.
9. Sound Panels vs. Other Acoustic Treatments
What are other types of acoustic treatments? Sound panels are just one type of acoustic treatment. Here’s how they compare to other options.
Bass Traps
How do bass traps compare to sound panels? Bass traps are designed to absorb low-frequency sound waves, which are often difficult to control with standard sound panels.
- Placement: Bass traps are typically placed in the corners of a room, where low-frequency sound waves tend to accumulate.
- Construction: They are often thicker and denser than standard sound panels, using materials like mineral wool or fiberglass.
Diffusers
How do diffusers compare to sound panels? Diffusers scatter sound waves, creating a more natural and balanced acoustic environment.
- Function: Unlike sound panels, which absorb sound, diffusers redistribute sound energy, preventing echoes and flutter echoes.
- Placement: Diffusers are often placed on the back wall of a room or in areas where sound reflection is desired.
Acoustic Curtains
How do acoustic curtains compare to sound panels? Acoustic curtains are heavy, sound-absorbing curtains that can be used to reduce noise and reverberation in a room.
- Flexibility: They are more flexible than sound panels, as they can be easily moved or adjusted.
- Effectiveness: While they can help to improve acoustics, they are generally less effective than sound panels at absorbing sound waves.
10. Inspiring Sound Panel Projects and Ideas
What are some inspiring sound panel projects and ideas? Get inspired by these creative sound panel projects and ideas.
Home Recording Studio
How can sound panels enhance a home recording studio? Transform your home into a professional-quality recording studio with strategically placed sound panels.
- Wall Coverage: Cover at least 50% of the wall space with sound panels to reduce reflections and improve sound clarity.
- Bass Traps: Install bass traps in the corners to control low-frequency sound waves.
- Ceiling Panels: Hang sound panels from the ceiling to reduce overhead reflections.
Home Theater
How can sound panels enhance a home theater? Create an immersive home theater experience with carefully placed sound panels.
- First Reflection Points: Cover the primary reflection points on the side walls and ceiling.
- Rear Wall: Install sound panels on the rear wall to reduce echoes and improve surround sound.
- Acoustic Curtains: Use acoustic curtains to block out external noise and improve the overall sound quality.
Office Space
How can sound panels enhance an office space? Improve productivity and reduce noise distractions in your office with sound panels.
- Wall Panels: Install sound panels on the walls to absorb sound waves and reduce reverberation.
- Desk Dividers: Use acoustic desk dividers to create a quieter and more private workspace.
- Ceiling Baffles: Hang acoustic baffles from the ceiling to absorb sound waves and reduce noise levels.
Streetsounds.net is your go-to resource for all things sound. With our extensive library of street sounds, comprehensive articles, and a vibrant community, you’ll find everything you need to elevate your audio projects. Whether you’re a music producer, filmmaker, or sound enthusiast, join us at Streetsounds.net and start exploring the endless possibilities of sound.
Address: 726 Broadway, New York, NY 10003, United States.
Phone: +1 (212) 998-8550.
Website: streetsounds.net.
FAQ About Making Sound Panels
1. What is the main purpose of a sound panel?
Sound panels primarily reduce echo and reverberation by absorbing sound waves, improving sound clarity in a room.
2. What materials are best for sound absorption in panels?
Mineral wool and fiberglass insulation are excellent choices due to their high sound absorption coefficients.
3. How do I determine how many sound panels I need for a room?
Covering 20-30% of the wall space is generally effective; calculate based on room size and panel dimensions.
4. What type of fabric should I use to cover a sound panel?
Breathable fabrics like burlap or acoustic fabric are ideal, as they allow sound to pass through to the absorption material.
5. Where should I place sound panels in a room for optimal effect?
Focus on first reflection points, corners, and behind speakers to reduce echoes and improve sound clarity.
6. Can I use acoustic foam instead of mineral wool?
Yes, but acoustic foam is generally less effective at lower frequencies compared to mineral wool or fiberglass.
7. How thick should a sound panel be for best performance?
A thickness of 2 to 4 inches is generally recommended for effective sound absorption across a range of frequencies.
8. What is the difference between sound absorption and sound diffusion?
Sound absorption reduces sound energy by converting it to heat, while sound diffusion scatters sound waves to create a balanced acoustic environment.
9. How do I clean and maintain my sound panels?
Use a vacuum cleaner with a brush attachment to remove dust, and spot clean any stains with a mild detergent.
10. Can I paint sound panels?
Painting can reduce the effectiveness of sound panels by clogging the fabric and absorption material, so it is generally not recommended.