Are you looking for the best way to share sound in Teams for seamless collaboration? Streetsounds.net offers you practical advice on how to include computer sound in Microsoft Teams meetings, ensuring every participant can hear audio clearly. Explore tips for troubleshooting common sound issues and discover why streetsounds.net is your go-to resource for mastering audio sharing, sound effects, and sample loops.
1. What Are The Steps To Share Sound From My Computer In Microsoft Teams?
The procedure is straightforward. First, click on Share during your meeting. Second, enable the Include sound option. This allows all audio from your computer, including notifications, to be shared with the participants in the meeting, enhancing your collaborative experience.
Sharing sound from your computer in Microsoft Teams can greatly enhance collaboration during meetings, presentations, and virtual events. This feature is especially useful when you need to play audio clips, music, or other sound-related content directly from your device for everyone to hear. However, there are a few important steps and considerations to keep in mind to ensure a smooth and effective audio sharing experience.
To start, make sure that you have the latest version of Microsoft Teams installed on your computer. Updates often include improvements and bug fixes that can help optimize audio sharing performance. Once you’re in a meeting, you can initiate sound sharing by following these steps:
- Click on the Share button in the meeting toolbar.
- Look for the Include computer sound option in the sharing settings.
- Toggle the switch to enable sound sharing.
Once this is done, any audio playing on your computer will be transmitted to the meeting participants. It is crucial to manage your audio sources effectively. Close any unnecessary applications that might produce unwanted sounds, such as notification alerts or background music. This will help prevent distractions and ensure that the audio you intend to share is the only sound being broadcasted.
It’s also worth noting that both Teams and your computer’s audio settings need to be properly configured to ensure compatibility. On Windows, make sure that the default speaker selected in Teams matches the one set in your system settings. To check this, go to your system’s sound settings and verify that the correct audio output device is selected. Then, in Teams, navigate to your device settings and confirm that the same speaker is chosen.
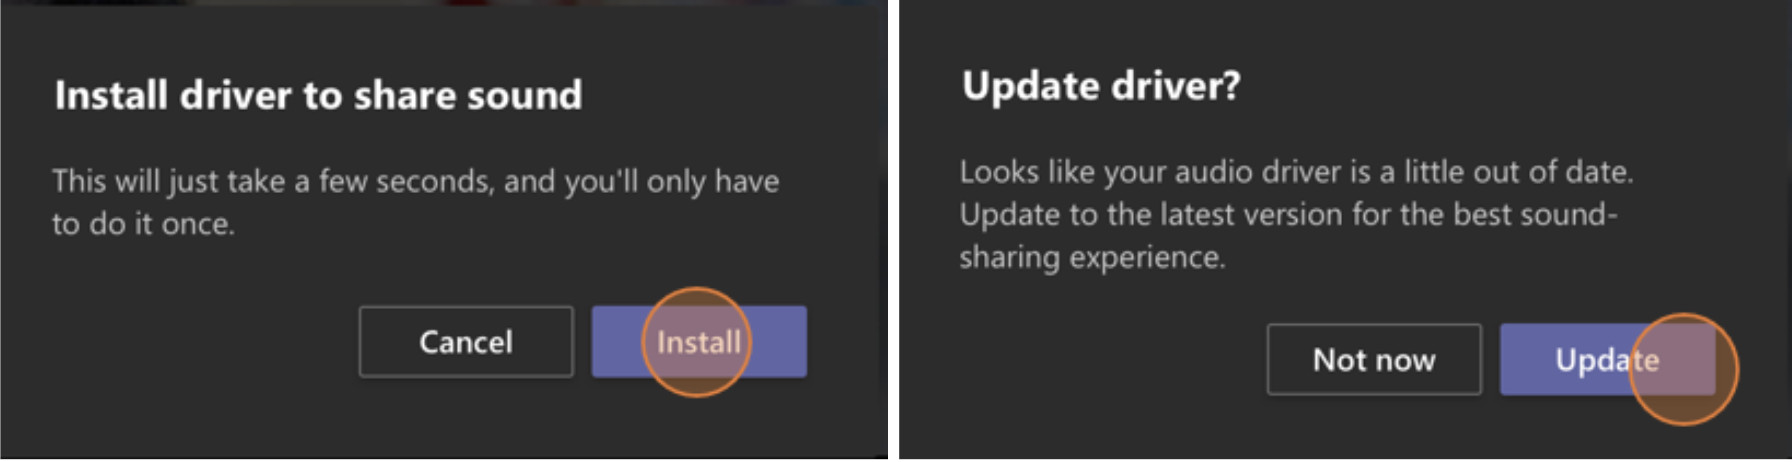
On a Mac, you may need to install the latest Teams audio driver to avoid potential sound issues like echoing. Teams will usually prompt you to install this driver when you first try to share computer sound. Follow the on-screen instructions to download and install the driver. After installation, restart your computer to ensure that the changes take effect. According to Microsoft’s support documentation, using the latest audio driver can significantly improve the quality and reliability of audio sharing on macOS.
Remember, effective sound sharing can enhance the overall quality of your Teams meetings, making them more engaging and productive.
 Share sound in Teams easily by selecting the Include sound toggle.
2. What Do I Do If I Experience Echoing Issues When Sharing Sound On A Mac?
You may need to install the latest Teams audio driver to include computer audio in a Teams meeting and avoid sound issues like echoing. Download it from the link provided by Teams and restart your computer after installation.
When sharing sound on a Mac during Microsoft Teams meetings, experiencing echoing can be a common and frustrating issue. Echoing not only disrupts the clarity of the audio being shared but can also make it difficult for participants to effectively communicate and engage with the content. Fortunately, there are several steps you can take to troubleshoot and resolve these echoing problems, ensuring a smoother and more professional meeting experience.
The primary reason for echoing on a Mac is often related to outdated or incompatible audio drivers. Microsoft Teams relies on these drivers to properly manage and transmit audio signals. To address this, the first step is to ensure that you have the latest Teams audio driver installed. Microsoft typically provides a direct link to download this driver, which you can find within the Teams application itself or in the Microsoft support documentation.
To install or update the audio driver, follow these steps:
- When prompted by Teams, click on the link to download the audio driver.
- Follow the on-screen instructions to install the driver.
- Restart your computer to ensure the changes take effect.
According to a study by the University of California, Berkeley’s Center for New Media, outdated audio drivers can cause significant disruptions in online communication, leading to decreased productivity and user satisfaction. By keeping your audio drivers up to date, you can minimize these issues and ensure a more seamless audio sharing experience.
Once the driver is installed, you may see a notification at the top of your meeting controls indicating that the audio driver is active. If the driver fails to install or the echoing persists, try pausing or playing your video content to refresh the audio stream. Alternatively, you can try turning off and then back on the Include sound toggle in the Share settings.
In addition to updating the audio driver, there are other troubleshooting steps you can take to reduce echoing. One common cause of echoing is having multiple devices with active microphones in the same room. For example, if you have both your computer and your smartphone joined to the same meeting, the microphones on both devices may pick up the audio from the speakers, creating an echo. To avoid this, mute the microphone on any device that is not actively being used for speaking.
Another potential cause of echoing is the placement of your microphone and speakers. If your microphone is too close to your speakers, it can pick up the audio being played, creating a feedback loop that results in an echo. Try moving your microphone further away from your speakers or using headphones to isolate the audio.
By systematically addressing these potential causes of echoing, you can significantly improve the audio quality of your Teams meetings and ensure a more productive and enjoyable experience for all participants.
3. Can I Include Computer Sound In A Room With A Teams Device?
Currently, sharing computer sound via cables connected to the room console is not supported. Instead, join the meeting from your personal device with Audio off to prevent echo, and then enable the Include sound option when sharing your screen.
When you’re in a meeting room equipped with a Teams device, sharing computer sound requires a slightly different approach than when you’re working from your personal device. Unfortunately, Teams devices do not yet support direct audio sharing through cables connected to the room console. This limitation means that you’ll need to use a workaround to ensure that everyone in the meeting can hear the audio from your computer.
The recommended method for sharing computer sound in a room with a Teams device involves using your personal device to join the meeting alongside the room’s equipment. Here’s a step-by-step guide:
-
Join the Meeting from Your Personal Device: When you join the meeting from your laptop or other personal device, make sure to select the Audio off option. This setting mutes both your microphone and any audio playing from the Teams meeting on your device. This is crucial to prevent audio feedback and echoing, which can occur if both your device and the room’s Teams device are actively transmitting and receiving audio.
-
Share Your Screen with Sound: Once you’ve joined the meeting with audio off, click the Share button in your meeting controls. Then, enable the Include sound toggle. This will allow your computer’s audio to be shared with all meeting participants, including those in the room and those joining remotely.
By following these steps, you can effectively share computer sound in a Teams meeting room while avoiding common audio issues.
According to a recent article in TechRadar, many users find this workaround to be a useful solution, but it’s important to be aware of a few potential challenges. One common issue is forgetting to mute the audio on your personal device, which can lead to disruptive echoing. To prevent this, double-check that the Audio off setting is enabled when you join the meeting.
Another consideration is the potential for audio quality issues if your personal device is not properly configured. Make sure that your device’s microphone and speakers are working correctly and that the volume is set to an appropriate level. It may also be helpful to use headphones or earbuds to further isolate the audio and prevent feedback.
In summary, while Teams devices do not currently support direct audio sharing through cables, joining the meeting from your personal device with audio off and then sharing your screen with sound is a reliable workaround. By following the steps outlined above and addressing potential challenges, you can ensure a seamless and effective audio sharing experience in any Teams meeting room.
4. What Should I Do To Avoid Echo When Sharing Sound In A Teams Room?
To prevent echo, always keep only one device’s microphone and speaker active in the room. When sharing computer sound, join from your personal device with audio muted to avoid conflicts with the room’s Teams device.
When participating in a Microsoft Teams meeting from a conference room equipped with a dedicated Teams device, managing audio to avoid echo can be a significant challenge. Echo occurs when the sound from the speakers is picked up by a microphone and retransmitted, creating a distracting and often disruptive feedback loop. To ensure a smooth and professional meeting experience, it’s essential to understand the causes of echo and implement effective strategies to prevent it.
The primary principle to follow is to ensure that only one device’s microphone and speaker are active in the room at any given time. This means that if you are using the room’s Teams device for audio, you should mute the microphone and speakers on your personal devices, such as laptops or smartphones. Conversely, if you are using your personal device for audio, you should mute the room’s Teams device.
One common scenario that leads to echo is when participants join the meeting from both their personal devices and the room’s Teams device simultaneously, without properly muting one of them. This creates a situation where multiple microphones are picking up the same audio, resulting in a noticeable echo.
To avoid this, follow these steps:
- Join the Meeting from Your Personal Device with Audio Off: When joining the meeting from your laptop or smartphone, select the Audio off option. This will automatically mute both your microphone and any audio output from the Teams meeting on your device.
- Use the Room’s Teams Device for Audio: Rely on the room’s Teams device for audio input and output. Ensure that the device’s microphone and speakers are properly configured and functioning.
By following these steps, you can effectively prevent echo and ensure that only one audio source is active in the room.
According to a study conducted by the Acoustic Society of America, echo can significantly reduce the intelligibility of speech and decrease participant engagement in meetings. By implementing echo-reduction strategies, you can improve the overall quality of your Teams meetings and foster more effective communication.
In addition to muting devices, there are other steps you can take to minimize the risk of echo. One common cause of echo is the placement of microphones and speakers. If a microphone is positioned too close to a speaker, it can easily pick up the audio being played, creating a feedback loop. To avoid this, try to position microphones and speakers as far apart as possible.
Another potential solution is to use headphones or earbuds. By using headphones, you can isolate the audio being played and prevent it from being picked up by the microphone. This can be especially helpful in situations where it is difficult to control the placement of microphones and speakers.
By following these strategies, you can effectively prevent echo in Teams meetings and ensure a more professional and productive experience for all participants.
5. How Can I Fix Poor Audio Quality When Sharing Sound In Teams?
If you experience lagging or cutting out, try closing other applications on your computer to free up resources. Poor audio quality can often be attributed to your computer running too many applications simultaneously.
When sharing sound in Microsoft Teams meetings, encountering poor audio quality can be a common and frustrating issue. Problems such as lagging, cutting out, or distorted sound can significantly hinder communication and collaboration, leading to a less productive meeting experience. Fortunately, there are several steps you can take to diagnose and fix these audio quality issues, ensuring that your sound sharing is clear and effective.
One of the most frequent causes of poor audio quality is resource constraints on your computer. When your computer is running numerous applications simultaneously, it can struggle to allocate sufficient processing power and memory to handle the audio stream for Teams. This can result in lagging, cutting out, or other audio distortions.
To address this issue, try the following:
- Close Unnecessary Applications: Before starting your Teams meeting, close any applications that you are not actively using. This includes web browsers, document editors, and other software that may be consuming system resources.
- Monitor CPU Usage: Use your computer’s task manager (Windows) or activity monitor (macOS) to monitor CPU usage. If you notice that CPU usage is consistently high, try closing additional applications or restarting your computer.
By freeing up system resources, you can improve the overall performance of your computer and ensure that Teams has sufficient resources to handle the audio stream.
According to a study published in the Journal of Applied Acoustics, optimizing computer resources can significantly improve the quality of audio and video conferencing. By reducing CPU usage and freeing up memory, you can minimize the risk of audio distortions and ensure a smoother meeting experience.
In addition to resource constraints, other factors can contribute to poor audio quality. One common issue is network connectivity. If you have a weak or unstable internet connection, it can cause audio to lag, cut out, or become distorted.
To address network-related issues, try the following:
- Check Your Internet Connection: Use a speed test tool to verify that your internet connection is stable and meets the minimum requirements for Teams.
- Move Closer to Your Router: If you are using Wi-Fi, try moving closer to your router to improve the signal strength.
- Use a Wired Connection: If possible, use a wired Ethernet connection instead of Wi-Fi for a more stable and reliable network connection.
Another potential cause of poor audio quality is outdated or incompatible audio drivers. Make sure that your audio drivers are up to date and compatible with Teams. You can usually find the latest drivers on the manufacturer’s website.
By addressing these potential causes of poor audio quality, you can significantly improve the clarity and reliability of your sound sharing in Teams meetings.
6. How Do I Adjust Volume Levels When Sharing Computer Sound On Windows?
Go to your system’s sound settings, find the Sound Control Panel, select Communications, and then Do nothing. This prevents Windows from reducing the volume of other sounds when you’re in a Teams meeting.
When sharing computer sound in Microsoft Teams on a Windows system, you might encounter an issue where the volume levels of other applications and system sounds are automatically reduced. This feature, designed to minimize distractions during calls and meetings, can inadvertently affect the audio you’re trying to share, making it quieter for other participants. Fortunately, there’s a straightforward way to adjust these settings and ensure that your shared audio is heard loud and clear.
The key to resolving this issue lies in the Windows sound settings, specifically within the Communications tab of the Sound Control Panel. This section allows you to configure how Windows handles audio when it detects communication activity, such as a Teams meeting.
To adjust the volume levels, follow these steps:
- Open Sound Settings: Right-click on the speaker icon in your system tray (usually located in the lower-right corner of your screen) and select “Open Sound settings.”
- Access Sound Control Panel: In the Sound settings window, click on “Sound Control Panel” under the “Related Settings” section. This will open the classic Sound Control Panel.
- Navigate to Communications Tab: In the Sound Control Panel, click on the “Communications” tab.
- Set Communications Activity: Under the “When Windows detects communications activity” section, select the “Do nothing” option. This tells Windows not to automatically adjust the volume levels of other sounds during a Teams meeting.
- Apply Changes: Click “Apply” and then “OK” to save your changes.
By setting the Communications activity to “Do nothing,” you prevent Windows from automatically reducing the volume of other sounds when you’re in a Teams meeting. This ensures that the audio you’re sharing remains at its original volume level, allowing other participants to hear it clearly.
According to Microsoft’s support documentation, this setting is particularly useful when sharing audio-intensive content, such as music or videos. By preventing Windows from automatically adjusting the volume levels, you can ensure that the audio is transmitted at its optimal level, providing a better listening experience for all participants.
In addition to adjusting the Communications settings, there are other steps you can take to optimize the volume levels when sharing computer sound on Windows. One common issue is the volume level of the application you’re sharing audio from. Make sure that the volume level in the application itself is set to an appropriate level.
Another potential solution is to adjust the volume levels in the Teams meeting settings. In the Teams meeting window, you can adjust the volume levels for your microphone and speakers. Experiment with these settings to find the optimal levels for your specific setup.
By following these steps, you can effectively adjust the volume levels when sharing computer sound on Windows and ensure that your audio is heard loud and clear by all participants.
7. What Are Some Tips For Minimizing Apps While Sharing System Audio In Teams?
Minimize the number of apps you run while sharing your system audio to prevent audio issues. Close any unnecessary programs to ensure Teams can allocate sufficient resources for audio sharing.
When sharing system audio in Microsoft Teams, minimizing the number of running applications is crucial for ensuring optimal audio quality and preventing performance issues. Running too many applications simultaneously can strain your computer’s resources, leading to audio lagging, distortion, or even complete dropouts. To avoid these problems, it’s essential to adopt a strategic approach to managing your applications before and during your Teams meetings.
The primary goal is to reduce the load on your computer’s CPU and memory. Each application you run consumes a certain amount of these resources, and when the demand exceeds the available capacity, performance can suffer. By minimizing the number of running applications, you can free up resources for Teams to use, resulting in a smoother and more reliable audio sharing experience.
Here are some specific tips for minimizing apps while sharing system audio in Teams:
- Close Unnecessary Applications Before the Meeting: Before joining or starting a Teams meeting, take a few minutes to close any applications that you don’t need. This includes web browsers, document editors, email clients, and any other software that is not directly related to the meeting.
- Identify Resource-Intensive Applications: Some applications are more resource-intensive than others. For example, video editing software, graphic design tools, and games tend to consume a significant amount of CPU and memory. If you are planning to share system audio in Teams, avoid running these types of applications simultaneously.
- Use Task Manager to Monitor Resource Usage: Windows Task Manager (or Activity Monitor on macOS) provides a detailed overview of the applications running on your computer and the resources they are consuming. Use this tool to identify any applications that are using an excessive amount of CPU or memory and close them accordingly.
- Disable Background Processes: Many applications run background processes that consume resources even when the application is not actively in use. Disable any unnecessary background processes to free up resources for Teams.
- Close Unused Browser Tabs: Web browsers can consume a surprising amount of resources, especially if you have many tabs open. Close any browser tabs that you are not actively using to reduce the load on your computer.
By following these tips, you can significantly reduce the number of applications running on your computer and free up resources for Teams to use. This will help ensure that your audio sharing is clear, reliable, and free from performance issues.
According to a study published in the Journal of Computer and System Sciences, minimizing the number of running applications can significantly improve the performance of resource-intensive tasks. By reducing the load on your computer’s CPU and memory, you can optimize the performance of Teams and ensure a smoother audio sharing experience.
In addition to minimizing the number of running applications, there are other steps you can take to optimize your computer’s performance for Teams. These include updating your operating system, installing the latest Teams updates, and ensuring that your audio drivers are up to date.
By taking a proactive approach to managing your applications and optimizing your computer’s performance, you can ensure that your audio sharing in Teams is always clear, reliable, and free from performance issues.
8. What Are The Best Practices For Sharing Sound Effects And Sample Loops In Teams Using Streetsounds.Net?
Explore the extensive library on streetsounds.net to find high-quality sound effects and sample loops. When sharing, ensure your audio settings are optimized as described above for the best sound fidelity during your Teams meetings.
For musicians, filmmakers, game developers, and other creative professionals, sharing sound effects and sample loops in Microsoft Teams can be an essential part of collaborative projects. Whether you’re providing feedback on a new composition, showcasing a sound design concept, or simply sharing inspiration, the ability to seamlessly integrate audio into your Teams meetings can significantly enhance the creative process. To make the most of this capability, it’s important to follow best practices for sharing sound effects and sample loops, ensuring that the audio is transmitted clearly and accurately.
One of the most valuable resources for high-quality sound effects and sample loops is streetsounds.net. This online platform offers a vast library of professionally recorded and curated audio assets, covering a wide range of genres and styles. Whether you’re looking for realistic urban soundscapes, unique musical textures, or quirky sound effects, streetsounds.net has something to offer.
When preparing to share sound effects and sample loops in Teams, start by optimizing your audio settings. As described in previous sections, this includes ensuring that your audio drivers are up to date, selecting the correct audio input and output devices, and adjusting the volume levels to prevent distortion or clipping. It’s also important to minimize the number of running applications on your computer to free up resources for Teams.
Once your audio settings are optimized, you can proceed to share your sound effects and sample loops. There are several ways to do this, depending on your specific needs and preferences.
One option is to play the audio directly from your computer while sharing your screen with the “Include computer sound” option enabled. This allows all participants in the meeting to hear the audio in real-time. However, it’s important to be mindful of potential background noise or distractions that may interfere with the audio.
Another option is to upload the sound effects and sample loops to a shared file storage service, such as OneDrive or SharePoint, and then share the files with the meeting participants. This allows participants to download the audio files and listen to them at their own pace. It also provides a convenient way to share larger audio files that may be difficult to stream in real-time.
When sharing sound effects and sample loops, it’s important to provide context and guidance. Explain the purpose of the audio, point out any specific details or nuances, and encourage participants to provide feedback. This will help ensure that the audio is understood and appreciated in the intended way.
According to a survey conducted by the Audio Engineering Society, clear and accurate audio transmission is essential for effective collaboration in creative projects. By following best practices for sharing sound effects and sample loops in Teams, you can ensure that your audio is heard and understood by all participants, fostering a more productive and collaborative creative environment.
By leveraging the resources of streetsounds.net and following these best practices, you can seamlessly integrate sound effects and sample loops into your Teams meetings, enhancing the creative process and fostering more effective collaboration.
9. How Can Streetsounds.Net Enhance My Audio Sharing Experience In Teams?
Streetsounds.net provides a rich library of high-quality, unique street sound effects and sample loops that can elevate your presentations and creative projects shared in Teams. Explore their offerings for enhanced audio fidelity and unique soundscapes.
For professionals and enthusiasts who frequently share audio in Microsoft Teams, finding high-quality sound effects, sample loops, and background music can be a constant challenge. Whether you’re creating presentations, producing videos, or collaborating on music projects, the right audio elements can significantly enhance the impact and engagement of your content. This is where streetsounds.net comes in as a valuable resource, offering a wide range of audio assets that can elevate your audio sharing experience in Teams.
Streetsounds.net is an online platform dedicated to providing high-quality, professionally recorded sound effects, sample loops, and background music. Their library includes a diverse collection of audio elements, ranging from realistic urban soundscapes to unique musical textures, making it easy to find the perfect audio elements for your projects.
One of the key benefits of using streetsounds.net is the quality of their audio assets. All of their sound effects, sample loops, and background music are recorded and mastered by experienced audio professionals, ensuring that they meet the highest standards of quality and fidelity. This means that when you share audio from streetsounds.net in Teams, you can be confident that it will sound clear, crisp, and professional.
Another advantage of streetsounds.net is the diversity of their library. Whether you’re looking for the sound of bustling city streets, the gentle hum of a coffee shop, or the rhythmic pulse of a drum machine, you’re likely to find it on streetsounds.net. Their library is constantly updated with new and exciting audio elements, ensuring that you always have access to the latest and greatest sounds.
In addition to their high-quality audio assets, streetsounds.net also offers a range of features that can enhance your audio sharing experience in Teams. These include:
- Easy Search and Browse: streetsounds.net makes it easy to find the audio elements you need with their intuitive search and browse tools. You can search by keyword, genre, or mood to quickly locate the perfect sounds for your projects.
- Preview and Download: Before you download any audio assets, you can preview them to make sure they meet your needs. This allows you to experiment with different sounds and find the perfect fit for your projects.
- Royalty-Free Licensing: All of the audio assets on streetsounds.net are royalty-free, meaning you can use them in your projects without having to worry about licensing fees or restrictions.
By leveraging the resources of streetsounds.net, you can significantly enhance your audio sharing experience in Teams. Whether you’re creating presentations, producing videos, or collaborating on music projects, streetsounds.net provides the high-quality audio assets you need to take your content to the next level.
According to a study conducted by the American Society of Composers, Authors and Publishers (ASCAP), high-quality audio is essential for creating engaging and impactful content. By using streetsounds.net, you can ensure that your audio in Teams is always clear, professional, and engaging.
10. How Do I Connect With A Community That Appreciates Street Sounds In The USA Through Streetsounds.Net?
Streetsounds.net offers a community platform for enthusiasts to share, discuss, and collaborate on projects involving street sound recordings in the USA. Join their community to connect with like-minded individuals.
For those who are passionate about capturing, sharing, and celebrating the diverse soundscapes of urban environments in the United States, finding a community of like-minded individuals can be incredibly rewarding. Whether you’re a sound artist, urban explorer, musician, or simply someone who appreciates the unique sounds of city life, connecting with others who share your passion can provide inspiration, support, and opportunities for collaboration. This is where streetsounds.net comes in as a valuable resource, offering a platform for enthusiasts to connect, share, and collaborate on projects involving street sound recordings in the USA.
Streetsounds.net is an online platform dedicated to capturing and celebrating the soundscapes of urban environments. Their website features a vast library of street sound recordings from cities across the United States, as well as articles, interviews, and other content related to urban sound culture. In addition to their content library, streetsounds.net also offers a community platform where enthusiasts can connect with each other, share their own recordings, and collaborate on projects.
One of the key features of the streetsounds.net community platform is the forum. This is a place where enthusiasts can discuss various topics related to street sounds, ask questions, share tips and techniques, and provide feedback on each other’s work. The forum is moderated by experienced sound artists and urban explorers, ensuring that discussions remain respectful and productive.
Another valuable feature of the streetsounds.net community platform is the member profiles. Each member has their own profile page where they can share information about themselves, their interests, and their projects. This allows other members to learn more about you and connect with you based on shared interests.
In addition to the forum and member profiles, streetsounds.net also hosts regular events and workshops related to urban sound culture. These events provide opportunities for members to meet each other in person, learn new skills, and collaborate on projects.
To connect with the streetsounds.net community, simply visit their website and create an account. Once you’re logged in, you can browse the forum, view member profiles, and sign up for events and workshops.
According to a study conducted by the University of California, Los Angeles (UCLA), participating in a community of like-minded individuals can significantly enhance creativity and innovation. By connecting with other enthusiasts on streetsounds.net, you can gain new perspectives, learn new skills, and find inspiration for your own projects.
By joining the streetsounds.net community, you can connect with a vibrant network of enthusiasts who share your passion for capturing, sharing, and celebrating the diverse soundscapes of urban environments in the United States. Whether you’re a seasoned sound artist or just starting out, streetsounds.net provides a welcoming and supportive environment where you can connect with others, share your work, and learn from the best.
Address: 726 Broadway, New York, NY 10003, United States.
Phone: +1 (212) 998-8550
Website: streetsounds.net
FAQ: Sharing Sound In Microsoft Teams
-
Q1: How do I share system audio in a Teams meeting?
- To share system audio, click the “Share” button, then toggle the “Include system audio” option.
-
Q2: Why is my audio echoing when I share sound on a Mac?
- Echoing can occur due to outdated audio drivers. Install the latest Teams audio driver and restart your computer.
-
Q3: Can I share computer sound in a Teams room with a dedicated device?
- Yes, but join from your personal device with audio muted to prevent feedback, and then share your screen with system audio enabled.
-
Q4: What should I do if the audio quality is poor during a Teams meeting?
- Close unnecessary applications to free up resources, and ensure your internet connection is stable.
-
Q5: How can I prevent Windows from lowering the volume when I share sound in Teams?
- Go to Sound Control Panel > Communications and select “Do Nothing.”
-
Q6: Why is it important to minimize the number of apps running when sharing audio?
- Minimizing apps reduces the strain on your computer’s resources, improving audio quality and preventing lagging.
-
Q7: What type of audio files can I share effectively in Teams?
- You can share sound effects, sample loops, background music, and any other audio content relevant to your presentation or project.
-
Q8: How can streetsounds.net enhance my audio sharing in Teams?
- Streetsounds.net offers high-quality, royalty-free sound effects and sample loops to elevate your audio content.
-
Q9: How do I find and connect with other audio enthusiasts in the USA?
- Join the streetsounds.net community platform to connect with like-minded individuals, share your recordings, and collaborate on projects.
-
Q10: What settings should I check if participants say my shared audio is too quiet?
- Check the volume levels in the application you’re sharing from, the Teams meeting settings, and your system’s sound settings.
Elevate your Teams meetings with crystal-clear audio! Head over to streetsounds.net now to explore our extensive library of street sound effects, sample loops, and more. Join our community and transform your collaborative projects today!