
Is sound not coming in my computer? Yes, sound issues can be incredibly frustrating, especially when you’re trying to enjoy music or work on a project and streetsounds.net, your ultimate destination for high-quality street sounds, can help resolve PC sound problems so you can get back to focusing on your next project. Let’s explore potential solutions to get your audio back on track, covering everything from basic checks to advanced troubleshooting like audio configuration, sound settings, and hardware issues.
1. Basic Troubleshooting: Is the Sound Even On?
Yes, start with the basics. It’s easy to overlook simple things when you’re in a hurry. Ensuring the volume isn’t muted and is set at an audible level is always the first step.
1.1 Check Volume Levels
Verify the volume level in the system tray, usually located in the lower-right corner of your screen. Click the speaker icon to bring up the volume slider. Ensure it’s not muted and that the volume is set to a reasonable level. Then, check the volume mixer for individual app volumes.
1.2 Physical Connections
Make sure that your speakers, headphones, or other audio devices are properly connected to your computer.
- Wired Connections: Ensure the cables are securely plugged into the correct ports. Try different ports to rule out a faulty port.
- Wireless Connections: If you’re using Bluetooth devices, make sure they’re paired correctly and the connection is stable. Go to your Bluetooth settings and reconnect the device if necessary.
2. Dive Deep: Audio Settings and Device Management
Yes, if the basic checks don’t resolve the issue, the problem may lie within your computer’s audio settings or device management configurations. Proper configuration is essential for sound output.
2.1 Check Default Playback Device
Sometimes, Windows can get confused about which device should be playing sound, especially if you have multiple audio devices connected.
- Right-click the speaker icon in the system tray.
- Select Open Sound settings.
- In the Output section, make sure the correct device is selected in the dropdown menu.
- If the correct device isn’t listed, ensure it’s connected and turned on. If it still doesn’t appear, try restarting your computer.
2.2 Device Manager: The Control Hub
Device Manager allows you to view and manage the hardware connected to your computer.
- Open Device Manager: Type “device manager” into the Windows search bar and select it from the results.
- Locate Sound Devices: Expand the “Sound, video and game controllers” section.
- Check for Errors: Look for any devices with a yellow exclamation mark, which indicates a problem.
- Update Drivers: Right-click on the problematic device and select “Update driver.” Choose “Search automatically for drivers” to let Windows find the best available driver.
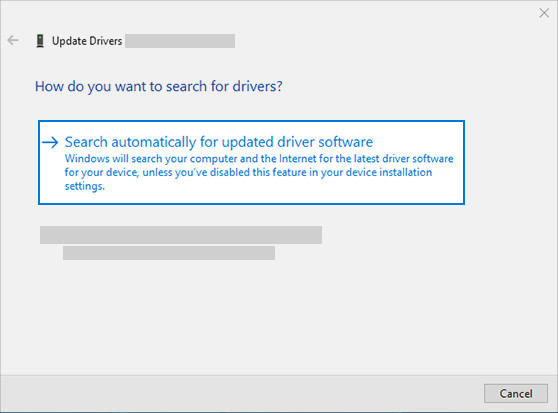 search automatically for updated driver software to update audio driver
2.3 Sound Enhancements
Sometimes, sound enhancements can interfere with audio output. Disabling these enhancements can help identify if they’re causing the issue.
- Open Sound Settings: Right-click the speaker icon in the system tray and select “Open Sound settings.”
- Device Properties: Under the “Output” section, select your audio device and click “Device properties.”
- Additional Device Properties: Click “Additional device properties” on the right side of the window.
- Enhancements Tab: Go to the “Enhancements” tab and check the box that says “Disable all enhancements.”
- Apply and Test: Click “Apply” and then test your audio to see if the problem is resolved.
3. Driver Issues: The Most Common Culprit
Yes, outdated, corrupted, or incompatible audio drivers are a common cause of sound problems. Keeping your drivers up to date is essential for sound functionality.
3.1 Updating Audio Drivers
- Open Device Manager: Type “device manager” into the Windows search bar.
- Expand Sound Devices: Expand the “Sound, video and game controllers” section.
- Update Driver: Right-click on your audio device and select “Update driver.”
- Automatic Search: Choose “Search automatically for drivers.”
- Manual Update: If Windows doesn’t find a new driver, visit the device manufacturer’s website and download the latest driver for your device.
3.2 Uninstalling and Reinstalling Audio Drivers
If updating the driver doesn’t work, uninstalling and reinstalling the driver can often resolve conflicts.
- Open Device Manager.
- Expand Sound Devices.
- Uninstall Device: Right-click on your audio device and select “Uninstall device.”
- Delete Driver Software: Check the box that says “Delete the driver software for this device” if available.
- Restart Your PC: Restart your computer. Windows will automatically reinstall the audio driver.
3.3 Using Generic Audio Drivers
If the manufacturer-specific drivers are causing issues, using the generic audio driver that comes with Windows can be a workaround.
- Open Device Manager.
- Expand Sound Devices.
- Update Driver: Right-click on your audio device and select “Update driver.”
- Browse My Computer: Choose “Browse my computer for drivers.”
- Let Me Pick: Select “Let me pick from a list of available drivers on my computer.”
- Select Generic Driver: Choose the generic audio driver from the list and follow the instructions to install it.
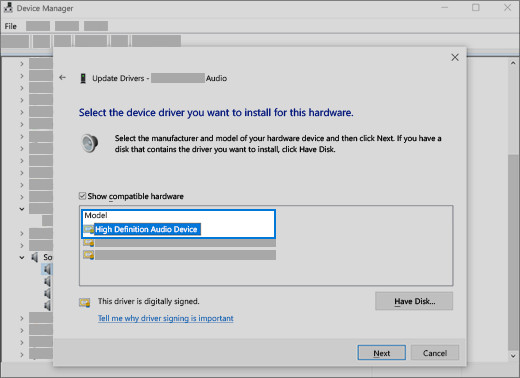 Select the driver and select next to use the generic audio driver
4. Compatibility Mode: Bridging the Gap
Yes, if you’re using older hardware or software, running programs in compatibility mode can resolve audio issues related to software compatibility.
4.1 Setting Compatibility Mode
- Locate the Program: Find the program that’s having audio issues.
- Properties: Right-click on the program’s shortcut or executable file and select “Properties.”
- Compatibility Tab: Go to the “Compatibility” tab.
- Run in Compatibility Mode: Check the box that says “Run this program in compatibility mode for:” and select an older version of Windows from the dropdown menu.
- Apply and Test: Click “Apply” and then test the program to see if the audio issue is resolved.
5. Audio Codecs: Ensuring Smooth Decoding
Yes, audio codecs are essential for encoding and decoding audio data. If you’re missing the necessary codecs, you might experience sound problems.
5.1 Installing Codecs
- Identify Missing Codecs: Determine which codecs are missing by looking at error messages or checking the program’s documentation.
- Download Codec Packs: Download a reputable codec pack, such as K-Lite Codec Pack or Combined Community Codec Pack.
- Install the Codec Pack: Run the installer and follow the instructions. Be cautious during installation and avoid installing any bundled software that you don’t need.
- Restart Your PC: Restart your computer after installing the codec pack.
6. Sound Schemes: Customizing Your Audio Experience
Yes, sound schemes can sometimes cause conflicts or unexpected behavior. Resetting to the default sound scheme can resolve these issues.
6.1 Resetting Sound Schemes
- Open Sound Settings: Right-click the speaker icon in the system tray and select “Open Sound settings.”
- Sound Control Panel: Click “Sound Control Panel” on the right side of the window.
- Sounds Tab: Go to the “Sounds” tab.
- Scheme: Select “Windows Default” from the dropdown menu.
- Apply and Test: Click “Apply” and then test your audio.
7. External Device Conflicts: Isolating the Problem
Yes, sometimes, external devices can interfere with your computer’s audio. Disconnecting unnecessary devices can help identify the source of the problem.
7.1 Disconnecting Devices
- Disconnect Unnecessary Devices: Disconnect any USB devices, external hard drives, printers, and other peripherals that you’re not currently using.
- Test Audio: Test your audio after disconnecting each device to see if the problem is resolved.
8. BIOS Settings: Configuring Hardware Behavior
Yes, in some cases, the audio settings in your computer’s BIOS (Basic Input/Output System) might be misconfigured. Accessing and adjusting these settings can resolve certain audio issues.
8.1 Accessing BIOS Settings
- Restart Your Computer: Restart your computer.
- Enter BIOS: Press the designated key (usually Delete, F2, F12, or Esc) during startup to enter the BIOS setup. The key to press is usually displayed on the screen during startup.
- Navigate to Audio Settings: Use the arrow keys to navigate to the “Advanced” or “Peripheral” settings. Look for audio-related options, such as “Onboard Audio” or “HD Audio Controller.”
- Enable Audio: Ensure that the audio controller is enabled. If it’s disabled, enable it and save the changes.
- Save and Exit: Save the changes and exit the BIOS setup. Your computer will restart.
9. Volume Mixer: Fine-Tuning App Volumes
Yes, the Volume Mixer allows you to adjust the volume levels for individual applications. Sometimes, an application’s volume might be set too low or muted, causing sound problems.
9.1 Adjusting App Volumes
- Open Volume Mixer: Right-click the speaker icon in the system tray and select “Open Volume mixer.”
- Adjust App Volumes: Look for the application that’s having audio issues and adjust its volume slider to a reasonable level.
- Unmute Apps: Ensure that the application isn’t muted.
10. Hardware Issues: When Software Isn’t the Problem
Yes, if you’ve tried all the software solutions and your audio still isn’t working, the problem might be with your computer’s hardware.
10.1 Checking Audio Devices
- Test with Different Devices: Try using different speakers, headphones, or microphones to see if the problem is with the device itself.
- Check for Physical Damage: Inspect your audio devices and computer ports for any physical damage, such as broken connectors or frayed cables.
10.2 Sound Card Problems
If you suspect that your sound card is failing, you can try the following:
- Reseat the Sound Card: If you have a dedicated sound card, try reseating it in its slot. Turn off your computer, open the case, and carefully remove the sound card. Then, reinsert it firmly into the slot.
- Test with a Different Sound Card: If possible, try using a different sound card to see if the problem is resolved. This can help determine if the original sound card is faulty.
11. Audio Services: Ensuring Essential Components Are Running
Yes, Windows relies on several audio-related services to function properly. If these services are disabled or not running, you might experience sound problems.
11.1 Checking Audio Services
- Open Services: Type “services” into the Windows search bar and select “Services” from the results.
- Locate Audio Services: Look for the following services:
- Windows Audio
- Windows Audio Endpoint Builder
- Remote Procedure Call (RPC)
- Check Status: Ensure that the status of each service is set to “Running.” If a service isn’t running, right-click on it and select “Start.”
- Automatic Startup: Double-click on each service and set the “Startup type” to “Automatic.”
- Apply and Restart: Click “Apply” and then restart your computer.
12. Restoring System: Reverting to a Stable State
Yes, System Restore allows you to revert your computer to a previous state when everything was working properly. This can be helpful if you’ve recently made changes that might be causing audio issues.
12.1 Performing a System Restore
- Open System Restore: Type “system restore” into the Windows search bar and select “Create a restore point” from the results.
- System Protection: In the System Properties window, go to the “System Protection” tab and click “System Restore.”
- Choose a Restore Point: Select a restore point from the list. Choose a restore point that was created before you started experiencing audio issues.
- Scan for Affected Programs: Click “Scan for affected programs” to see which programs will be affected by the restore.
- Confirm and Restore: Confirm your selection and follow the instructions to restore your system. Your computer will restart.
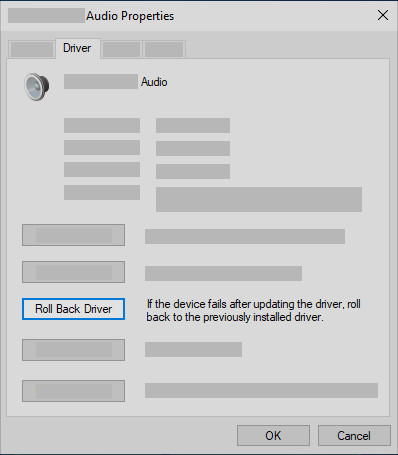 Roll back the audio driver in Device Manager
13. Audio Troubleshooter: Automated Problem Solving
Yes, Windows includes a built-in audio troubleshooter that can automatically diagnose and fix common sound problems.
13.1 Running the Audio Troubleshooter
- Open Settings: Press the Windows key + I to open the Settings app.
- Update & Security: Go to “Update & Security” and select “Troubleshoot.”
- Playing Audio: Click “Playing Audio” and then click “Run the troubleshooter.”
- Follow Instructions: Follow the instructions to complete the troubleshooting process.
14. Interference: Identifying External Factors
Yes, audio interference can result from various external factors, including electrical interference, proximity to other devices, and even environmental conditions. Addressing these factors can often improve sound quality.
14.1 Identifying Sources of Interference
- Electrical Interference: Move audio cables and devices away from power cords, transformers, and other sources of electrical interference.
- Proximity to Other Devices: Keep audio devices away from other electronic devices that might cause interference, such as mobile phones, Wi-Fi routers, and microwave ovens.
- Environmental Conditions: Avoid placing audio equipment in areas with high humidity or extreme temperatures, as these conditions can affect performance.
14.2 Shielding and Grounding Techniques
- Use Shielded Cables: Shielded audio cables can help reduce interference. Ensure that you’re using high-quality cables with proper shielding.
- Grounding: Ensure that all audio equipment is properly grounded to prevent ground loops, which can cause hum and noise. Use a ground loop isolator if necessary.
15. Mixing Console Software: Advanced Audio Control
Yes, if you’re using professional audio software or a mixing console, the settings within these programs can affect your computer’s audio output. Proper configuration is crucial for achieving the desired sound.
15.1 Configuring Mixing Console Software
- Check Input/Output Settings: Ensure that the input and output settings in your mixing console software are correctly configured. Verify that the correct audio devices are selected for both input and output.
- Adjust Levels and Routing: Adjust the levels and routing of audio signals within the mixing console software. Make sure that the audio signals are being routed to the correct outputs.
- Monitor Settings: Check the monitor settings to ensure that you’re hearing the audio signals as intended. Adjust the monitor levels as needed.
16. Digital Audio Workstations (DAWs): Harnessing Sound Potential
Yes, Digital Audio Workstations (DAWs) are powerful tools for creating and manipulating audio. However, they require careful setup to ensure proper sound output.
16.1 Configuring DAWs
- Audio Interface Selection: Select the correct audio interface in your DAW’s settings. This ensures that your DAW is using the proper device for audio input and output.
- Buffer Size: Adjust the buffer size in your DAW’s settings. A smaller buffer size can reduce latency, but it may also increase the risk of audio dropouts. Experiment with different buffer sizes to find the optimal setting for your system.
- Routing and Mixing: Properly route and mix audio signals within your DAW. Ensure that all tracks are routed to the correct outputs and that the levels are properly balanced.
17. Streaming Software: Setting Up for Success
Yes, if you’re using streaming software like OBS Studio or XSplit, proper audio configuration is essential for broadcasting high-quality sound.
17.1 Configuring Streaming Software
- Audio Input/Output Devices: Select the correct audio input and output devices in your streaming software’s settings. This ensures that your software is capturing and outputting audio properly.
- Gain Levels: Adjust the gain levels for your audio inputs to ensure that the audio is neither too quiet nor too loud. Use the audio meters in your streaming software to monitor the levels.
- Filters and Effects: Use filters and effects, such as noise suppression and EQ, to improve the quality of your audio. Experiment with different settings to find the optimal configuration for your setup.
18. Virtual Audio Cables: Routing Audio Like a Pro
Yes, virtual audio cables allow you to route audio between different applications. This can be useful for tasks like recording audio from one application into another or creating custom audio setups.
18.1 Configuring Virtual Audio Cables
- Install Virtual Audio Cable Software: Download and install virtual audio cable software, such as VB-Cable or Voicemeeter.
- Set Default Devices: Set the virtual audio cable as the default input or output device in Windows, depending on your needs.
- Route Audio: Configure the applications to use the virtual audio cable for audio input or output. This allows you to route audio between the applications.
19. Dual Boot Systems: Managing Multiple OS Audio
Yes, if you’re running a dual boot system with multiple operating systems, you might encounter audio issues related to driver conflicts or configuration differences. Managing audio across multiple OSs can be complex.
19.1 Managing Audio in Dual Boot Systems
- Install Drivers in Each OS: Install the necessary audio drivers in each operating system. This ensures that the audio devices are properly recognized and configured in each OS.
- Configuration Differences: Be aware of configuration differences between the operating systems. Audio settings and device configurations might vary between the OSs, so you might need to adjust them accordingly.
- Avoid Conflicts: Avoid running audio-intensive applications in both operating systems simultaneously, as this can cause conflicts and performance issues.
20. Contacting Support: When All Else Fails
Yes, if you’ve exhausted all troubleshooting options and your audio still isn’t working, it might be time to contact technical support.
20.1 Seeking Expert Assistance
- Manufacturer Support: Contact the manufacturer of your computer or audio devices for assistance. They might be able to provide specific troubleshooting steps or information about known issues.
- Professional Technicians: Consult with a professional computer technician. They can diagnose and repair hardware issues that might be causing the audio problems.
Experiencing sound issues on your computer can be frustrating, but by systematically working through these troubleshooting steps, you can often identify and resolve the problem. And when you finally get your sound working, explore the diverse library of street sounds at streetsounds.net. Our sounds are perfect for adding authenticity to your next project, whether it’s a film, game, or music production. Dive into our collection and bring the vibrant sounds of the city to your creative endeavors! For more information, visit our website or contact us at Address: 726 Broadway, New York, NY 10003, United States. Phone: +1 (212) 998-8550.
FAQ: Sound Troubleshooting on Your Computer
Q1: Why is no sound coming from my computer speakers?
No sound from your computer speakers can stem from muted volume, incorrect default playback device, driver issues, or hardware problems. Ensure volume isn’t muted, the correct device is selected in sound settings, drivers are updated, and test with different speakers.
Q2: How do I fix sound problems on my computer?
Fixing sound issues involves checking volume levels, verifying device connections, updating or reinstalling audio drivers, ensuring the correct playback device is selected, and running the Windows audio troubleshooter. Hardware issues might require professional assistance.
Q3: How do I update my audio drivers on Windows 10 or Windows 11?
Update audio drivers through Device Manager: type “device manager” in the search bar, expand “Sound, video and game controllers,” right-click your audio device, and select “Update driver.” Choose “Search automatically for drivers,” or manually download the latest driver from the manufacturer’s website.
Q4: What do I do if my headphones aren’t working on my computer?
If headphones aren’t working, check the connection, ensure they’re set as the default playback device, test with different headphones, and check the volume levels. Update or reinstall audio drivers if necessary.
Q5: How can I troubleshoot microphone problems on my computer?
Troubleshoot microphone problems by checking connections, ensuring it’s the default recording device, verifying microphone levels, and updating audio drivers. Test the microphone on another computer to rule out hardware issues.
Q6: What if my audio device has a yellow exclamation mark in Device Manager?
A yellow exclamation mark in Device Manager indicates a problem with the device. Right-click the device, select “Properties,” and check the “Device status” for error messages. Update or reinstall the driver to resolve the issue.
Q7: How do I disable audio enhancements in Windows?
Disable audio enhancements by right-clicking the speaker icon, selecting “Open Sound settings,” clicking “Device properties” under Output, then “Additional device properties.” Go to the “Enhancements” tab and check “Disable all enhancements.”
Q8: Why is sound only coming out of one speaker?
Sound coming out of only one speaker may be due to incorrect audio balance settings, faulty cables, or hardware issues. Check the audio balance in sound settings, ensure cables are properly connected, and test with different speakers.
Q9: How do I restore my computer to a previous state using System Restore?
Perform a System Restore by typing “system restore” in the search bar, selecting “Create a restore point,” clicking “System Restore,” and choosing a restore point before the audio issues began. Follow the prompts to restore your system.
Q10: Why is my Bluetooth audio device not connecting or working correctly?
If a Bluetooth audio device isn’t connecting or working, ensure it’s paired correctly, the connection is stable, drivers are updated, and the correct playback device is selected. Reset the Bluetooth device if necessary.
By addressing these potential issues, you can often resolve sound problems on your computer and continue enjoying high-quality audio experiences, and if you are looking for new sounds, don’t forget to check streetsounds.net.