
Recording a FaceTime with sound allows you to preserve important conversations, capture memorable moments, and create engaging content, and streetsounds.net provides the resources and guidance you need to achieve high-quality audio recordings, but Apple’s built-in tools have privacy limitations. This article explores effective methods for recording FaceTime calls with sound on various devices, ensuring you capture both video and audio clearly while respecting privacy and legal requirements; explore the possibilities of capturing high-quality audio for your creative projects and content creation with tools like Krisp, loopback options, and external recording devices. Unlock professional audio for memorable moments and creative ventures while adhering to ethical recording practices and enhance your audio recording experience today with insights from streetsounds.net.
1. Recording FaceTime with Sound on iPhone or iPad: A Comprehensive Guide
Recording a FaceTime call on your iPhone or iPad can be incredibly useful, whether it’s for preserving a heartfelt conversation with loved ones or capturing important information from a business meeting. While Apple’s built-in tools offer a screen recording feature, capturing internal audio during a FaceTime call requires a few extra steps. This section breaks down the process, providing a detailed, step-by-step guide to ensure you capture both video and audio effectively.
1.1. Enabling Screen Recording on Your iPhone or iPad
Before diving into the recording process, the first step is to ensure that the Screen Recording feature is active and accessible on your device. This feature is your primary tool for capturing the visual aspect of the FaceTime call, and it needs to be readily available in your Control Center.
-
Open Settings: Start by navigating to the Settings app on your iPhone or iPad. This app is usually found on your home screen and is represented by a gear icon.
-
Access Control Center: In the Settings menu, scroll down until you find “Control Center” and tap on it. The Control Center is where you can customize which features are quickly accessible from anywhere on your device.
-
Add Screen Recording: Within the Control Center settings, you’ll see two sections: “Included Controls” and “More Controls”. The “Included Controls” section shows the features already available in your Control Center. Look for “Screen Recording” in the “More Controls” section. If it’s not there, it means it hasn’t been added yet.
-
Activate Screen Recording: To add Screen Recording to your Control Center, tap the green “+” icon next to it. This action moves Screen Recording to the “Included Controls” section, making it accessible with a simple swipe.
-
Confirm Availability: To ensure the Screen Recording icon is now available in your Control Center, swipe down from the top-right corner of your screen (on newer iPhones and iPads) or swipe up from the bottom edge of the screen (on older devices). You should see the Screen Recording icon, which looks like a circle with a dot inside.
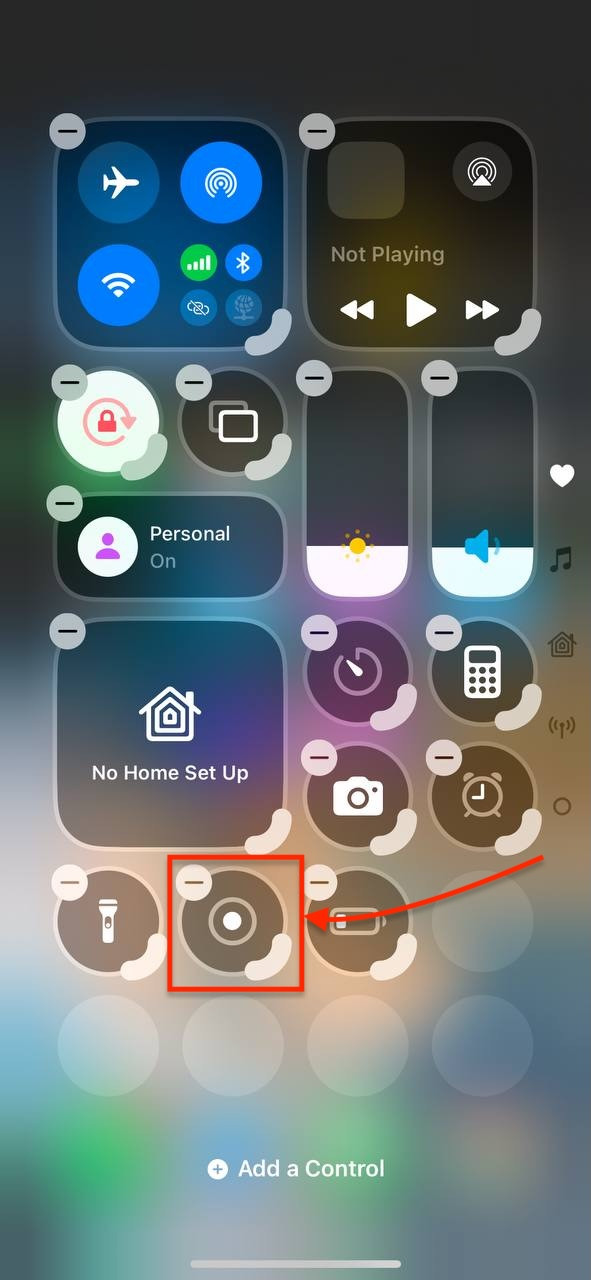 iPhone Control Center showcasing the Screen Recording feature activated, allowing users to easily capture on-screen activity.
1.2. Initiating a FaceTime Call
With the Screen Recording feature enabled, the next step is to start your FaceTime call. Ensure you’re in an environment conducive to clear communication, with minimal background noise and adequate lighting.
-
Open the FaceTime App: Locate the FaceTime app on your home screen and tap to open it.
-
Select Your Contact: Choose the person or group you wish to call. You can either select a contact from your list or enter a name or number in the search bar.
-
Start the Call: Tap the video or audio call button to initiate the FaceTime call. Wait for the recipient to answer and ensure your camera and microphone are working correctly.
1.3. Starting Screen Recording During the FaceTime Call
Once your FaceTime call is underway, you can initiate the screen recording process. Remember, the default setting will only capture the video and external audio (like your voice), not the internal audio from the FaceTime call. Capturing the audio of the other participant requires additional steps, which will be covered shortly.
-
Access Control Center: Swipe down from the top-right corner of the screen (or swipe up from the bottom edge on older devices) to open the Control Center.
-
Tap the Screen Recording Icon: Locate the Screen Recording icon (the circle with a dot inside) and tap it. A three-second countdown will begin, giving you a moment to prepare before the recording starts.
-
Start Recording: After the countdown, the recording will begin. You’ll see a red bar or icon at the top of your screen, indicating that the screen is being recorded.
 iPhone screen recording in progress during a FaceTime call, illustrating the steps to capture video and audio effectively.
1.4. Capturing External Audio
By default, the Screen Recording feature on iOS devices only captures video and any external audio picked up by your device’s microphone. This means that while your voice and any ambient sounds in your environment will be recorded, the audio from the FaceTime call itself won’t be included. To capture your voice along with the screen recording, follow these steps:
-
Long-Press the Screen Recording Icon: Instead of tapping the Screen Recording icon, press and hold it. This action will open a menu with additional options.
-
Enable Microphone: In the menu that appears, you’ll see a “Microphone” option. If it’s turned off (indicated by a gray icon), tap it to turn it on (indicated by a red icon). This will enable your device’s microphone to record external audio while the screen recording is in progress.
-
Start Recording: Once the microphone is enabled, tap “Start Recording” to begin capturing both the screen and external audio.
1.5. Capturing Internal Audio
Unfortunately, due to Apple’s privacy restrictions, capturing internal audio directly during a screen recording on an iPhone or iPad is not possible with the built-in tools. To record the internal audio, you would typically need to use external hardware or third-party applications that can bypass these restrictions. However, using such methods may violate Apple’s terms of service or local laws regarding call recording, so proceed with caution and ensure you have the necessary permissions and consent.
1.6. Stopping the Recording
Once you’ve finished recording your FaceTime call, stopping the recording is straightforward.
-
Tap the Red Bar/Icon: Look for the red bar or icon at the top of your screen, which indicates that the recording is in progress. Tap it.
-
Confirm Stop: A prompt will appear asking if you want to stop the screen recording. Tap “Stop” to end the recording.
-
Access Your Recording: Your recorded video will be saved automatically to your Photos app. You can access it by opening the Photos app and looking for the latest video in your library.
1.7. Ethical and Legal Considerations
Before recording any FaceTime call, it’s crucial to consider the ethical and legal implications. In many jurisdictions, recording a conversation without the consent of all parties involved is illegal. Always inform all participants that you intend to record the call and obtain their explicit consent before proceeding.
1.8. Enhancing Audio Quality with streetsounds.net
For users seeking professional-grade audio quality, especially when capturing external audio with the microphone, streetsounds.net offers a variety of resources and tools. While streetsounds.net primarily focuses on street sounds, the principles of audio capture and enhancement apply universally.
-
Microphone Selection: Choosing the right microphone can significantly improve the quality of your recording. Consider using an external microphone designed for clear voice recording, which can be connected to your iPhone or iPad.
-
Noise Reduction: Ambient noise can degrade the quality of your recording. Use noise reduction techniques to minimize background sounds.
-
Audio Editing Software: Post-recording, use audio editing software to further enhance the sound quality. These tools can help you adjust levels, reduce noise, and improve clarity.
By following these steps and considering the ethical and legal aspects, you can effectively record FaceTime calls on your iPhone or iPad. For those looking to enhance their audio recording capabilities, exploring the resources available at streetsounds.net can provide valuable insights and tools to achieve professional-quality sound.
2. How to Record FaceTime with Sound on Mac: A Detailed Guide
Recording a FaceTime call on your Mac offers more flexibility and options compared to recording on an iPhone or iPad. macOS provides built-in tools that, when combined with the right settings and applications, allow you to capture both video and internal audio seamlessly. This section explores two primary methods: using the built-in screen recording feature and leveraging Krisp for superior audio quality.
2.1. Method 1: Using the Built-In Screen Recording Feature on Mac
macOS has a built-in screen recording tool that can be accessed via a simple keyboard shortcut. This tool allows you to record your entire screen or a selected portion, making it ideal for capturing FaceTime calls.
2.1.1. Starting the FaceTime Call
-
Launch FaceTime: Open the FaceTime application on your Mac. It’s usually located in the Applications folder or can be found using Spotlight search (Command + Space).
-
Initiate the Call: Select the contact you wish to call and click the video or audio call button. Ensure your camera and microphone are functioning correctly before proceeding.
2.1.2. Opening the Screen Recording Tool
- Use the Keyboard Shortcut: Press Command (⌘) + Shift + 5 on your keyboard. This will bring up the screen recording toolbar at the bottom of your screen.
2.1.3. Selecting the Recording Area
-
Choose Recording Option: The toolbar provides several options: record the entire screen, record a selected window, or capture a still image.
-
Select the FaceTime Window: If you want to record only the FaceTime window, click on “Record Selected Window” (the icon that looks like a window with a rectangle inside). Then, click on the FaceTime window to select it. If you prefer to record the entire screen, click on “Record Entire Screen” (the icon that looks like a screen).
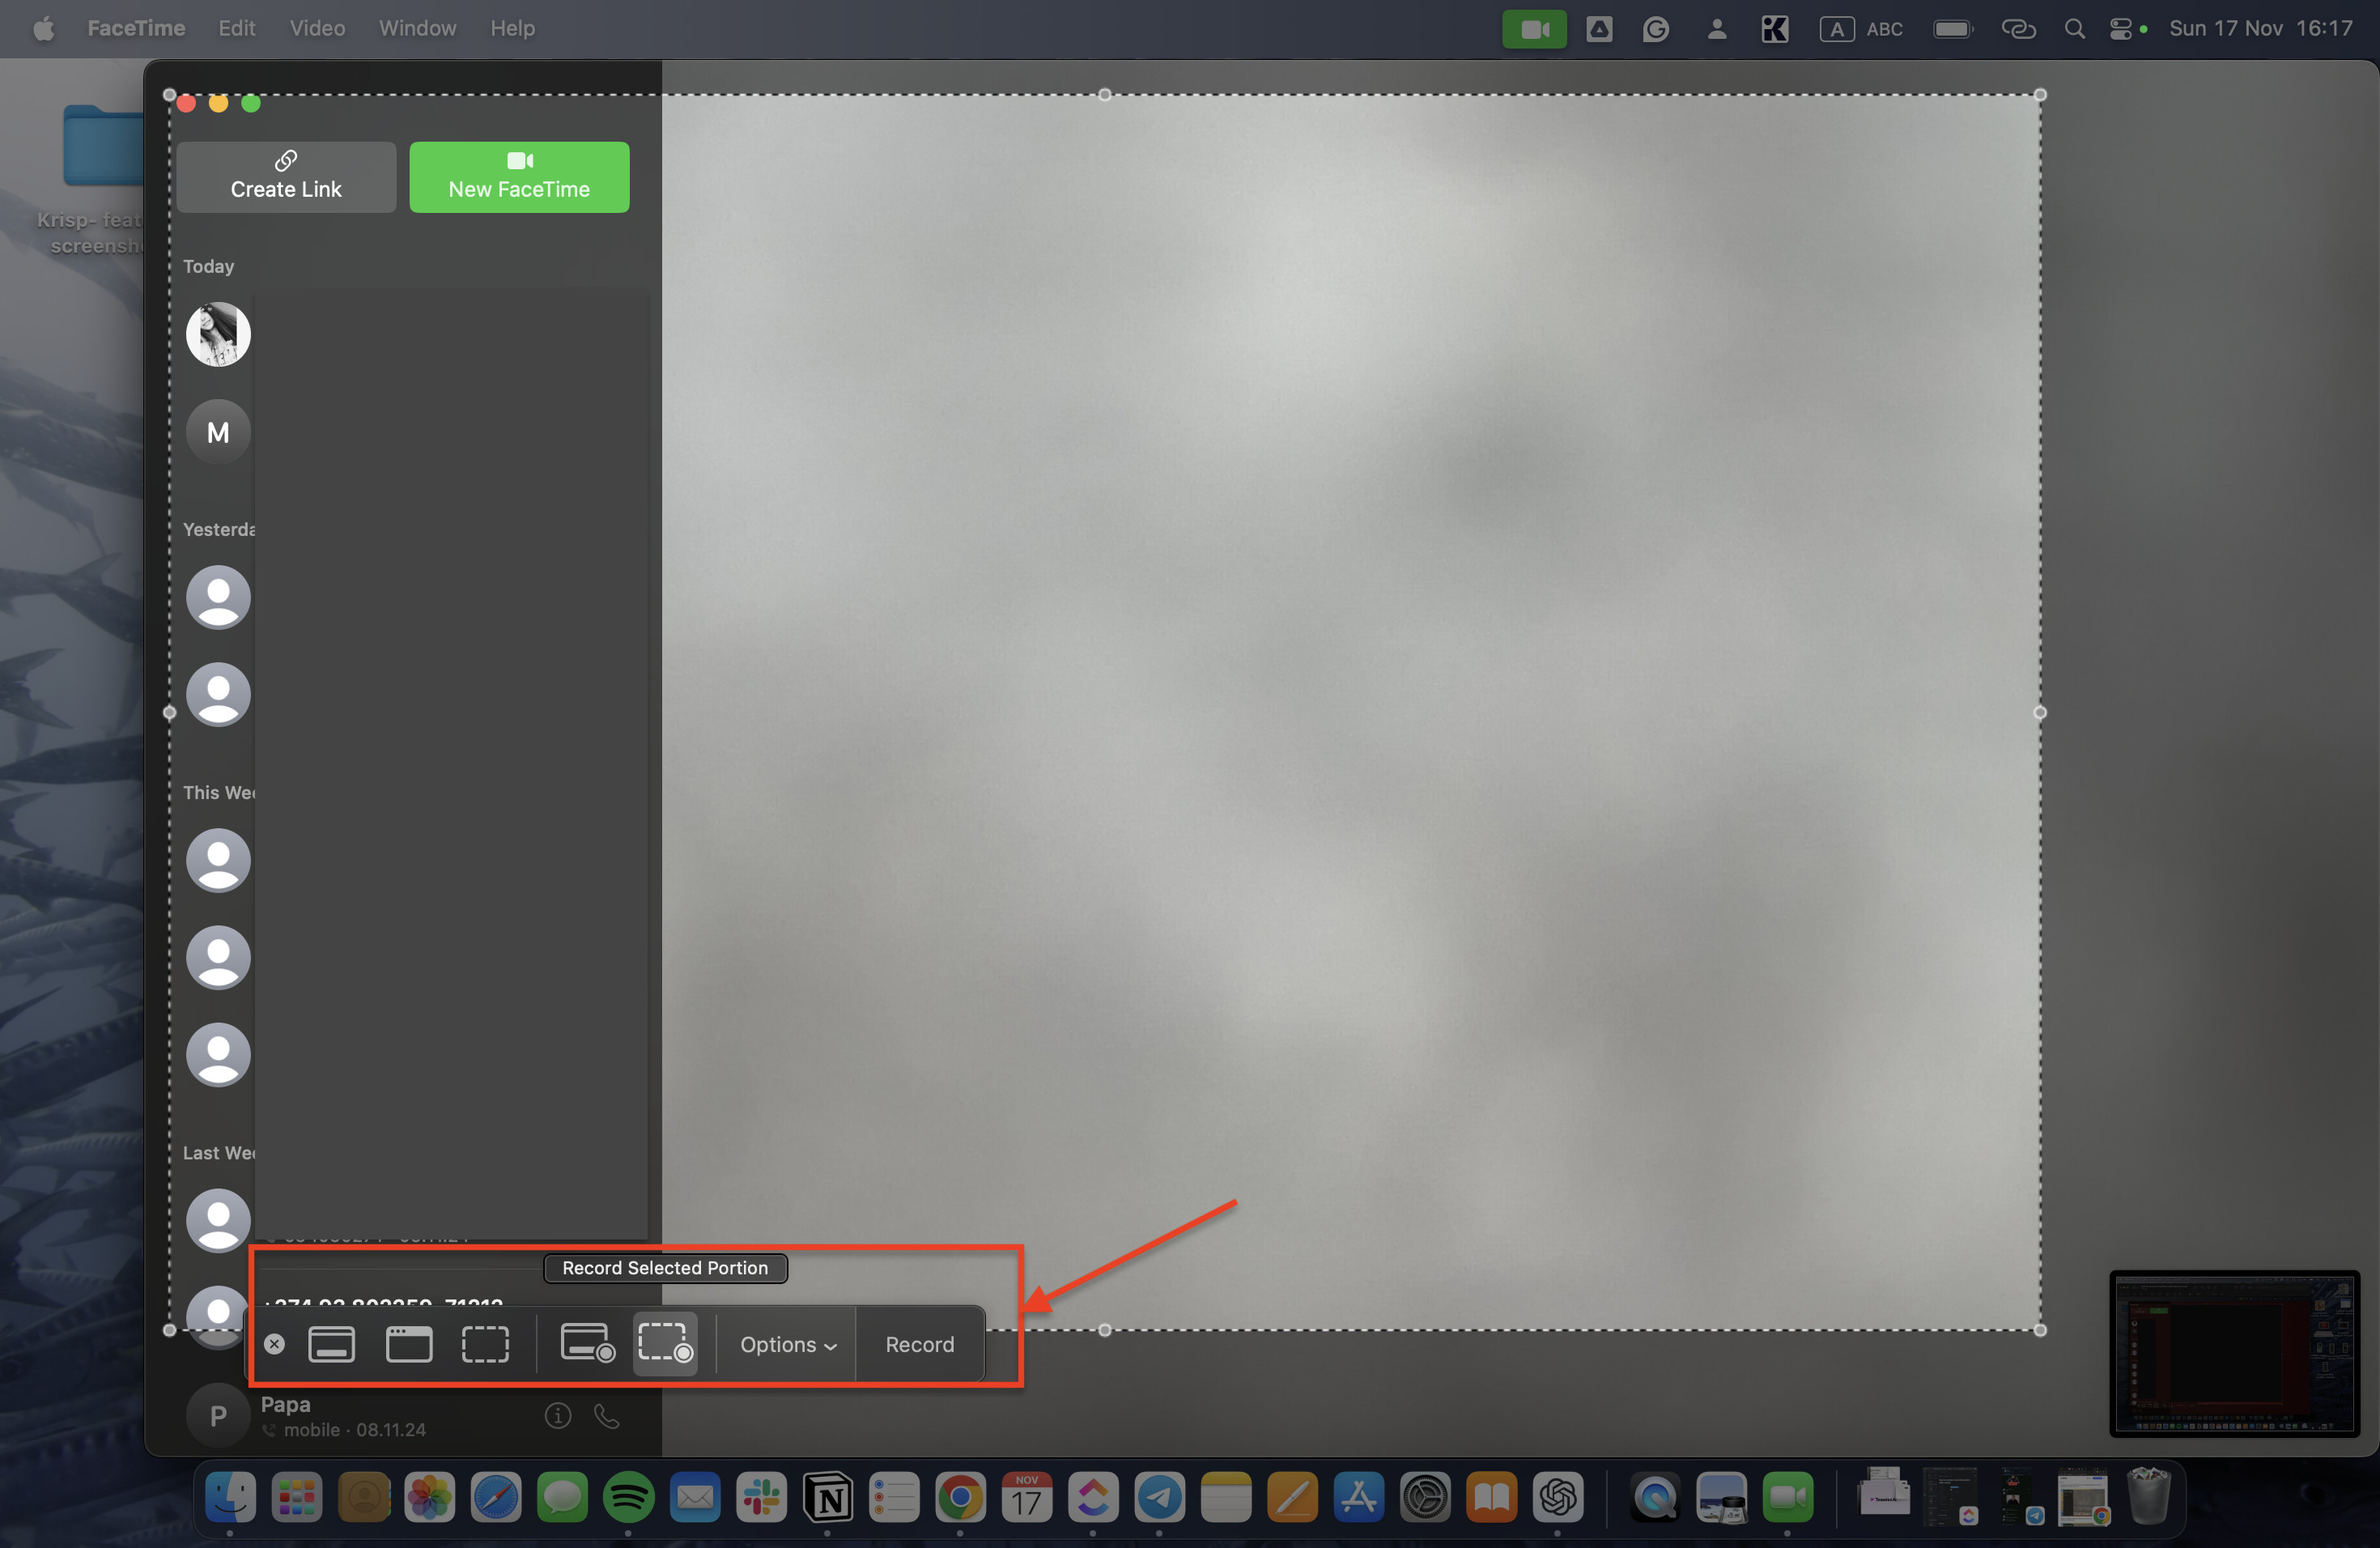 Screenshot showing the selection of a specific portion of the screen for recording on a Mac, enhancing focus on the subject.
2.1.4. Configuring Audio Recording
-
Access Options: In the screen recording toolbar, click on “Options”.
-
Choose Audio Source: Under the “Microphone” section, select your preferred audio input. This could be your Mac’s built-in microphone, an external microphone, or an audio routing application like Loopback (more on this later).
Note: To capture internal audio (i.e., the audio from the other participant in the FaceTime call), you will need to use an audio routing application like Loopback. macOS does not natively support recording internal audio due to privacy restrictions.
2.1.5. Starting the Recording
-
Click Record: Once you have selected your recording area and configured the audio settings, click the “Record” button in the toolbar. The recording will begin immediately.
-
Conduct Your Call: Proceed with your FaceTime call as normal. Ensure you and the other participant speak clearly for the best audio quality.
2.1.6. Stopping and Saving the Recording
-
Stop the Recording: To stop the recording, click the “Stop” button in the menu bar at the top of your screen (it looks like a square inside a circle). Alternatively, you can press Command (⌘) + Shift + 5 again and select “Stop Recording”.
-
Locate Your Recording: Your recording will be saved automatically to your desktop or another designated folder. The file will be in .MOV format.
 Screenshot illustrating where to choose the save location for a FaceTime recording on a Mac, ensuring easy access.
2.1.7. Capturing Internal Audio with Loopback
To capture the internal audio from the FaceTime call, you’ll need an audio routing application like Loopback. Loopback allows you to create virtual audio devices that route audio from one application to another.
-
Download and Install Loopback: Visit the Rogue Amoeba website and download Loopback. Follow the installation instructions to set it up on your Mac.
-
Configure Loopback: Open Loopback and create a new virtual audio device. Add the FaceTime application as an audio source. This tells Loopback to capture audio from FaceTime.
-
Set Loopback as Input: In the screen recording options (Command + Shift + 5), select the Loopback virtual audio device as your microphone input.
-
Start Recording: Begin your screen recording as described above. Loopback will now route the audio from FaceTime to the screen recording, capturing both your voice (if you have a microphone selected) and the audio from the other participant.
2.2. Method 2: Using Krisp for High-Quality Audio Recording
Krisp is an AI-powered noise cancellation application that can significantly enhance the audio quality of your FaceTime recordings. It eliminates background noise and improves the clarity of both your voice and the audio from the other participant.
2.2.1. Installing and Setting Up Krisp
-
Download and Install Krisp: Visit the Krisp website and download the Krisp application for macOS. Follow the installation instructions to set it up on your Mac.
-
Create an Account or Log In: Open the Krisp application and create an account or log in if you’re already a user.
-
Select Krisp as Your Audio Device: In the Krisp application, select your microphone as the input device and your speakers as the output device. Krisp will then filter noise from your microphone input and the audio output from the other participant.
-
Configure FaceTime: In FaceTime, go to Preferences > Audio/Video and set Krisp as the microphone and speaker.
2.2.2. Recording the FaceTime Call
-
Use Screen Recording Tool: Use the built-in screen recording tool (Command + Shift + 5) or another screen recording application like QuickTime Player.
-
Select Krisp as Audio Source: When configuring the audio settings for your screen recording, choose Krisp as both the input and output device. This ensures that the audio is processed through Krisp for noise cancellation.
2.2.3. Enhancing the Recording
With Krisp set up, your FaceTime recordings will be free from background noise and distractions, resulting in a professional-quality audio experience.
 Illustration of a Krisp call recording, highlighting noise reduction for crystal clear audio.
2.2.4. Saving and Sharing Your Recording
Once the call is over, save your recording and share it as needed. The enhanced audio quality provided by Krisp makes your recordings suitable for professional use, important personal conversations, or any situation where clear sound is essential.
2.3. Benefits of Using Krisp
- Noise Cancellation: Krisp eliminates background noise from both your microphone and the audio from the other participant, ensuring clear and focused recordings.
- Improved Clarity: By reducing noise and enhancing audio quality, Krisp makes it easier to understand and transcribe your recordings.
- Professional Quality: Krisp provides professional-grade audio quality, making your recordings suitable for business meetings, interviews, and other important conversations.
2.4. Ethical and Legal Considerations
As with recording on an iPhone or iPad, it’s crucial to consider the ethical and legal implications of recording FaceTime calls on your Mac. Always obtain consent from all participants before recording, and be aware of local laws regarding call recording.
By following these methods and utilizing tools like Loopback and Krisp, you can effectively record FaceTime calls with high-quality audio on your Mac. Whether you’re capturing important business meetings or preserving personal conversations, these techniques ensure you don’t miss a word.
3. Using FaceTime on Android Devices: A Comprehensive Guide
While FaceTime is primarily an Apple-exclusive application, recent updates have made it possible for Android users to participate in FaceTime calls through web-based links. This section provides a detailed guide on how Android users can join FaceTime calls, along with considerations for recording these calls.
3.1. Receiving a FaceTime Link
The first step for an Android user to join a FaceTime call is to receive a FaceTime link from an Apple user. Here’s how the Apple user can create and share the link:
-
Open the FaceTime App: On their iPhone, iPad, or Mac, the Apple user should open the FaceTime application.
-
Create a Link: In the FaceTime app, they should tap on “Create Link.” This generates a unique URL that can be shared with others.
-
Share the Link: The Apple user can share this link via email, text message, or any other messaging application with the Android user.
3.2. Opening the FaceTime Link on Android
Once the Android user receives the FaceTime link, they can proceed to join the call. Here’s how:
-
Open the Link: On the Android device, open the message or email containing the FaceTime link.
-
Tap the Link: Tap on the link. This will open the link in the default web browser on the Android device. Google Chrome or any other modern browser is recommended for the best experience.
3.3. Joining the FaceTime Call
After opening the link, the Android user will be directed to a FaceTime web page where they can enter their details and join the call:
-
Enter Your Name: On the FaceTime web page, enter your name when prompted. This name will be visible to other participants in the call.
-
Tap Continue: After entering your name, tap the “Continue” button.
-
Allow Permissions: The browser will request permission to access the microphone and camera on the Android device. Grant these permissions to enable audio and video during the call.
-
Tap Join: Finally, tap the “Join” button to enter the FaceTime call.
3.4. Host Admits You into the Call
Once the Android user taps “Join,” the host (the Apple user who created the link) will receive a notification that someone is trying to join the call. The host needs to approve the request for the Android user to enter the call. Once the host approves, the Android user will be able to participate in the FaceTime conversation.
3.5. Limitations for Android Users
While Android users can join FaceTime calls via a web browser, there are some limitations compared to using the FaceTime app on Apple devices:
- No Native App: Android users cannot download and use the native FaceTime app. They must join calls through a web browser.
- Limited Features: The web-based version of FaceTime may have fewer features compared to the native app on Apple devices. Some advanced features like Memoji or certain effects may not be available.
- Browser Compatibility: The experience may vary depending on the web browser used on the Android device. Google Chrome is generally recommended for the best compatibility.
3.6. Recording FaceTime Calls on Android
Recording a FaceTime call on an Android device presents some challenges. Unlike Apple devices, Android does not have a built-in screen recording feature with native audio capture for web-based calls. However, there are a few potential workarounds:
-
Using Third-Party Screen Recording Apps:
- Android users can download third-party screen recording apps from the Google Play Store. These apps can capture both the screen and audio.
- Popular screen recording apps include AZ Screen Recorder, XRecorder, and Screen Recorder – No Ads.
- After downloading and installing a screen recording app, users can start the app and then join the FaceTime call through the web browser. The screen recording app will capture the video and audio from the call.
-
External Recording Devices:
- For higher quality audio, users can connect an external microphone to their Android device.
- Use a splitter to route the audio from the Android device to an external recording device.
- This method requires additional hardware but can result in better audio quality.
3.7. Legal and Ethical Considerations for Android Users
As with recording FaceTime calls on any device, Android users must also consider the legal and ethical implications:
- Consent: Always obtain consent from all participants before recording a FaceTime call. In many jurisdictions, it is illegal to record a conversation without the consent of all parties involved.
- Privacy: Respect the privacy of other participants. Avoid sharing the recorded content without their permission.
- Local Laws: Be aware of local laws regarding call recording. Some regions require one-party consent, while others require two-party consent.
3.8. Enhancing Audio Quality for Android Users
For Android users looking to enhance the audio quality of their FaceTime calls, there are several strategies they can employ:
-
Using a Good Quality Microphone:
- Using a high-quality external microphone can significantly improve the audio quality.
- Connect the microphone to the Android device using a USB adapter if necessary.
-
Noise Reduction Techniques:
- Use noise reduction apps or software to minimize background noise during the call.
- Ensure the environment is quiet and free from distractions.
-
Audio Editing Software:
- After recording the call, use audio editing software to further enhance the sound quality.
- Adjust levels, reduce noise, and improve clarity.
By following these steps and considerations, Android users can effectively join and, with the necessary precautions and tools, record FaceTime calls. Whether it’s for personal or professional use, understanding the limitations and legal aspects is crucial.
4. Legal and Ethical Considerations When Recording FaceTime Calls
Recording FaceTime calls can be a valuable tool for preserving memories, documenting important conversations, or creating content. However, it’s essential to understand and adhere to the legal and ethical considerations surrounding call recording. This section provides a comprehensive overview of these aspects to ensure you record responsibly and legally.
4.1. Understanding Local Laws
Laws regarding call recording vary significantly depending on your location. It’s crucial to be aware of the specific regulations in your jurisdiction to avoid legal consequences.
4.1.1. One-Party Consent
In some regions, only one party involved in the call needs to consent to the recording. This means that if you are part of the conversation, you can record it without informing the other participants, as long as you are aware and consent to the recording.
4.1.2. Two-Party Consent (All-Party Consent)
In other regions, all parties involved in the call must explicitly agree to the recording. This means you must inform everyone on the call that you are recording and obtain their consent before proceeding.
4.1.3. Global Differences
Outside of the United States, laws can be even more varied. Some countries have strict regulations regarding call recording, while others are more lenient. Always check the local laws of the country where the call participants are located.
4.1.4. Resources for Checking Local Laws
- Online Legal Databases: Websites like Nolo and FindLaw provide information on call recording laws by state and country.
- Legal Professionals: Consult with a local attorney to ensure you are compliant with all applicable laws.
- Government Websites: Check the official government websites of your region for detailed legal information.
4.2. Obtaining Consent
Even if the law in your area does not require consent, obtaining it is a good ethical practice. Transparency and respect for privacy are essential when recording conversations.
4.2.1. Informing Participants
At the beginning of the call, clearly state that you plan to record the conversation. Be upfront and honest about your intentions.
4.2.2. Explaining the Purpose
Explain why you are recording the call. Whether it’s for personal reference, documentation, or content creation, providing a clear reason can help participants feel more comfortable.
4.2.3. Asking for Agreement
Explicitly ask for verbal or written agreement before proceeding with the recording. Ensure that all participants understand they are being recorded and consent to it.
4.2.4. Documenting Consent
Keep a record of the consent you have obtained. This can be in the form of a written agreement or a recording of the verbal consent at the beginning of the call.
4.3. Respecting Privacy
Even with consent, it’s crucial to respect the privacy of the participants and handle recorded content responsibly.
4.3.1. Confidential Conversations
Avoid recording calls that involve sensitive or confidential information without clear and explicit consent. This includes discussions about personal health, financial matters, or other private topics.
4.3.2. Workplace Policies
If recording a professional call or meeting, adhere to your company’s policies regarding call recordings. Many organizations have specific guidelines on when and how calls can be recorded.
4.3.3. Limiting Use
Use the recorded content only for the purpose for which consent was given. Do not use the recordings for any unauthorized purposes or share them without permission.
4.4. Protecting Recorded Content
Once a recording is made, it becomes your responsibility to safeguard it and prevent unauthorized access.
4.4.1. Secure Storage
Store recordings in a secure location, such as a password-protected computer, encrypted hard drive, or secure cloud storage service. Avoid storing recordings on easily accessible devices like smartphones or USB drives.
4.4.2. Limiting Sharing
Share recordings only with those who have a legitimate reason to access them and with the agreement of all participants. Use secure methods for sharing, such as encrypted email or file transfer services.
4.4.3. Deleting Unnecessary Recordings
Delete recordings when they are no longer needed. Retaining recordings indefinitely can increase the risk of unauthorized access or misuse.
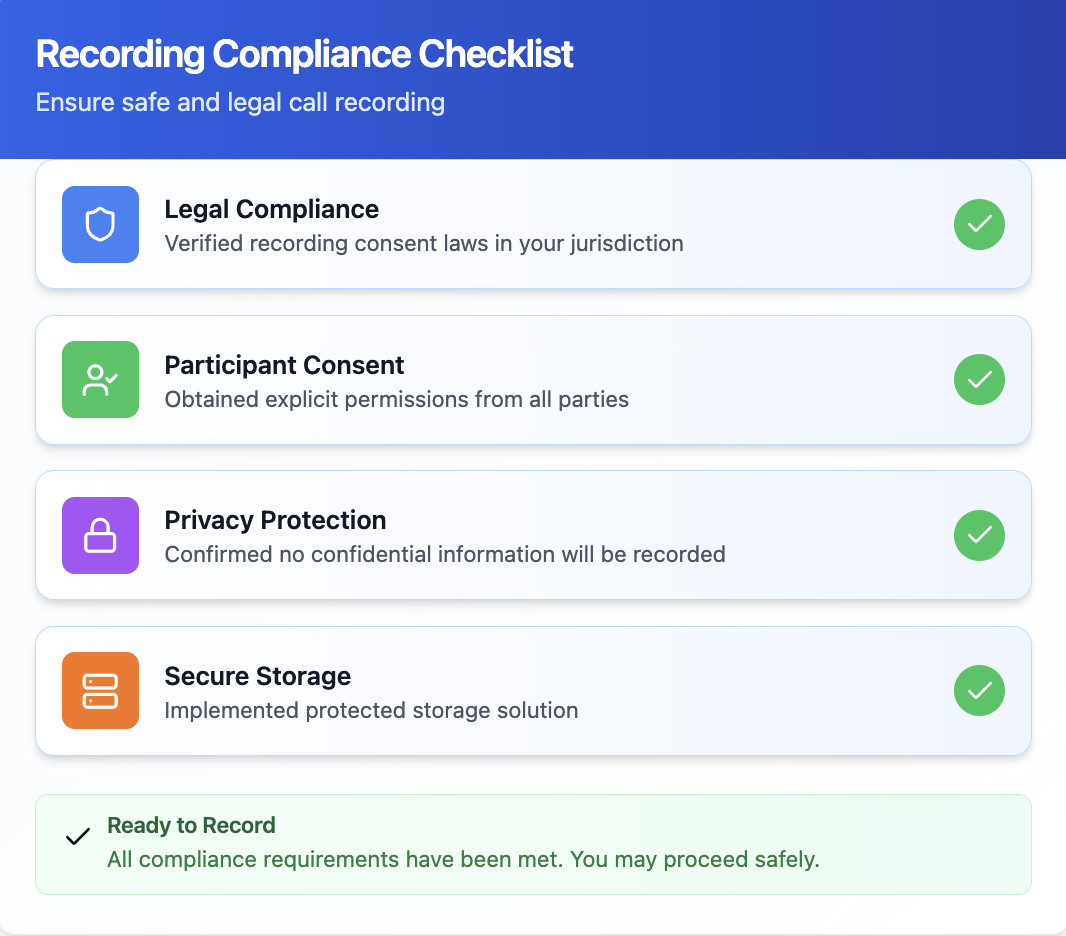 Compliance checklist for FaceTime recording, ensuring ethical and legal guidelines are followed.
4.5. Ethical Considerations
Beyond the legal requirements, ethical considerations play a crucial role in responsible call recording.
4.5.1. Transparency
Be transparent with all participants about your intentions and the purpose of the recording. Honesty and openness can build trust and ensure everyone is comfortable with the process.
4.5.2. Respect
Treat all participants with respect and dignity. Avoid recording calls for malicious purposes, such as blackmail or harassment.
4.5.3. Fairness
Ensure that the recording process is fair and equitable. Avoid selectively recording portions of the conversation to misrepresent someone’s views or actions.
4.6. Best Practices for Responsible Recording
- Obtain Explicit Consent: Always obtain explicit consent from all participants before recording a call.
- Be Transparent: Clearly communicate your intentions and the purpose of the recording.
- Respect Privacy: Handle recorded content with care and avoid sharing it without permission.
- Secure Storage: Store recordings in a secure location to prevent unauthorized access.
- Comply with Laws: Be aware of and comply with all applicable laws regarding call recording.
By following these guidelines, you can ensure that you are recording FaceTime calls responsibly, ethically, and legally.
5. Enhancing Audio Quality in FaceTime Recordings: Tips and Techniques
Achieving high-quality audio in your FaceTime recordings is essential for clear communication and professional results. Whether you’re recording on an iPhone, iPad, Mac, or even an Android device, there are several tips and techniques you can use to enhance the audio quality. This section explores these strategies in detail.
5.1. Choosing the Right Equipment
The equipment you use can significantly impact the audio quality of your recordings. Investing in the right microphone and accessories can make a noticeable difference.
5.1.1. External Microphones
Using an external microphone is one of the best ways to improve audio quality. External microphones typically offer better sound capture and noise reduction compared to the built-in microphones on your devices.
- USB Microphones: These microphones connect directly to your computer or mobile device via USB and are easy to set up and use.
- Lavalier Microphones: Also known as lapel mics, these small microphones clip onto your clothing and are ideal for capturing clear voice audio while minimizing background noise.
- Shotgun Microphones: These directional microphones are designed to pick up sound from a specific direction, making them useful for recording in noisy environments.
5.1.2. Audio Interfaces
For more advanced audio setups, consider using an audio interface. An audio interface connects to your computer and provides high-quality audio inputs and outputs.
- XLR Microphones: Professional-grade microphones often use XLR connectors, which require an audio interface to connect to your computer.
- Phantom Power: Some microphones require phantom power, which is supplied by the audio interface.
5.1.3. Accessories
- Pop Filters: These filters reduce popping sounds caused by plosive consonants (such as “p” and “b”) and help to improve the clarity of your voice.
- Shock Mounts: These mounts isolate the microphone from vibrations, reducing unwanted noise and rumble.
- Acoustic Treatment: Using acoustic panels or screens can help to reduce echo and reverberation in your recording environment.
5.2. Optimizing Your Recording Environment
The environment in which you record can have a significant impact on the audio quality. Choose a quiet space and minimize background noise.
5.2.1. Quiet Space
Select a room that is free from external noise sources, such as traffic, construction, or other people talking. Close windows and doors to minimize outside noise.
5.2.2. Reducing Echo
Echo and reverberation can degrade the quality of your recordings. Use soft materials, such as curtains, rugs, and blankets, to absorb sound and reduce echo.
5.2.3. Minimizing Background Noise
Turn off any appliances or devices that may generate background noise, such as fans, air conditioners, or computers. Use noise-canceling headphones to monitor your audio and identify any unwanted sounds.
5.3. Using Noise Reduction Software
Noise reduction software can help to eliminate background noise and improve the clarity of your recordings. Several software options are available for both desktop and mobile devices.
5.3.1. Krisp
Krisp is an AI-powered noise cancellation application that can remove background noise in real-time. It integrates with various communication and recording apps, making it easy to use.
5.3.2. Audacity
Audacity is a free, open-source audio editing software that includes powerful noise reduction tools. It allows you to identify and remove unwanted noise from your recordings.
5.3.3. Adobe Audition
Adobe Audition is a professional-grade audio editing software that offers advanced noise reduction and audio restoration features. It is part of the Adobe Creative Cloud suite.
5.4. Adjusting Audio Settings
Properly adjusting your audio settings can help to optimize the sound quality of your recordings.
5.4.1. Input Levels
Set your microphone input levels appropriately. The audio should be loud enough to be clearly audible, but not so loud that it distorts. Use the audio meters in your recording software to monitor your levels.
5.4.2. Sample Rate and Bit Depth
Use a high sample rate and bit depth for your recordings. A sample rate of 48 kHz and a bit depth of 24 bits are generally recommended for professional-quality audio.
5.4.3. Audio Codecs
Choose an appropriate audio codec for your recordings. Common codecs include AAC, MP3, and WAV. AAC is a good choice for general use, while WAV is preferred for archival purposes.
5.5. Post-Processing Techniques
After recording your audio, you can use post-processing techniques to further enhance the sound quality.
5.5.1. Equalization (EQ)
Use EQ to adjust the frequency balance of your audio. You can boost or cut specific frequencies to improve the clarity and tone of your voice.
5.5.2. Compression
Use compression to reduce the dynamic range of your audio. Compression can help to make your voice sound more consistent and present.
5.5.3. Normalization
Use normalization to bring the overall level of your audio up to a consistent level. Normalization can help to ensure that your audio is loud enough without clipping or distorting.
5.6. streetsounds.net Resources
streetsounds.net offers a variety of resources and tools for enhancing audio quality, including:
- Audio Libraries: Access high-quality sound effects and audio samples to enhance your recordings.
- Tutorials and Guides: Learn about advanced audio techniques and best practices for recording and editing audio.
- Community Forums: Connect with other audio professionals and enthusiasts to share tips and advice.
By following these tips and techniques, you can significantly improve the audio quality of your FaceTime recordings and achieve professional-quality results.
6. Frequently Asked Questions (FAQs) About Recording FaceTime Calls
This section addresses some of the most common questions about recording FaceTime calls, providing clear and concise answers to help you navigate the process.
Q1: Can you screen record FaceTime with audio?
Yes, you can screen record FaceTime with audio, but the method varies depending on the device you are using. On iPhones and iPads, the built-in screen recording feature captures video but not internal audio due to Apple’s privacy restrictions. To capture both video and audio, you may need to use third-party apps or external tools. On Macs, you can use the built-in screen recording tool or QuickTime Player combined with audio routing software like Loopback to capture both video and internal audio.
Q2: Why is there no sound when I screen record FaceTime?
The absence of sound when screen recording FaceTime on iPhones and iPads is due to Apple’s privacy measures. The built-in screen recording feature is designed to protect the privacy of call participants by not recording internal audio. This means that only external audio picked up by your device’s microphone will be captured.
Q3: How do you record audio on a FaceTime call?
To record audio on a FaceTime call, you can use several methods depending on your device:
- On a Mac: Use QuickTime Player along with an audio routing app like Loopback to capture both internal and external audio.
- On an iPhone or iPad: Use the built-in screen recording feature to capture external audio via the microphone, or explore third-party apps that claim to record internal audio (use with caution due to privacy and legal considerations).
- On Android: Use a third-party screen recording app from the Google Play Store to capture both video and audio.
Q4: Can you screen record a call with sound on an iPhone?
While the iPhone’s built-in screen recording feature does capture video, it does not capture internal sound for calls. You can enable the microphone to record external audio, but the audio from the FaceTime call itself will not be recorded. To capture both, you would need external hardware or third-party applications that can bypass these restrictions.
Q5: Is it legal to record a FaceTime call?
The legality of recording a FaceTime call depends on the laws of your jurisdiction. Some regions require one-party consent, meaning that only one participant needs to be aware and consent to the recording. Other regions require two-party consent, meaning that all participants must be informed and give their consent before the call can be recorded. Always check local laws before recording a call.
Q6: Can you video record a FaceTime session?
Yes, you can video record a FaceTime session using your device’s screen recording feature or external tools. On iPhones, iPads, and Macs, the built-in screen recording tools allow you to capture the video portion of the call. However, capturing the audio may require additional software or setups, as mentioned above.
Q7: What is the best app to record FaceTime calls?
The best app to record FaceTime calls depends on your specific needs and the device you are using. Some popular options include:
- QuickTime Player (Mac): A built-in tool that can record video and audio when combined with audio routing software.
- Loopback (Mac): An audio routing application that allows you to capture internal audio from FaceTime.
- AZ Screen Recorder (Android): A third-party app that can